Why These Cookies Make Me Smile
I remember the first time my little niece asked me to make cookies that looked like dog paws. I laughed so hard. We had flour on the ceiling and peanut butter in her hair. But those cookies were the best we ever made together. A cookie that looks like a paw print is just fun. It makes people stop and grin.
Doesn’t that sound like a good reason to bake? We all need a little silly joy sometimes. Have you ever made a cookie that looks like an animal or a shape? I would love to hear your story.
The Secret to a Soft and Chewy Center
The trick for these cookies is not overbaking them. You want the edges set but the middles still soft. That is why we only bake them for 7 to 9 minutes. They will look a little puffy and pale. That is perfect.
Why does this matter? Because a dry cookie is a sad cookie. And when you press the warm chocolate disk into the center, the soft cookie lets it sink in just right. The chocolate stays shiny and smooth. It looks like a little paw pad.
Here is a fun fact: Peanut butter was first sold as a health food for older people. Now we use it for cookies and dog-shaped treats. Isn’t that a funny twist?
Picking the Right Peanut Butter
I always use creamy peanut butter for these cookies. Not the crunchy kind. And not the natural kind that separates into oil on top. That oil makes the cookies spread too thin. You want a nice thick dough that holds its shape.
This matters because the dough is what makes the paw print look cute. If the cookie flattens out like a pancake, the toes get all squished. We want neat little paw prints. If you are a crunchy peanut butter lover, save it for toast.
What kind of peanut butter do you keep in your cupboard? Creamy or crunchy? I bet most of you say creamy for baking.
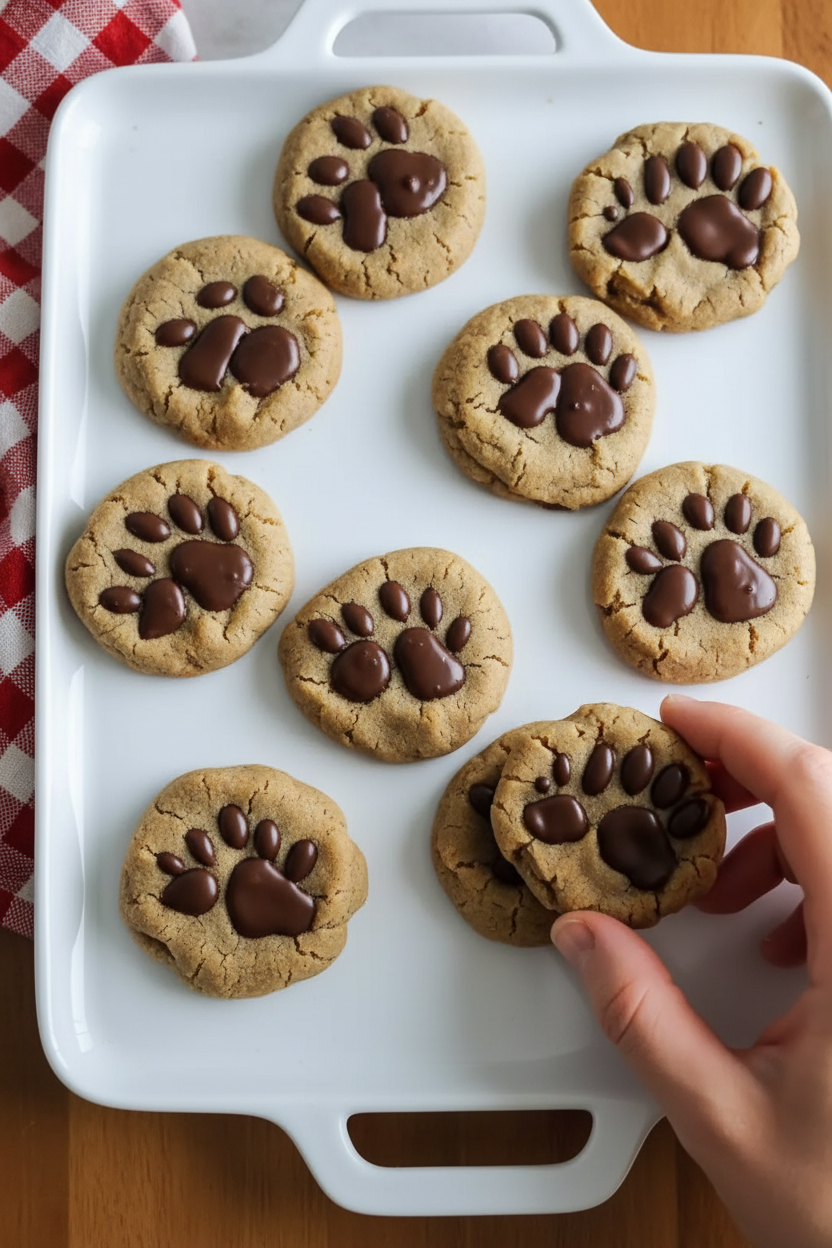
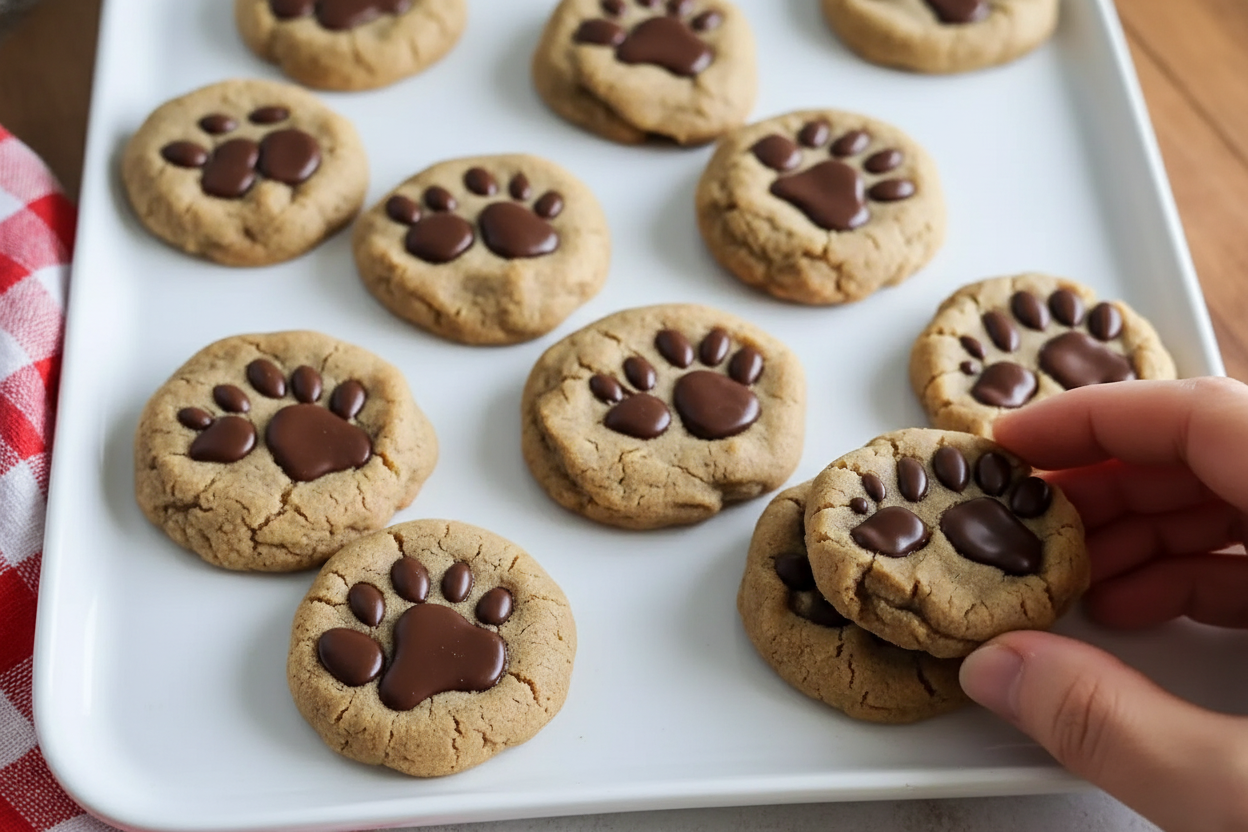
Building the Paw Print the Right Way
After the cookies come out of the oven, you work fast. Gently press one melting chocolate disk right in the middle. That makes the big pad of the paw. Then take three or four chocolate chips and push them into a little arch above the disk. Those are the toe pads.
I still laugh at how serious I look counting out chocolate chips. Four toes per cookie. One big pad. It feels like you are building a tiny chocolate animal. Kids adore helping with this part. Let them place the chips. It does not have to be perfect.
Why does this matter? Because when you share these cookies, people see the love you put into every little toe. They know you made them special. That is better than any fancy bakery cookie.
Let Them Cool or the Chocolate Melts
I know it is hard to wait. The kitchen smells like peanut butter and warm sugar. But you must let the cookies cool completely on a wire rack. If you move them too soon, the chocolate smears everywhere. You will just have brown blobs instead of paw prints.
Give them about 20 minutes. The chocolate will set firm and shiny. Then you can lift them up and see the little paw pattern clearly. That is the moment of pure magic. I always call my husband over to look before anyone takes a bite.
Doesn’t that smell amazing while they cool? It fills up the whole house. What is your favorite baking smell? For me, it is always peanut butter and vanilla together.
Who You Should Share These With
These cookies are perfect for a dog-themed birthday party. Or for a class treat when you study animals. I also bring them to the vet’s office during the holidays. The humans love them. The dogs just stare at the plate. Sorry, pups, these are for people only.
They also make a good gift for a friend who loves cats or dogs. Put a few in a little bag with a ribbon. Write a note that says, “A paw-some treat for you.” Everybody laughs at that pun. I still think it is funny every time.
Who would you gift a paw print cookie to? I bet you have someone in mind right now. Maybe it is your own dog. I will not tell.
One Last Tip Before You Bake
If you have leftover chocolate disks or chips, do not throw them away. Melt them and dip pretzel sticks into them. That makes a great snack while you wait for more cookies to bake. Waste not, want not, as my grandma used to say.
Also, the dough can be made ahead and chilled in the fridge for a day. That actually makes the cookies even chewier. So do not rush. Baking is about having fun and making something with your hands. And now you know how to make a paw print that looks like a real little animal stepped into your cookie. That is a good day in the kitchen.
Ingredients:
| Ingredient | Amount | Notes |
|---|---|---|
| Butter | 0.5 cups | Softened for rich texture and moisture |
| Creamy Peanut Butter | 1 cup | This star ingredient delivers that perfect nutty flavor |
| Granulated Sugar | 1 cup | Sweetens the dough and helps the cookies hold their shape |
| Light Brown Sugar | 0.5 cups | Packed; adds depth and moisture for a chewy texture |
| Eggs | 2 | Large ones to bind everything together and enhance richness |
| Vanilla Extract | 0.5 teaspoons | Adds a touch of aromatic sweetness that complements peanut butter |
| All-Purpose Flour | 2 cups | Provides structure and bulk for the perfect cookie base |
| Baking Soda | 2 teaspoons | A vital leavening agent that ensures a light, puffy texture |
| Salt | 0.5 teaspoons | Enhances the overall flavor and balances sweetness |
| Melting Chocolate Disks | 48 pieces | Create the adorable paw print centers |
| Chocolate Chips | 144 pieces | Use either dark or milk chocolate to form the cute paw toes |
My Grandma’s Paw Print Cookies Secret
I still remember the first time my little nephew asked me to make “doggy cookies.” I laughed and said, “These are for people, sweetie!” But he was right. These Peanut Butter Paw Print Cookies really do look like tiny puppy paws. Doesn’t that smell amazing already? The peanut butter fills your whole kitchen with warmth. It’s the kind of smell that makes kids come running. I’ve been making these for over thirty years now. They always disappear faster than I can bake them.
The dough comes together like a soft, sweet hug. You want your butter really soft, almost like thick cream. That’s the trick for a rich, tender cookie. I once used cold butter and the dough was a crumbly mess. My grandma would have tapped my hand for that mistake. So learn from me, okay? Let your butter sit out for an hour before you start. Your cookies will thank you.
Now for the fun part, the paw prints. You press a chocolate disk right in the middle. Then add three little chocolate chips around it for the toes. My neighbor Mrs. Chen uses white chocolate chips for a cute look. But I love dark chocolate against the sweet dough. It makes each bite feel like a little treasure. The kids always fight over who gets the most “toes.” I still laugh at that every time.
Here is the step-by-step guide. Take your time. This is supposed to be fun.
Step 1: Preheat your oven to 350 degrees. Line two baking sheets with parchment paper. I like to use a dark pan for even baking. (Hard-learned tip: Do not skip the parchment paper, or the bottoms will burn. Trust me, I learned the hard way at a school bake sale.)
Step 2: In a big bowl, beat the softened butter and creamy peanut butter together. Use a mixer on medium speed until it looks smooth and shiny. This takes about one minute. My little helper always sneaks a finger-full of this mixture. I pretend not to notice.
Step 3: Add the white sugar and the brown sugar. Beat for two to three minutes until it looks fluffy. The brown sugar gives it that chewy, soft center. If you only have white sugar, the cookies will be too crispy. I once tried using just white sugar and my family called them “biscuits.” Ouch.
Step 4: Crack in the two eggs. Add the vanilla extract. Mix until everything is yellow and smooth. The eggs help the cookies stay soft in the middle. If you add a little extra vanilla, your kitchen will smell like heaven. Does your family have a favorite vanilla brand? Share below!
Step 5: In another bowl, whisk the flour, baking soda, and salt together. Slowly pour this into the wet bowl. Mix just until no white streaks show. Overmixing makes tough cookies. I did that once when I was distracted by a phone call. The cookies came out like little hockey pucks.
Step 6: Roll the dough into balls about the size of a walnut. Place them two inches apart on the baking sheet. They spread out a lot, so give them room. I once put them too close and got one giant cookie blob. It tasted fine but looked like a pancake.
Step 7: Bake for 7 to 9 minutes. The edges should look set and a little golden. The centers will look puffy and soft. Do not overbake them. They keep cooking on the hot sheet after you pull them out. I burned a batch once while I was washing dishes. Now I set a timer every single time.
Step 8: Right after you take them out, press a chocolate disk into the middle. Add three chocolate chips around it like paw toes. Let them cool completely on a wire rack. The chocolate needs to harden before you stack them. Patience is hard, but it pays off.
Cook Time: 7-9 minutes
Total Time: 20 minutes
Yield: 48 cookies
Category: Dessert, Cookies
Three Fun Twists to Try
Sometimes I like to change things up a little. These twists keep the recipe new and exciting. My grandkids love guessing which version I made. Here are my three favorites.
Peppermint Paw Prints: Crush up some candy canes and sprinkle them on top before the chocolate sets. It looks like snow on little paws. Perfect for Christmas cookie trays.
Sunflower Seed Swap: Use sunflower seed butter instead of peanut butter for a nut-free version. My school’s bake sale needs this every year. It tastes just as yummy and safe for everyone.
Spicy Chocolate Paws: Add a pinch of cinnamon and a tiny pinch of chili powder to the dry flour mix. The warmth sneaks up on you. It’s a grown-up secret that kids also love. Which one would you try first? Comment below!
How to Serve and Sip
These cookies are lovely on a simple plate, but I think they shine with a little extra love. Arrange them in a circle with the paw prints facing up. Kids love to count the toes. You can also dip half the cookie in melted chocolate for a fancy look. My friend serves them next to a scoop of vanilla ice cream. It turns a snack into a real dessert.
For drinks, I like a cold glass of oat milk. It’s creamy and not too sweet. Grown-ups might enjoy a small glass of dark rum or a warm coffee with cinnamon. The nutty flavor of the cookie matches both perfectly. Which would you choose tonight?
Storing Your Paw Print Cookies for Later
These cookies keep well in an airtight container at room temperature for up to five days. Just layer them with wax paper so the chocolate paws don’t smudge. I once left a batch on the counter and my husband finished them in two days. They were still soft and chewy.
You can also freeze the unbaked dough balls for up to three months. Roll them, place them on a tray, and freeze until hard. Then pop them into a zip-top bag. When you want fresh cookies, bake them straight from frozen. Just add an extra minute or two to the baking time. This is why batch cooking matters: you get warm cookies whenever a craving hits without all the mess. Have you ever tried storing it this way? Share below!
For reheating, a few seconds in the microwave makes them taste just-baked. Place one on a plate and heat for ten seconds. The chocolate gets a little gooey again. It is pure comfort on a rainy afternoon.
Three Common Cookie Problems and Easy Fixes
First problem: cookies spread too flat. This happens if your butter is too soft or warm. Chill the dough for fifteen minutes before baking. I remember making a flat batch once. They still tasted good, but the paws looked stretched and sad. Fixing this gives you puffy cookies with cute, clear paws. Why this matters: pretty cookies make you proud to share them.
Second problem: chocolate chips sink or melt into the dough. Press them in gently right after baking while the cookie is still warm. If you push too hard, they disappear. Let the cookie cool a minute first. Why this matters: perfect paw prints are the whole point of this recipe. They make every bite fun and special.
Third problem: cookies are too dry. Measure your flour carefully. Scoop it into the cup with a spoon and level it off. Do not dip the cup into the bag. I once scooped too much flour and my cookies were crumbly. My grandson still ate them with milk. Which of these problems have you run into before?
Your Questions Answered
Q: Can I make these gluten-free? A: Yes. Swap the all-purpose flour for a 1-to-1 gluten-free baking blend. The texture will be a little softer but still delicious.
Q: Can I make the dough ahead? A: Absolutely. Make the dough, wrap it tight in plastic, and keep it in the fridge for up to three days. Let it warm up for ten minutes before rolling.
Q: Can I swap the peanut butter? A: Yes. Use any creamy nut or seed butter. Sunflower butter works great for nut-free cookies. The flavor will change, but the texture stays good.
Q: How do I scale the recipe? A: To make half a batch, simply cut every ingredient in half. Use one egg and beat it first, then use half. To double, just multiply everything by two.
Q: Any optional tips? A: Sprinkle a tiny pinch of flaky sea salt on the warm chocolate. It makes the sweet and salty pop. Which tip will you try first?
A Warm Goodbye from Lena
These paw print cookies are more than a treat. They are a chance to make someone smile. I love seeing the look on a kid’s face when they bite into a chocolate paw. It is pure joy. *Fun fact: my cat once sat on a warm cookie and left her own paw print. We laughed and called it a bonus design.*
I hope you make a batch for your family or just for yourself. Share a photo of your cookies with us. Have you tried this recipe? Tag us on Pinterest! Happy cooking!
—Lena Morales.

Peanut Butter Paw Print Cookies Fun Festive Treats
Description
Peanut Butter Paw Print Cookies Fun Festive Treats
Ingredients
Instructions
- Preheat your oven to 350°F (175°C). Gather your baking sheets lined with parchment paper.
- In a large mixing bowl, beat together ½ cup of softened butter and 1 cup of creamy peanut butter until smooth.
- Add 1 cup of granulated sugar and ½ cup of packed light brown sugar; mix for about 2-3 minutes until well blended.
- Add 2 large eggs and ½ teaspoon of vanilla extract; mix until fully combined and smooth.
- In a separate bowl, whisk together 2 cups of flour, 2 teaspoons of baking soda, and ½ teaspoon of salt. Gradually add this to the wet ingredients.
- Form the dough into balls, about 1-1.5 inches in diameter, and place them on the baking sheet, spaced about 2 inches apart.
- Bake for 7-9 minutes, until puffy but not overly browned; edges should be set and centers soft.
- Press a melting chocolate disk into the center of each cookie and add 3-4 chocolate chips around it to create the paw design.
- Cool completely on a wire rack before serving, allowing the chocolate to set.


Leave a Reply