My First Spider Party
I made these spider pizzas for my grandson’s birthday. He was turning eight. The other kids loved them. They thought they were so funny to eat. I still laugh at that.
It’s not about being perfect. It’s about being playful. That matters. Food should be fun, especially for kids. It makes a meal a happy memory. Do you have a favorite funny food from when you were little?
Let’s Get Our Pizzas Ready
First, heat your oven to 425. Put your pan in too. This heats the pan. A hot pan makes the crust extra crispy. Trust me on this.
Now, cut circles from the thin crusts. A cup or cookie cutter works. Spoon on some red sauce. Then add that lovely white cheese. Doesn’t that smell amazing already?
Making the Silly Spiders
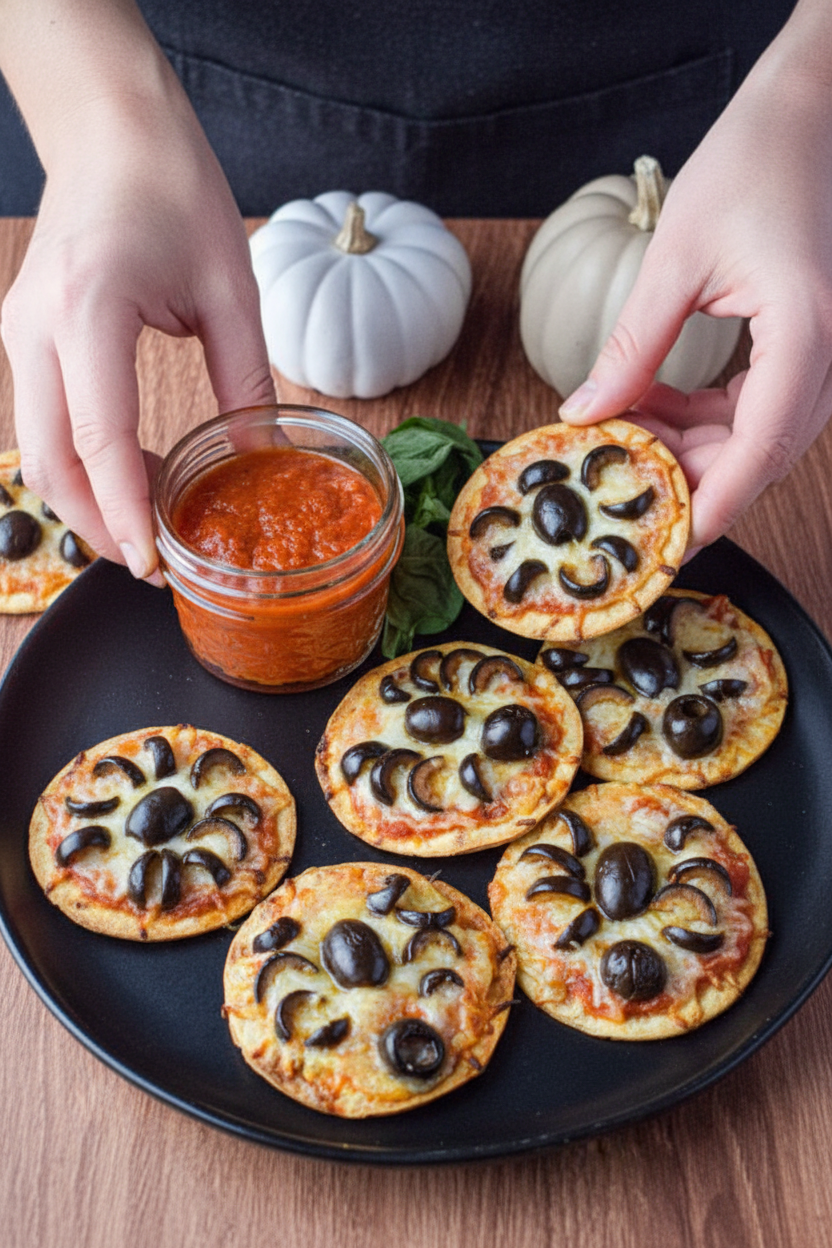
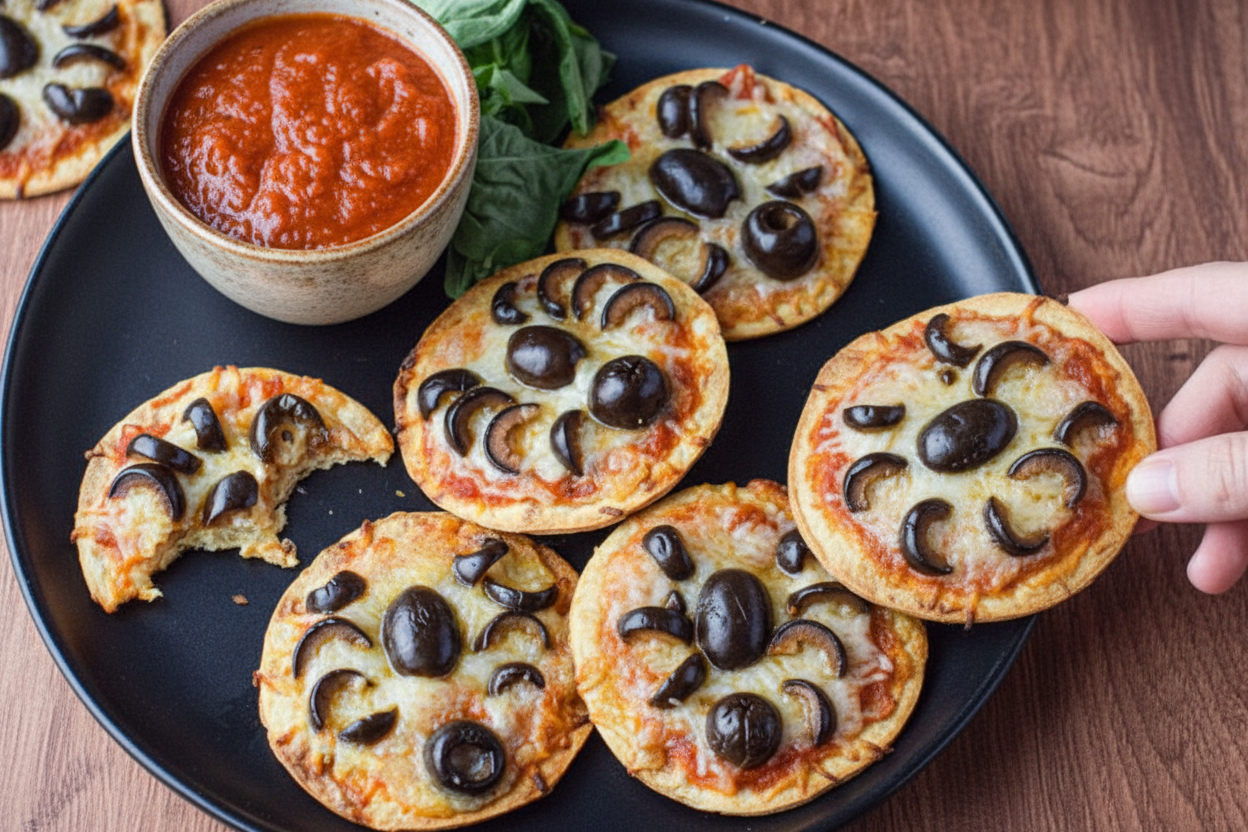
This is the best part. Take a black olive. Slice it in half. That’s the body. Then make little cuts for eight legs. Use another half for the head.
Place them on your cheesy circles. They look so cute! *Fun fact: Olives grow on trees and are called drupes, just like peaches!* Now, would you make happy spiders or scary spiders? I always go for happy.
Why This Simple Recipe Works
Using pre-made crust is a smart trick. It lets you focus on the fun part. That is the decorating. This matters because cooking shouldn’t be stressful.
Letting kids help here is key. They can add cheese or place spiders. This makes them proud. They are more likely to eat what they make. It’s a good lesson for us all.
Time to Bake and Share
Carefully slide your pizzas onto the hot pan. Bake for 6-8 minutes. Watch for golden edges and bubbly cheese. That’s when they’re perfect.
Let them cool just a bit. Then serve with extra sauce for dipping. The crunch is so good. What other shapes would you try? Mini pumpkins for fall, maybe?
Ingredients:
| Ingredient | Amount | Notes |
|---|---|---|
| Ultra thin pizza crusts | 2 large | |
| Marinara sauce | ½ cup | You can use more or less according to personal preference |
| Shredded mozzarella cheese | 1 cup | You can use more or less according to personal preference |
| Whole, pitted black olives |
Spider Pizzas: A Spooky, Silly Kitchen Adventure
Hello, my dear! Come sit. Let’s make something fun today. We are making little spider pizzas. They are perfect for a party or a silly dinner. I remember making these with my grandson, Mateo. He used to giggle so much arranging the olive legs. I still laugh at that.
This is not a fancy, difficult recipe. It is about playing with your food. The kitchen should be a happy place. Doesn’t that smell amazing when the cheese melts? Now, let’s get our hands a little messy. Follow these simple steps with me.
Step 1: First, turn your oven on to 425 degrees. Put your baking sheet inside right now. This heats it up. A hot pan makes the crust super crispy. It is my secret for a perfect crunch. (My hard-learned tip: always preheat your pan. A cold pan makes soggy pizza!)
Step 2: Take your thin pizza crusts. Use a round cutter to make circles. No cutter? A cup works too! You should get about 14 little rounds. This is the spider’s body. Mateo called them “pizza moons.” What would you call them? Share below!
Step 3: Now, add the sauce and cheese. Use a small spoon for the sauce. Do not use too much. Then sprinkle on that lovely mozzarella. You can add more if you love cheese. I always do. This is the cozy blanket for our spiders.
Step 4: Time to make the spiders! Take a pitted black olive. Slice it in half longways. Then, carefully cut little strips into each half for legs. Use another olive half for the head. It looks tricky, but it is easy. See the picture if you need help.
Step 5: Place your olive spiders on the cheesy circles. Be gentle. Then, very carefully, take the hot pan from the oven. Use a mitt! Slide your pizzas onto it. Bake for 6-8 minutes. Watch until the cheese bubbles and turns golden. Your kitchen will smell wonderful.
Cook Time: 6–8 minutes
Total Time: About 20 minutes
Yield: 14 mini pizzas
Category: Snack, Party Food
Three Fun Twists on Our Spider Friends
Once you know the basic recipe, you can change it. Cooking is about making it your own. Here are three silly ideas for your next batch. Which one would you try first? Comment below!
Cheesy Ghosts: Use white cheddar cheese for the “body.” Make little olive eyes. Spooky and cute!
Rainbow Spiders: Add tiny pieces of bell pepper. Use red, yellow, and green. Very colorful legs!
Breakfast Spiders: Use a biscuit dough circle. Top with scrambled eggs and a bacon bit head. A funny morning treat.
Serving Your Creepy-Crawly Feast
These little pizzas are a full meal with the right sides. I love to put out a big bowl of marinara for dipping. It is so fun. Add some carrot sticks and cucumber slices on the side. They look like little logs in a forest.
For drinks, a fizzy lemonade is always good. The tartness cuts the rich cheese. For the grown-ups, a light lager beer pairs nicely. It is crisp and refreshing. Which would you choose tonight?
Keeping Your Spider Pizzas Perfect
These little pizzas are best fresh and hot. But you can save them for later. Let them cool completely first. Then store them in a single layer in the fridge.
They will keep for about two days. I once tried stacking them warm. It made the crusts soggy. Now I always let them cool.
You can freeze them too. Place them on a baking sheet until frozen solid. Then pop them into a freezer bag. This stops them from sticking together.
To reheat, use your oven or toaster oven. It keeps the crust crispy. The microwave makes them soft. A few minutes at 375 degrees works great.
Batch cooking saves so much time. Make a big batch of olive spiders. Store them in a little container. Then assembly is a snap on a busy night. Have you ever tried storing it this way? Share below!
Spider Pizza Troubleshooting
Sometimes the crust circles tear. Do not worry. Just press the dough back together. Your sauce and cheese will hide it. I remember my first one looked like a map!
The olive legs can break. Use a very sharp knife. Make slow, gentle cuts. This keeps your spider legs strong for baking.
Your cheese might not melt evenly. Shred your own cheese if you can. The bagged kind has starch that can block melting. This small step makes a big flavor difference.
Why does this matter? Fixing small problems builds your cooking confidence. You learn that mistakes are okay. It also makes your food taste its very best. Which of these problems have you run into before?
Your Spider Pizza Questions, Answered
Q: Can I make this gluten-free? A: Yes! Use your favorite gluten-free pizza crust. Just roll it thin.
Q: Can I make parts ahead? A: Absolutely. Cut the crusts and olives a day early. Keep them separate in the fridge.
Q: What if I don’t have black olives? A: Try small slices of bell pepper. You can make little pumpkin shapes instead.
Q: Can I double the recipe? A: You can! Just use two baking sheets. Switch their spots in the oven halfway through.
Q: Any fun extra tips? A: A tiny sprinkle of garlic powder on the sauce is delicious. *Fun fact: The first pizza was just bread, oil, and herbs!* Which tip will you try first?
From My Kitchen to Yours
I hope you have fun making these silly spiders. Cooking should be joyful. It is about sharing laughs and good food.
I would love to see your creations. Did your spiders make everyone smile? Please share a picture with me. Have you tried this recipe? Tag us on Pinterest!
Thank you for cooking with me today. I am so glad you are here. Happy cooking!
—Lena Morales.

Spider Pizzas: Unique Gourmet Pizza Creations
Description
Fun and spooky individual spider-shaped pizzas, perfect for a Halloween party or a creative snack.
Ingredients
Instructions
- Preheat the oven to 425 degrees F. Place the baking sheet or pizza stone in the oven to preheat along with the oven. *This will ensure an extra crispy crust.*
- Use a 2-3 inch cookie or biscuit cutter and a sharp knife to carefully trace and cut 14 circles out of 2 ultra thin pizza crusts.
- Then spoon a little sauce on each of the pizzas and top with shredded mozzarella cheese.
- Make the spiders by slicing a whole black olive in half then cut 4 slices into each half as legs. Cut another olive in half and use for the head. *See pictures above as a guide.*
- Arrange your olive spiders on top of the pizzas. Then carefully place the pizzas on the preheated baking sheet or pizza stone.
- Bake at 425 degrees F for about 6-8 minutes until the cheese has melted and the crust is golden brown.
- Remove from the oven and serve with a side of marinara sauce for dipping. Enjoy!
Notes
- You can use pre-made pizza dough or English muffins as a base for a quicker version.


Leave a Reply