The Best Part of Carving a Pumpkin
My favorite part of Halloween was never the candy. It was the seeds. My abuela would save every single one. She said wasting them was like throwing away a tiny treasure. I still laugh at that.
She would let me pull them out with my hands. It felt so slimy and fun! We would sit at the kitchen table, picking seeds from the stringy pulp. It was our special time together. Do you have a favorite kitchen memory with someone you love?
Why We Boil First
You might want to skip the boiling step. Please don’t! I learned this the hard way. My first batch of seeds was tough and chewy. They never got crispy.
Boiling them in salty water does two great things. First, it makes the shells easier to chew. Second, it gets the salt flavor right inside the seed. This matters because it means every bite is tasty, not just the outside. Your seasoning goes all the way through.
The Secret to Getting Them Crispy
The real secret is patience. Dry those seeds very, very well. I use a clean kitchen towel and pat them like little babies. Any extra water will steam them in the oven. We don’t want steamed seeds. We want crunchy ones!
Then, you must spread them in one layer. No piling up! And stir them every 15 minutes. This matters because it gives every seed its own space to get golden and crisp. Doesn’t that smell amazing when they’re roasting?
A Little Story About Salt
My brother Luis always wanted more salt. He would shake and shake the shaker. One year, I made a batch just for him, extra salty. He ate them all in one night! His face was a funny mix of happiness and thirst.
That’s the fun of this recipe. You can make it your own. After baking, you can add other flavors too. Do you like yours spicy, sweet, or super salty? Tell me your favorite way to season snacks!
More Than Just a Snack
These seeds are little power packs. They have good protein and fiber. That means they help keep you full and give you energy. It’s a snack that loves you back.
Fun fact: The pumpkin itself is a fruit, but its seeds are called “pepitas.” Isn’t that a fun word to say? Next time you carve a pumpkin, think of it as two treats in one. You get a funny face for your porch and a delicious snack for your bowl. What will you name your pumpkin this year?
Ingredients:
| Ingredient | Amount | Notes |
|---|---|---|
| Pumpkin seeds | 1 1/2 cups | from 1 large or 2-3 small sugar pumpkins |
| Water | 4 cups | for boiling |
| Fine sea salt | 1 Tbsp | plus more for sprinkling after roasting |
| Extra virgin olive oil | 2 tsp |
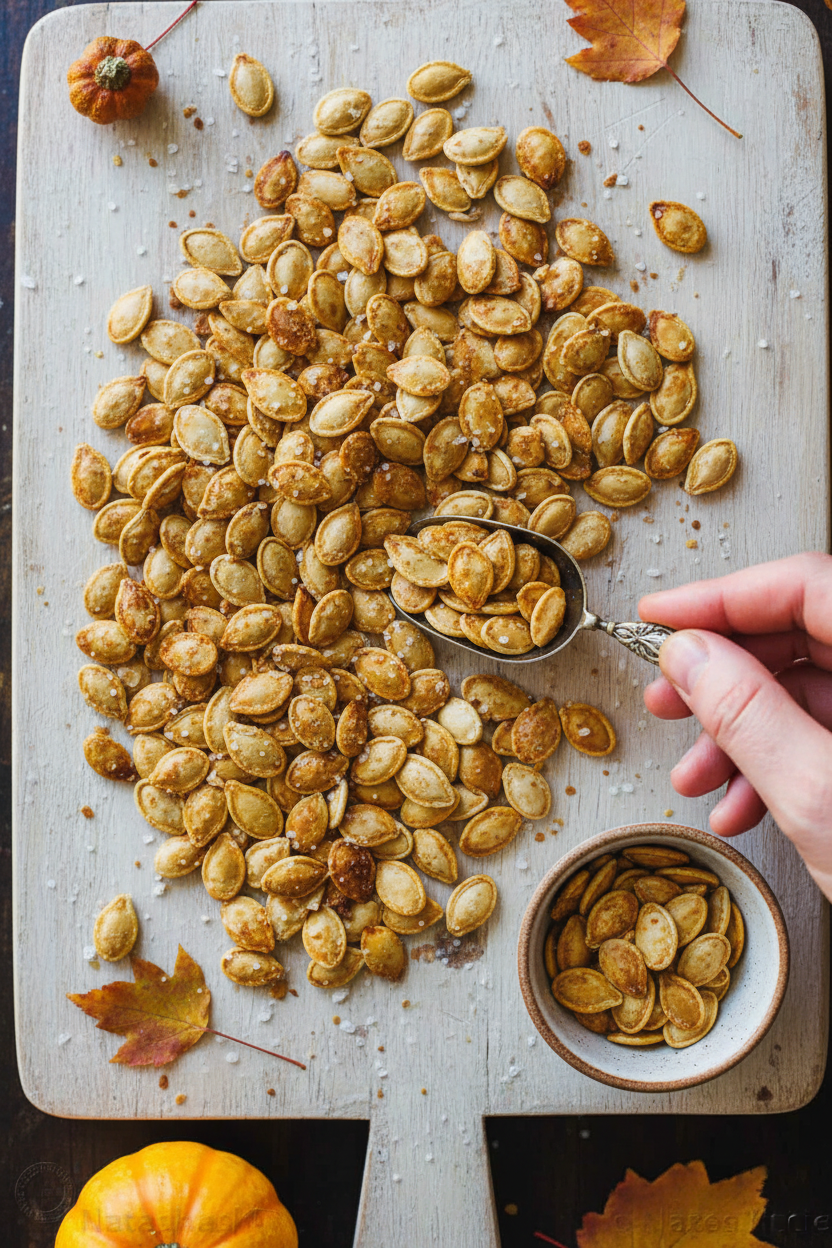
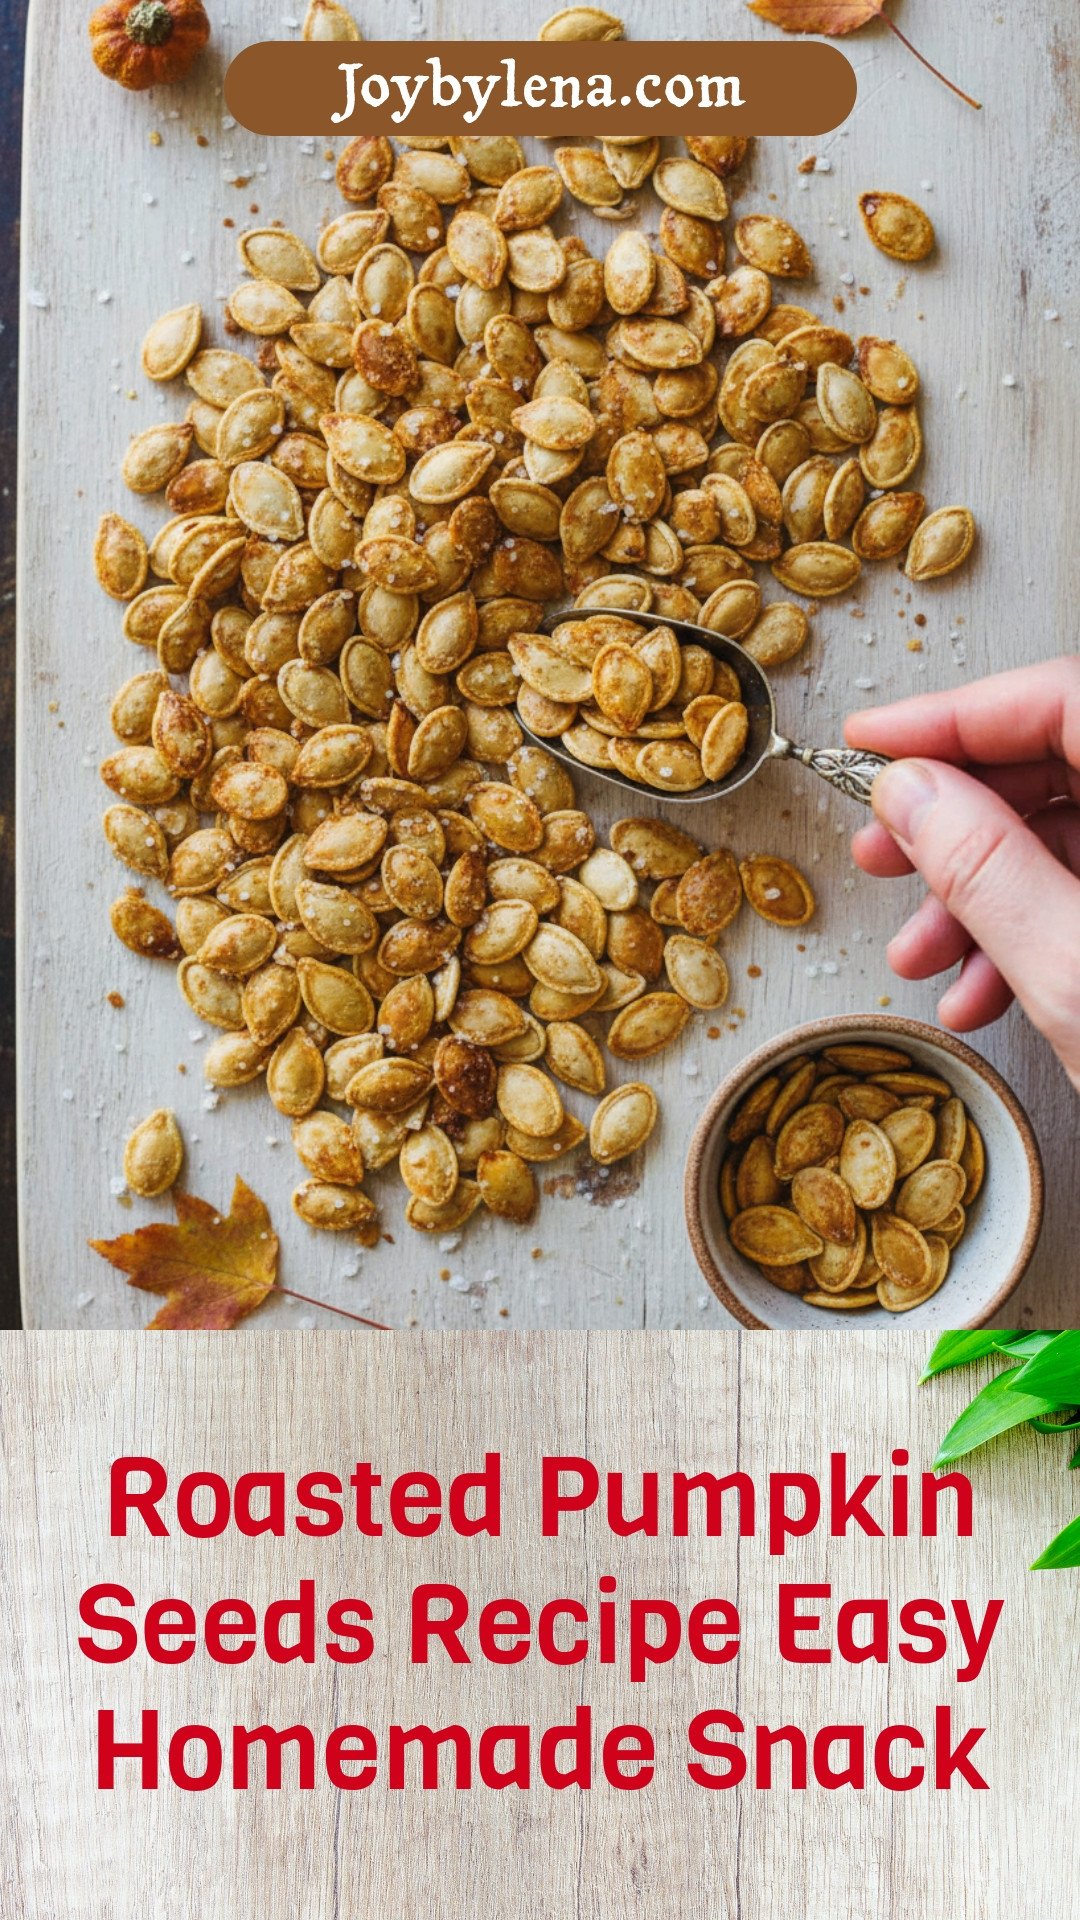
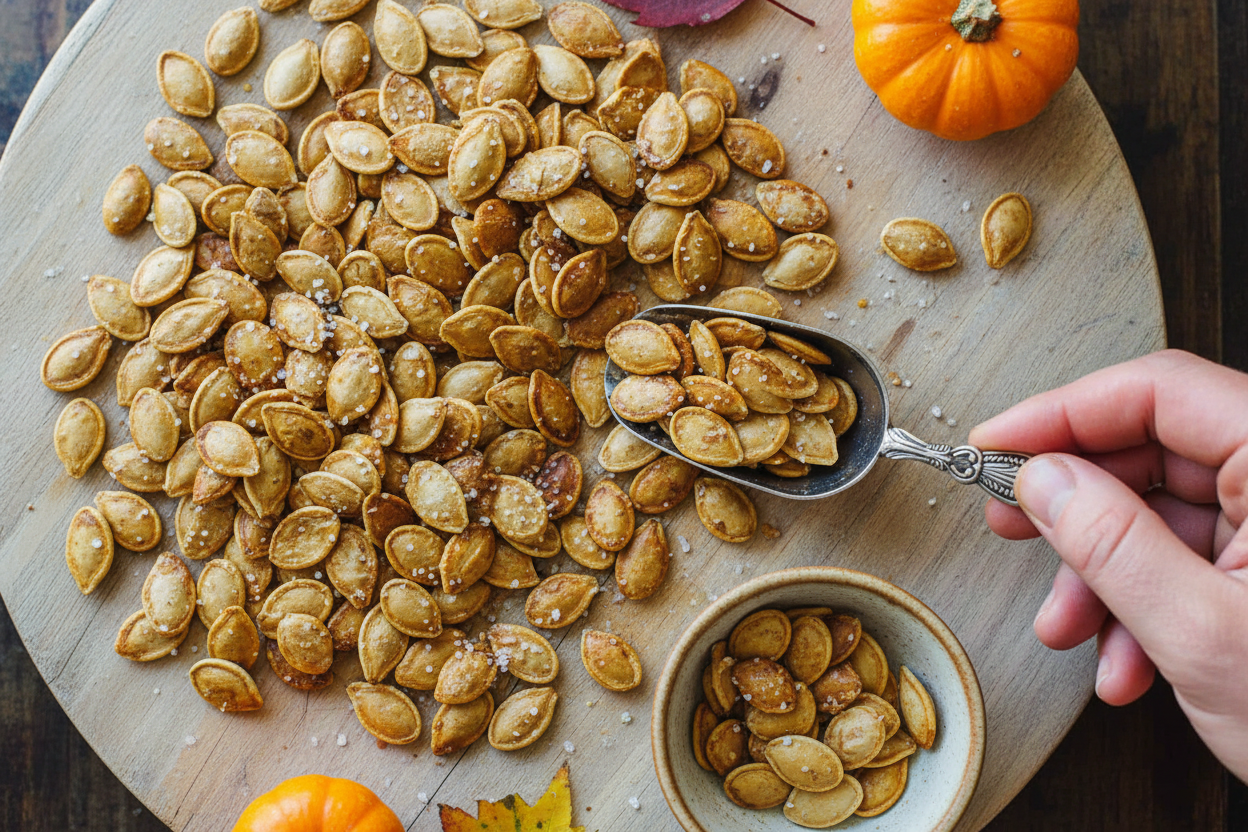
My Favorite Fall Snack: Roasted Pumpkin Seeds
Hello, my dear! It’s Lena. Come sit with me for a moment. I just love the smell of pumpkin in the oven. It reminds me of my grandchildren carving funny faces. We would always save the seeds. Doesn’t that smell amazing? I think the best part is the snack you get afterwards. These roasted seeds are so crunchy and good. Let me show you how my family has always made them.
Step 1: Clean the Seeds
First, get your seeds from the pumpkin. Cut the top off at an angle. Now, scoop everything out with a big spoon. It will be messy and slimy! I still laugh at that. Put all the seeds and stringy bits into a big bowl of water. The seeds will float. This makes them easier to clean.
Step 2: Boil & Dry
Pick the seeds out of the pumpkin guts. Rinse them well in the water. Try to get most of the orange strings off. Don’t worry if a few stick. Now, here is the secret step! Boil them in salty water for ten minutes. This makes them extra crispy later. (My hard-learned tip: Dry them VERY well with a towel. Wet seeds steam instead of roast!)
Step 3: Season & Prep for Baking
Drizzle a little olive oil on your baking sheet. Toss the dry seeds in it. Spread them out in one layer. Give them a little sprinkle of salt. Your oven should be at 300°F. That’s a gentle heat. It toasts them slowly so they don’t burn. Why do we boil the seeds first? Share below!
Step 4: Roast to Perfection
Bake them for about half an hour. Stir them every fifteen minutes. This helps them get crispy all over. You will know they are done when they look lightly golden. They will get even crispier as they cool. Let them sit on the pan for a few minutes. Then, try not to eat them all at once!
| Cook Time | 40-50 minutes |
| Total Time | About 1 hour |
| Yield | About 1 1/2 cups |
| Category | Snack |
Three Fun Ways to Flavor Your Seeds
Once you know the basic recipe, you can play! My grandkids love trying new flavors. Here are our top three twists. They are so simple. Just toss the seeds with these extras right after the oil.
- Sweet & Spicy: Mix in a teaspoon of brown sugar and a pinch of cayenne pepper. It’s a surprising little kick!
- Everything Bagel: Sprinkle on some garlic powder, onion powder, and sesame seeds. It tastes just like your favorite bagel.
- Cheesy Herb: Add grated Parmesan cheese and dried rosemary before baking. It smells like a cozy Italian kitchen.
Which one would you try first? Comment below!
Serving Your Crunchy Creation
These seeds are perfect just in a bowl. But I love to use them for extra crunch. Sprinkle them on a bowl of butternut squash soup. They are wonderful on a big green salad, too. You can even mix them into your trail mix for a hike. They add such a nice, toasty flavor.
For a drink, I think of cool autumn evenings. A cold apple cider is just right. For the grown-ups, a glass of amber ale pairs beautifully. It’s a lovely, simple combination. Which would you choose tonight?
Storing Your Snack Treasure
Let’s keep those crunchy seeds perfect. Cool them completely first. Then store them in a jar or bag. They will stay crisp for two weeks.
You can freeze them too. I use a freezer bag. They last for months this way. Just take out a handful anytime.
No need to reheat from the cupboard. They are ready to eat. If frozen, let them sit out for a bit. They will taste fresh.
I once stored warm seeds. They got soggy fast. I learned my lesson about cooling. Batch cooking matters for busy days. A big bowl of seeds means easy snacks all week. Have you ever tried storing it this way? Share below!
Fixes for Common Seed Struggles
First, soggy seeds happen. The secret is drying them well. Pat every seed with a towel. Wet seeds steam instead of roast.
Second, burnt seeds are no fun. Your oven might run hot. Check them five minutes early. I remember when I burned a batch. I was chatting on the phone!
Third, seeds might not be salty enough. Taste one after boiling. You can add more salt then. This step builds your cooking confidence. Good flavor starts with seasoning early. Which of these problems have you run into before?
Your Quick Questions, Answered
Q: Is this recipe gluten-free? A: Yes, pumpkin seeds are naturally gluten-free. Just check your salt label.
Q: Can I make these ahead? A: Absolutely. Make them on the weekend. Enjoy them all week long.
Q: What can I use instead of olive oil? A: Melted butter or avocado oil works great. Both add a nice taste.
Q: Can I double the recipe? A: You can. Just use two baking sheets. Switch their spots in the oven.
Q: Any fun extra tips? A: Try a sprinkle of garlic powder. Fun fact: Pumpkin seeds are called “pepitas” in Spanish. Which tip will you try first?
From My Kitchen to Yours
I hope you love this simple snack. It always reminds me of fall afternoons. The smell fills my whole house.
I would love to see your seeds. Share a picture of your baking sheet. Show me your biggest, crunchiest seed. Have you tried this recipe? Tag us on Pinterest!
Thank you for cooking with me today. Come back soon for another kitchen story.
Happy cooking!
—Lena Morales.
Roasted Pumpkin Seeds Recipe: Roasted Pumpkin Seeds Recipe Easy Homemade Snack
Description
A simple and delicious snack, these homemade roasted pumpkin seeds are perfectly crispy and salty.
Ingredients
Instructions
- Preheat oven to 300°F. Remove the top of the pumpkin, cutting into it at an angle towards the stem. Use a large metal spoon to scrape out the seeds.
- Submerge the seeds in water and pick out the strings and pumpkin debris, then drain.
- In a large saucepan, add 4 cups water and 1 Tbsp salt. Add the pumpkin seeds, bring to a boil, and continue boiling for 10 minutes then drain and thoroughly pat dry with a kitchen towel.
- Drizzle a rimmed baking sheet with extra virgin olive oil. Add the pumpkin seeds and stir to coat in oil. Spread the seeds in a single layer and sprinkle with salt.
- Bake at 300°F for 30-40 minutes, depending on the size of your seeds, stirring every 15 minutes. Remove from the oven when they are barely golden and have reached your desired crispness.
Notes
- Store cooled seeds in an airtight container for up to a week. For variation, try adding spices like paprika, garlic powder, or cayenne pepper before baking.


Leave a Reply