The Magic of a Messy Middle
Let me tell you about my first lava cake. It was a little scary. I pulled it from the oven and thought, “Oh no, it’s not done!” The top looked soft. But that’s the magic. The outside bakes into a cake. The inside stays a gooey, chocolate river. I still laugh at that moment of panic turning into joy.
Why does this matter? It teaches us that perfect isn’t always the goal. Sometimes the best part is hidden inside, just waiting to spill out. Have you ever had a happy surprise like that in the kitchen?
Melting Together
We start with butter and chocolate. You just melt them together. Doesn’t that smell amazing? It’s like a warm hug for your nose. Use a good chocolate bar you’d eat by itself. That makes the best cake.
Fun fact: The heat from the melted butter is what gently melts the chocolate. You just stir it into a smooth, shiny pool. Then we add the powdered sugar. It mixes in so easily, no lumps! This is the sweet start of our lava.
Eggs and a Little Patience
Next come the eggs and extra yolks. The yolks make the center extra rich and creamy. Stir gently until it’s all one color. Then add the flour. Just stir until it disappears. No need to mix for a long time. The batter will be thick and beautiful.
Now, the ramekins. Grease them well! This is very important. It lets our little cakes come out for their plate presentation. Pour the batter in evenly. Four little cups of promise. What’s your favorite dessert to make in little dishes like this?
The Hot Oven Wait
The oven must be hot, 425 degrees. This high heat cooks the outside fast. It traps the soft center inside. They only bake for 13 minutes. Set a timer! When they come out, the tops will be puffed and maybe cracked. Perfect.
Here is the second big “why this matters.” You must let them sit for 5-10 minutes. This is hard, I know! But it lets the cake firm up just enough. Then you can turn it out. If you skip this, the lava will run everywhere too soon. Patience makes the perfect flow.
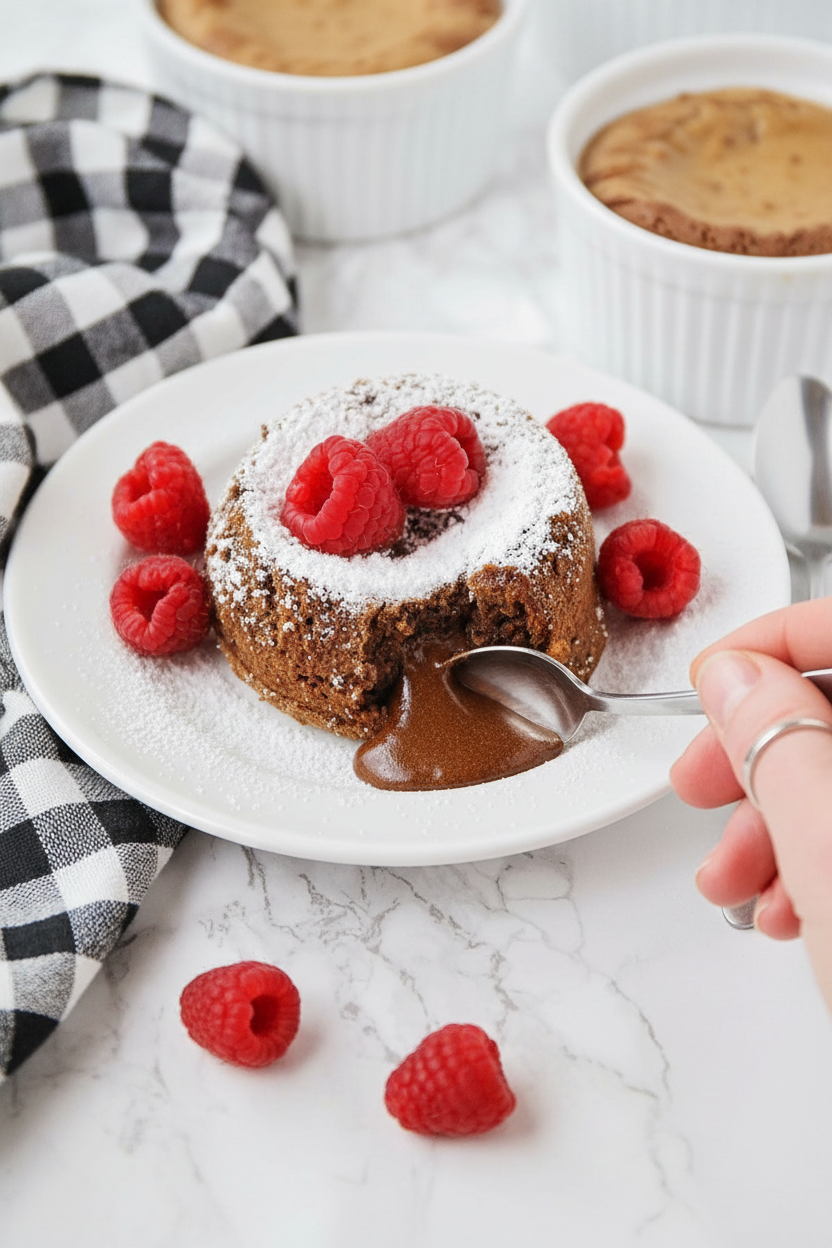
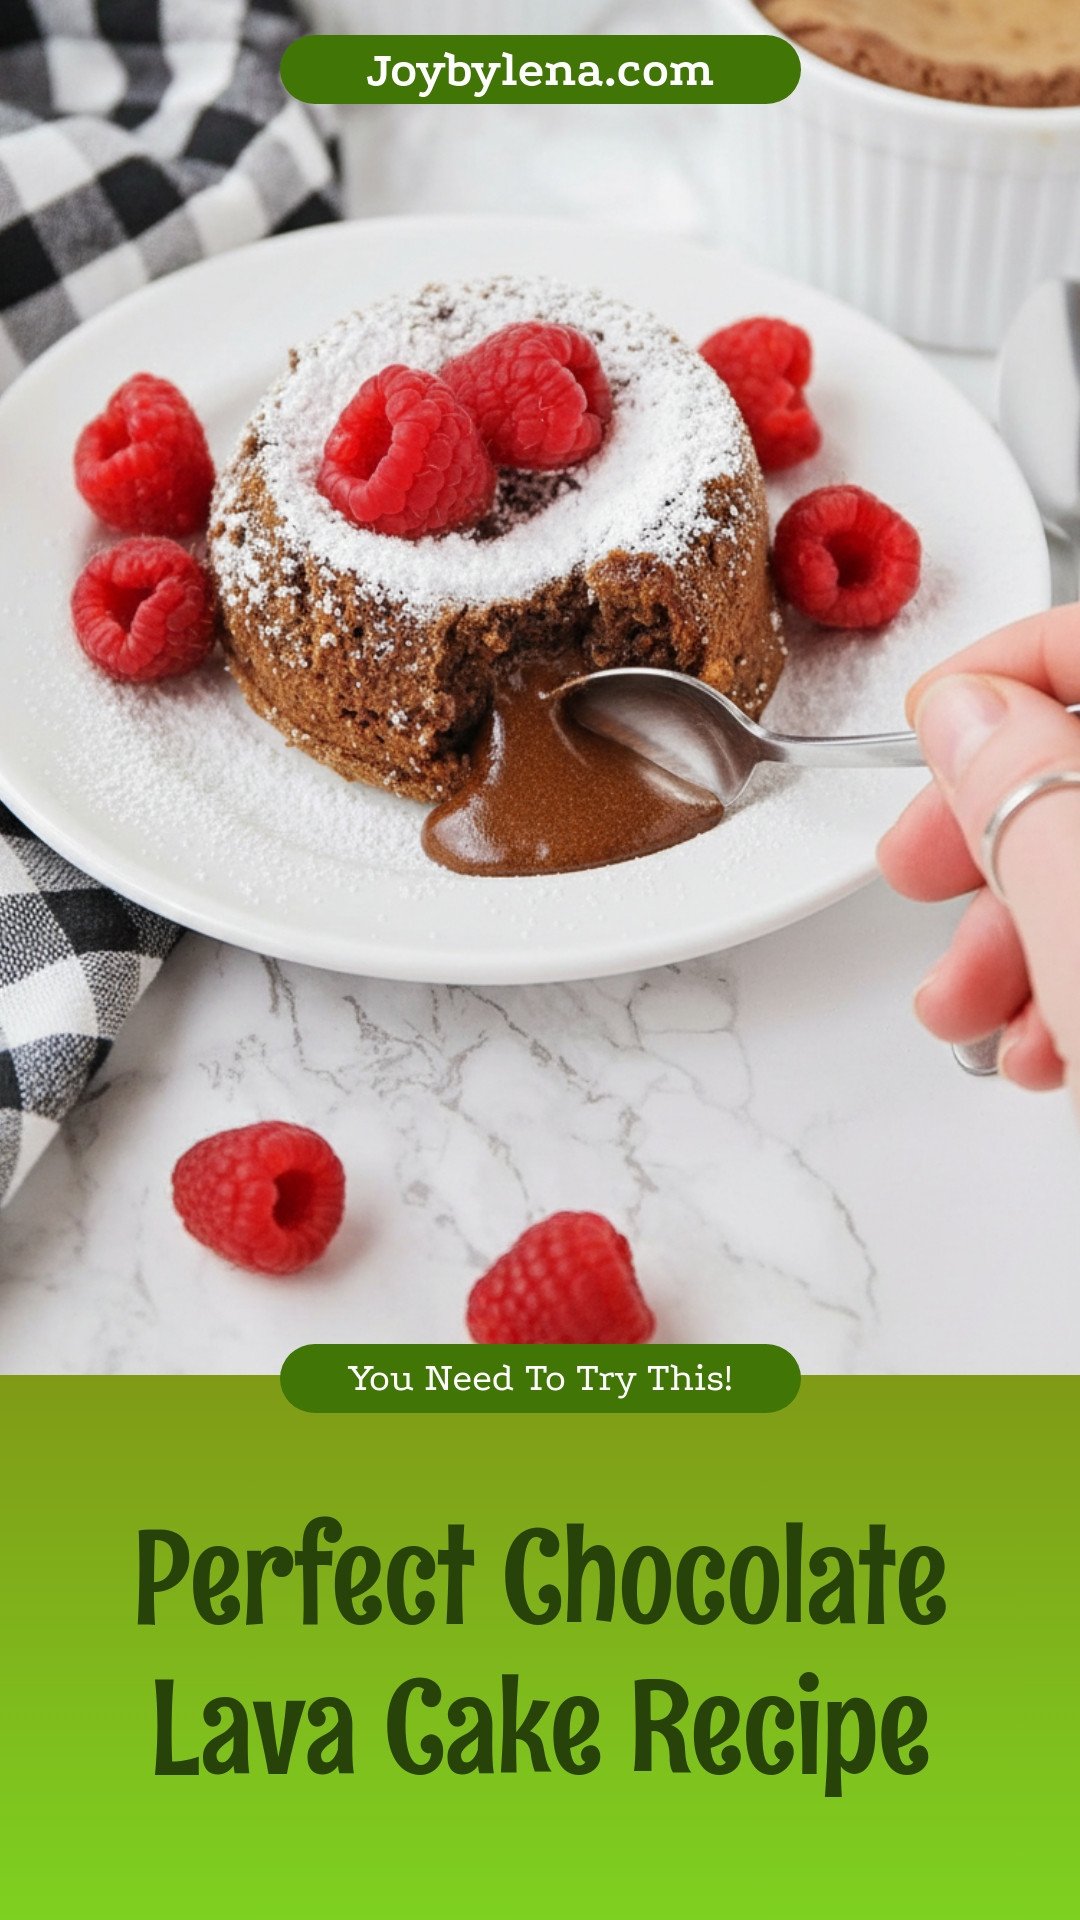
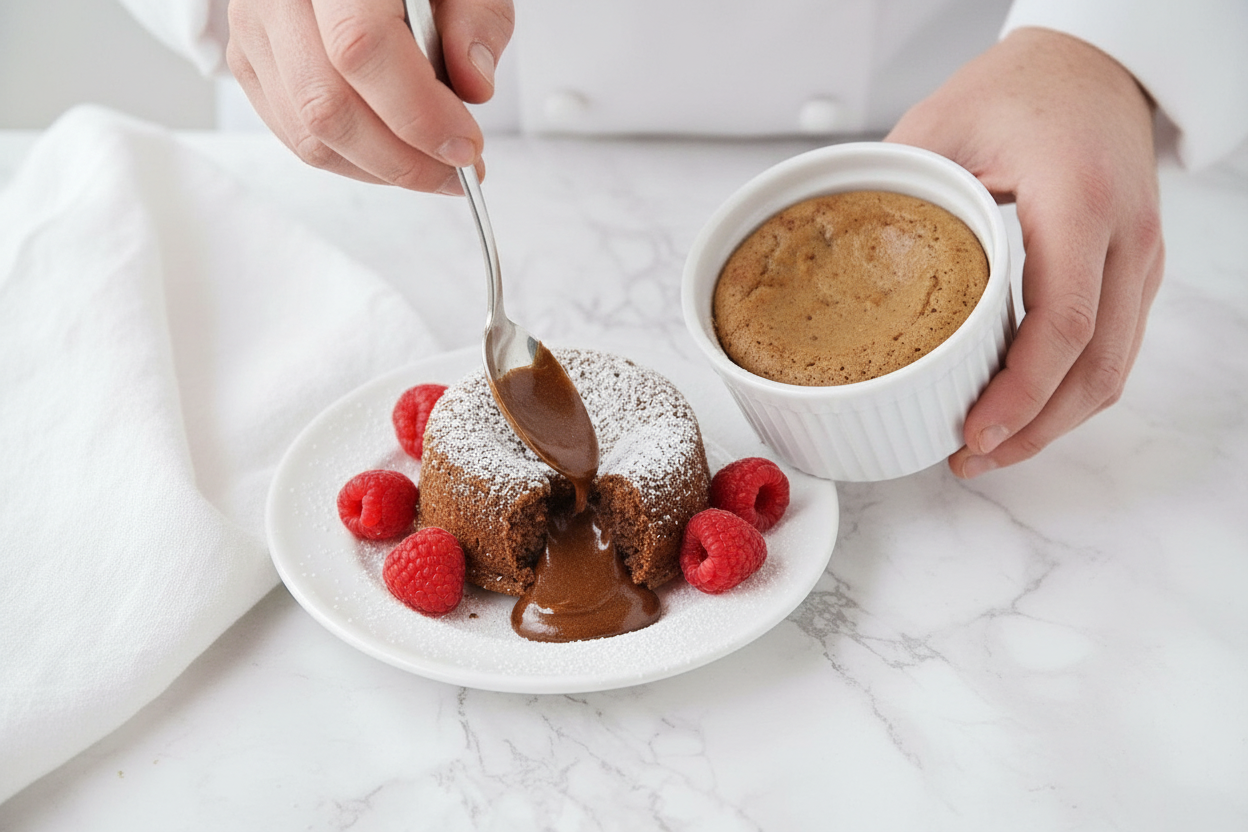
Your Moment of Truth
Run a knife around the edge. Place a plate on top. Flip it with confidence! Lift the ramekin. There it is, your cake. Give it a light dusting of powdered sugar like a little snow. Then, dig in with a spoon.
The warm chocolate center will flow. It’s the reward for your work. Do you like yours plain, with ice cream, or maybe some berries? Tell me your favorite way to eat a lava cake. I love hearing your ideas.
Ingredients:
| Ingredient | Amount | Notes |
|---|---|---|
| unsalted butter | ½ cup | |
| semisweet chocolate, chopped | 4 ounces | |
| powdered sugar | 1¼ cups | |
| whole eggs | 2 | |
| egg yolks | 3 | |
| vanilla extract | 1 teaspoon | |
| all-purpose flour | ½ cup |
My Chocolate Lava Cake Secret
Hello, my dear. Come sit. Let’s make magic. This cake is pure joy. It has a warm, gooey heart. I learned it from my friend Marie. We made it every Tuesday for years. I still laugh at that.
You just need a few simple things. Good chocolate is the key. It makes all the difference. The smell will fill your whole kitchen. Doesn’t that smell amazing? It reminds me of happy birthdays. Now, let’s begin our little project.
Step 1: First, get your oven nice and hot. Set it to 425°F. Grab four little ramekins. Give them a quick spray. Place them on a baking sheet. This makes everything easy to carry. (My hard-learned tip: always use the baking sheet! It saves your oven from drips.)
Step 2: Now, melt the butter and chocolate. Put them in a bowl. Microwave for one minute. The butter should be melted. Take it out and stir, stir, stir. The chocolate will melt from the heat. It becomes a smooth, shiny pool. I love this part.
Step 3: Stir in the powdered sugar. It will look a bit sandy. That’s okay! Next, add the eggs and yolks. Add the vanilla, too. Stir until it’s all smooth and glossy. It feels like silk. Why do we use extra egg yolks? Share below!
Step 4: Finally, mix in the flour. Just until you don’t see white. Don’t over-mix! Pour the batter into your ramekins. Try to make them even. I use a spoon to help. Now, they are ready for their hot bath.
Step 5: Bake for exactly 13 minutes. The tops will be firm. The centers will be jiggly. This is the lava! Let them sit for 5-10 minutes. Then, run a knife around the edge. Flip them onto a plate. Be brave! Dust with powdered sugar like snow. Serve right away.
Cook Time: 13 minutes
Total Time: 30 minutes
Yield: 4 servings
Category: Dessert
Let’s Get Creative!
This recipe is your friend. You can dress it up. Here are three fun twists I love to try. They make it feel new again.
Peanut Butter Heart: Hide a tiny spoonful of peanut butter in the center of each ramekin before baking.
Orange Zest Sparkle: Add a teaspoon of fresh orange zest to the batter. It tastes like a fancy chocolate orange.
Minty Fresh: Stir a few drops of peppermint extract into the melted chocolate. Top with a candy cane piece.
Which one would you try first? Comment below!
The Perfect Final Touch
Presentation is part of the fun. Place the warm cake on a pretty plate. Add a scoop of vanilla ice cream right beside it. The cold and hot mix is heaven. A few raspberries look lovely, too. Their tartness is perfect with the sweet chocolate.
For a drink, I have two ideas. A glass of cold milk is always the best. For the grown-ups, a small glass of red wine works nicely. It sips like a dark berry. Which would you choose tonight?
Keeping Your Lava Cakes for Later
These cakes are best fresh from the oven. But sometimes, you need to plan ahead. You can make the batter a day early. Just cover it tightly and keep it in the fridge. Pour it into ramekins right before baking.
I do not recommend freezing baked lava cakes. The lovely gooey center changes texture. But you can freeze the unbaked batter in the ramekins for a month. Bake straight from the freezer, adding a few extra minutes.
My first time, I reheated a leftover cake in the microwave. It was tasty but not the same. For the best reheat, warm it in a 350°F oven for 5-8 minutes. This keeps the magic alive. Batch cooking matters because it lets you share joy anytime.
Have you ever tried storing it this way? Share below!
Lava Cake Troubles? Easy Fixes Here!
Problem one: no lava center. This means you baked it too long. Every oven is different. Start checking at 11 minutes. The edges should look set, but the top center jiggles.
Problem two: the cake sticks to the ramekin. Always spray your dish well. Let the cakes rest for 5-10 minutes after baking. Then run a thin plastic knife around the edge. I remember when my first cake broke. I was so sad! This matters because a clean release feels like a win.
Problem three: the batter looks grainy or split. Your eggs or butter might have been too cold. Let your eggs sit out for 15 minutes. Make sure the melted chocolate mixture is just warm, not hot, before adding eggs. This matters for a smooth, rich texture you will love.
Which of these problems have you run into before?
Your Lava Cake Questions, Answered
Q: Can I make this gluten-free?
A: Yes! Swap the all-purpose flour for your favorite gluten-free blend. Use a 1-to-1 style blend for best results.
Q: Can I make it ahead?
A: Absolutely. Prepare the batter and keep it in the fridge overnight. Bake it just before serving.
Q: What if I don’t have semisweet chocolate?
A: You can use dark or bittersweet chocolate. *Fun fact: The first chocolate I used was from a baking bar my grandpa bought.* Milk chocolate will make it much sweeter.
Q: Can I double the recipe?
A: You sure can. Just double all the ingredients. Use more ramekins on your baking sheet.
Q: Any fun serving ideas?
A: A scoop of vanilla ice cream is perfect. A few raspberries on the side add a nice, fresh touch.
Which tip will you try first?
From My Kitchen to Yours
I hope you love making these little chocolate wonders. They are pure happiness in a cup. Cooking is about sharing stories and creating sweet moments. I would love to see your creations.
Share a photo of your finished lava cakes with me. Let’s build a community of happy bakers. Your kitchen adventures inspire me every single day.
Have you tried this recipe? Tag us on Pinterest!
Happy cooking!
—Lena Morales.
Perfect Chocolate Lava Cake Recipe
Description
Experience the ultimate dessert with this decadent Chocolate Lava Cake, featuring a rich, molten chocolate center encased in a warm, delicate cake.
Ingredients
Instructions
- Preheat the oven to 425°F. Spray four 6-ounce ramekins with cooking spray and place them on a baking sheet.
- Add the butter and chocolate to a microwave-safe bowl. Microwave on high for one minute, or until the butter is melted. Remove the bowl from the microwave and stir until the chocolate is completely melted.
- Add the powdered sugar and stir until combined, then add the eggs, egg yolks, and vanilla, and stir until smooth. Add the flour, and stir until combined. Divide the batter evenly between the ramekins.
- Bake for 13 minutes, then remove from the oven and let stand for 5-10 minutes. Run a plastic knife around the edge of each cake to release it from the ramekin, then invert it onto a plate.
- Dust with powdered sugar and serve warm.
Notes
- For best results, do not overbake. The cakes should be set around the edges but still soft in the center. Letting them stand after baking is crucial for the perfect molten texture.


Leave a Reply