The Best Kind of Mess
Let me tell you about my grandson, Mateo. He made this cake for my birthday. He crushed the Oreos with a rolling pin. Crumbs flew everywhere! I still laugh at that. His face was so proud.
The kitchen was a happy mess. That is the best kind. This recipe is not about being perfect. It is about having fun together. That matters more than a clean floor.
Why We Start with a Crust
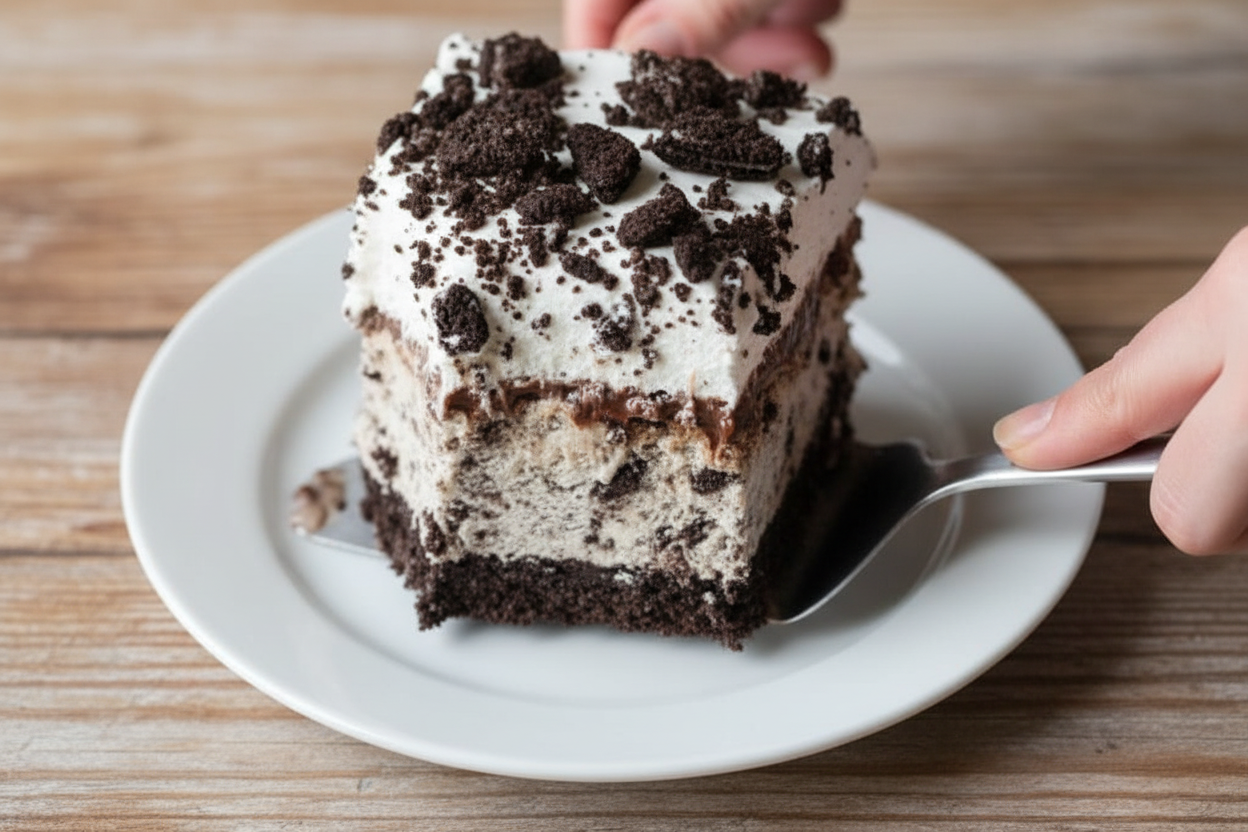
First, we make the crunchy bottom. You mix the crumbs with melted butter. It feels like wet sand. Press it into your pan. This makes a strong base for our cake.
This step matters. Without it, the cake would be too soft to slice. The crust gives it shape. It also adds a nice crunch. Do you like a thick or thin crust on your desserts?
The Magic of Layers
Next, spread the softened ice cream. Work fast! Then comes the warm fudge. Doesn’t that smell amazing? The hot and cold make magic. It hardens into a chewy ribbon.
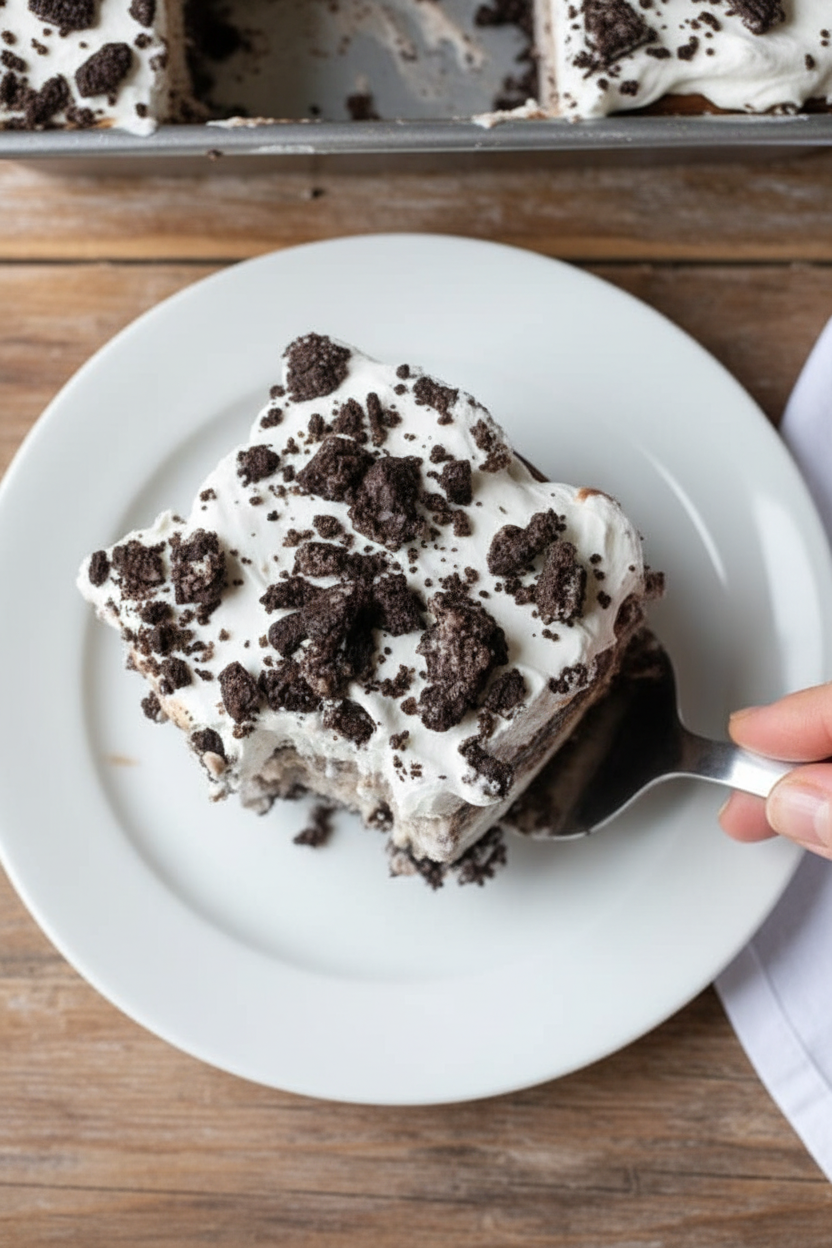
Finally, add the fluffy whipped topping. Sprinkle the last crumbs on top. *Fun fact: The first ice cream cake was made in the 1940s!* Layering flavors and textures is the secret. Every bite is a surprise.
Patience is a Sweet Ingredient
This cake needs time in the freezer. I know, waiting is hard. But this is important. Freezing each layer makes them set. Otherwise, it would be a soupy puddle.
Take it out 15 minutes before serving. Let it soften just a bit. This makes it easy to cut. What is the hardest dessert you have ever had to wait for?
Make It Your Own
This recipe is like a friendly suggestion. You can change it! Use mint chocolate chip ice cream. Or try caramel sauce instead of fudge. Make it yours.
Food is about sharing joy. This cake is for birthdays, hot days, or just because. It brings people together. That is why we cook. What flavor would you create? Tell me your idea.
Ingredients:
| Ingredient | Amount | Notes |
|---|---|---|
| Oreos, crushed | 1 (13.29-ounce) package | |
| Butter | 1/4 cup | melted |
| Cookies and cream ice cream | 1/2 gallon | softened |
| Hot fudge | 1 (16-ounce) jar | warmed |
| Whipped topping | 8 ounces | thawed |
My No-Bake Oreo Ice Cream Cake
Hello, my dear! Come sit. Let’s make a magic cake together. It’s my grandson Miguel’s favorite birthday treat. We don’t even need to turn on the oven. Doesn’t that sound perfect for a warm day? I love how the kitchen smells like cookies and cold cream. It reminds me of summer afternoons with my own abuela. She always had a sweet treat ready. This recipe is just as simple and full of love. Are you ready? Let’s begin our little kitchen project.
Step 1: First, let’s make our crunchy crust. Grab your package of Oreos. We need to crush them up finely. You can use a bag and a rolling pin. I still laugh at Miguel doing this—he makes such a happy noise! Mix the crumbs with the melted butter. It should feel like wet sand. Press it firmly into your greased pan. This is your cake’s foundation. Make it nice and even.
Step 2: Now for the fun part—the ice cream! Let it soften on the counter for about 10 minutes. You want it spreadable, not soupy. Scoop it all onto your crust. Gently spread it out with a spoon. (My hard-learned tip: run your spoon under hot water to make spreading easier). Pop the whole pan into the freezer. Let it get solid again for two hours. This takes patience, but it’s worth it.
Step 3: Time for the fudge ribbon! Warm your jar of hot fudge slightly. This makes it pour like a dream. Drizzle that lovely, shiny chocolate all over the firm ice cream. Try making little swirls. Doesn’t that look beautiful? Back into the freezer it goes for one hour. This sets the fudge so it doesn’t mix with our next layer. Quick quiz: What’s your favorite part so far—the crust or the fudge? Share below!
Step 4: The final touch is the fluffy hat. Take your whipped topping and spread it over the cold fudge. Be gentle so the layers stay pretty. Sprinkle the last of your crushed Oreos on top. It looks like a cookie garden! Freeze it for two more hours. Before serving, let it sit out for 15 minutes. This makes slicing so much easier. Then, just cut, serve, and watch those happy faces.
Cook Time: 4–6 hours (freezing)
Total Time: 5 hours 15 minutes
Yield: 15 servings
Category: Dessert, No-Bake
Three Fun Twists to Make It Yours
This cake is like a blank canvas. You can paint it with your favorite flavors. Here are three ideas I love. Peanut Butter Paradise: Use peanut butter cup ice cream and swirl in melted peanut butter with the fudge. Mint Chocolate Fresh: Try mint chocolate chip ice cream and add a drop of peppermint extract to the whipped topping. Berry Blast: Use vanilla ice cream and layer with a jar of warmed raspberry jam instead of fudge. So many possibilities! Which one would you try first? Comment below!
Serving It With Style
This cake is a star all by itself. But I love making it extra special. Serve each slice with a few fresh raspberries on the side. Or add a tiny extra dollop of whipped cream. For a party, put a whole Oreo right on top of each piece. For drinks, the grown-ups might like a cold coffee or a little glass of Baileys. For everyone else, a tall glass of cold milk is the classic choice. It just goes perfectly with cookies. Which would you choose tonight?
Keeping Your Ice Cream Cake Perfect
This cake loves the freezer. Keep it covered tight with foil. That stops ice crystals from forming. You can store it for up to two weeks.
Let it sit out for 15 minutes before slicing. This softens it just right. A warm knife cuts clean slices. Just dip it in hot water first.
I once served it straight from the freezer. My spoon nearly bounced off! A little patience makes it perfect. This matters because texture is everything.
You can make the whole cake ahead. It actually gets better overnight. The flavors mingle and become friends. Have you ever tried storing it this way? Share below!
Simple Fixes for Common Hiccups
Is your ice cream too hard to spread? Let it soften on the counter. Ten to fifteen minutes is usually enough. I remember when mine melted into soup!
Is the crust crumbling apart? Press it firmly into the pan. Use the bottom of a cup. A solid crust matters for that perfect bite.
Is the hot fudge too thick? Warm it gently for a few seconds. This helps it drizzle like a dream. A good drizzle adds wonderful flavor layers.
Fixing small problems builds your kitchen confidence. You learn that most mistakes have easy answers. Which of these problems have you run into before?
Your Quick Questions, Answered
Q: Can I make this gluten-free?
A: Yes! Use gluten-free sandwich cookies. Check your ice cream label too.
Q: How far ahead can I make it?
A: You can make it up to two weeks ahead. The freezer is your friend.
Q: What can I use instead of hot fudge?
A: Caramel sauce or strawberry topping work great. Use what you love.
Q: Can I make a smaller cake?
A: Sure. Halve the recipe for an 8×8 pan. Just adjust freezing times.
Q: Any fun extra tip?
A: Add mini chocolate chips on top. *Fun fact: The first Oreo was sold in 1912!* Which tip will you try first?
From My Kitchen to Yours
I hope you love making this cake. It is pure joy on a plate. Share it with people you love. That is the best part of cooking.
I would love to see your creation. Your version might give me a new idea. Have you tried this recipe? Tag us on Pinterest! Let’s build a sweet community together.
Happy cooking!
—Lena Morales.
Oreo Ice Cream Cake: Oreo Ice Cream Cake Recipe Easy Homemade
Description
This easy, no-bake Oreo Ice Cream Cake features a buttery Oreo crust, a layer of cookies and cream ice cream, hot fudge, and whipped topping.
Ingredients
Instructions
- Add crushed cookie crumbs to a bowl reserving ½ cup for the top. Add butter and mix well. Press into a greased 9×13 pan.
- Spread softened ice cream over crust and freeze for 2 hours.
- Drizzle warm fudge over ice cream and freeze for 1 hour.
- Add whipped topping, sprinkle with reserved Oreos, and freeze for 2 hours. Remove from the freezer and let it set out for 15 minutes before serving.
Notes
- For best results, let the ice cream soften at room temperature for 15-20 minutes before spreading. You can use Cool Whip or homemade whipped cream.


Leave a Reply