My First Mummy Mess
Let me tell you about my first try with these cookies. I was in a big hurry. I didn’t let the coating set. My mummies became a sticky, melty puddle. I still laugh at that.
Patience is the secret ingredient here. Waiting for the coating to harden matters. It turns a messy idea into a cute cookie. Have you ever ruined a recipe by rushing?
Why We Make Silly Treats
These aren’t just cookies. They are little bits of joy. Making something silly together is the best part. It’s about the fun, not just the food.
Sharing a laugh in the kitchen creates happy memories. That matters more than a perfect treat. Does your family have a funny recipe you make together?
Let’s Get Wrapping
First, melt your white candy coating. Dip each Vienna Finger cookie in. Use a fork to let the extra drip off. Place them on wax paper.
Now, the waiting part. Let them sit until hard. The fridge speeds this up. Doesn’t that shiny coating look nice? Fun fact: The coating hardens because it cools and sets, just like crayons!
Giving Them a Face
Melt a little more coating. Put it in a bag and snip a tiny corner. Drizzle lines over your cookies to look like bandages. This is the fun part!
Quickly, add two mini M&Ms for eyes. Press them in gently. See? They come to life! Do you think blue or brown M&M eyes are spookier?
A Sweet Little Secret
Using a store-bought cookie is a smart trick. It gives you a perfect shape every time. This matters because anyone can make them. You feel like a baking genius.
It lets you focus on the decorating fun. The real magic is in your creativity. What other cookie shapes could become funny monsters?
Ingredients:
| Ingredient | Amount | Notes |
|---|---|---|
| Vienna Fingers vanilla cookies | 26 cookies | |
| White candy coating | 2 bags | |
| Mini M&Ms | 52 pieces | For the eyes |
Mummy Cookies: A Spooky Story in the Kitchen
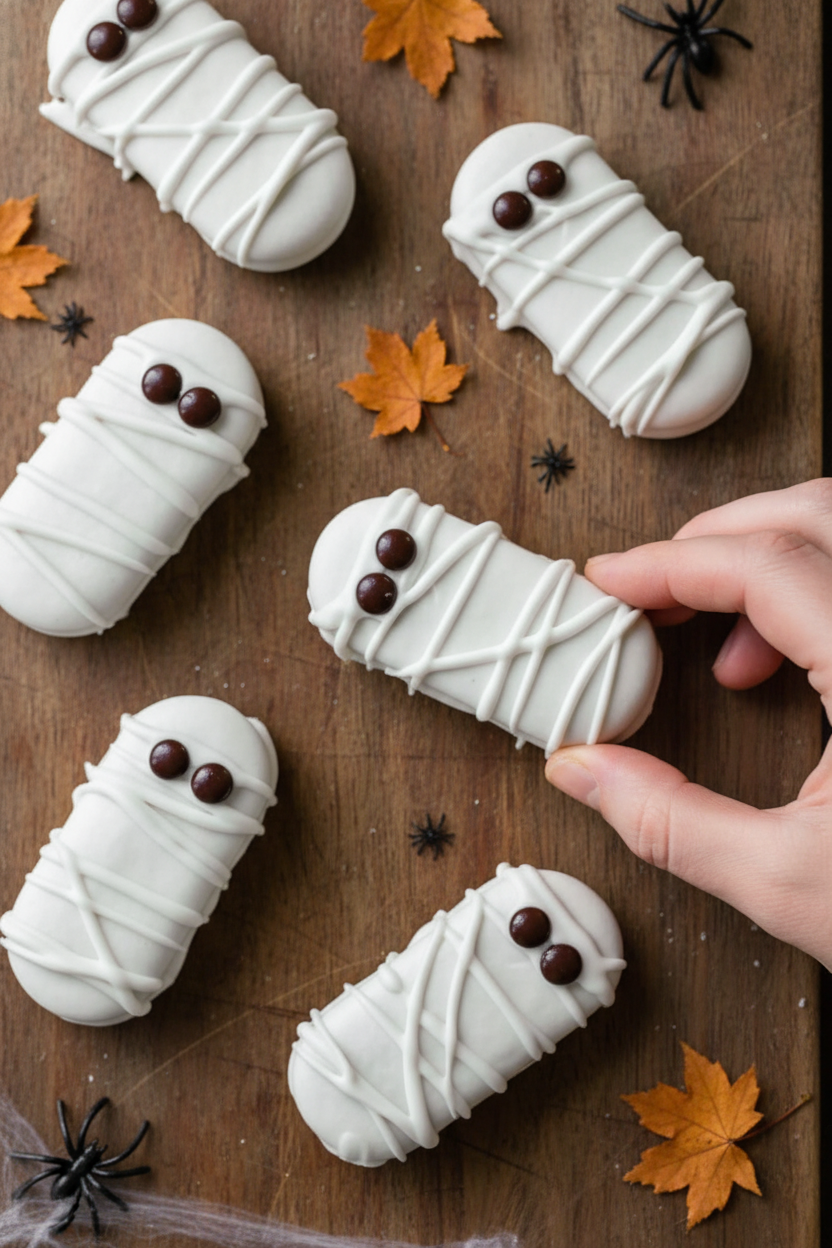
Hello, my dear! It’s Lena. Come sit at my table. I want to tell you about our Mummy Cookies. They are a silly, sweet Halloween tradition in my house. My grandson, Mateo, invented them years ago. He was just about your age. He said our cookies needed “bandages” for Halloween. I still laugh at that.
We use simple things you might already have. The magic is in the drizzling! It’s like painting with chocolate. Doesn’t that smell amazing? Let’s make a little mess and a lot of memories. I’ll walk you through it, step-by-step.
Step 1: First, melt your white candy coating. Follow the package directions carefully. I use a small bowl that fits over a pot of simmering water. Stir it slowly until it’s perfectly smooth. (A hard-learned tip: Don’t let any water get in the bowl! It makes the coating seize up into a lump.)
Step 2: Now, let’s dress our mummies! Drop a vanilla cookie into the melted coating. Use a fork to flip it over. Coat every side. Lift it out and let the extra drip off. Place it on waxed paper. Repeat with all your cookies. This part is wonderfully sticky.
Step 3: Patience time! Let the coating harden. You can leave them on the counter for an hour. Or pop the tray in the fridge for half an hour. I always use the fridge. Mateo could never wait very long. Do you like crunchy or soft cookies better? Share below!
Step 4: Time for the bandages! Melt a little more coating. Pour it into a small ziploc bag. Snip a tiny piece off one corner. Now drizzle lines back and forth over each cookie. They look like wrapped-up mummies already! My hand isn’t as steady as it used to be. Wobbly lines are just fine.
Step 5: The final touch! Press two mini M&Ms onto each cookie for eyes. Let them set again. Then they are ready to scare your family! Or just make them smile. I love seeing them all lined up on my platter.
Cook Time: 20 minutes
Total Time: 1 hour 20 minutes (with setting)
Yield: 26 cookies
Category: Dessert, Holiday
Three Spooky Twists for Your Mummies
Once you know the basics, you can play! Here are three fun twists my family loves. Try one next time.
- Zombie Mummies: Use green food coloring in your candy coating. Spooky!
- Peanut Butter Bandages: Use a peanut butter cup as the base instead of a cookie. So rich.
- Glitter Ghosts: Skip the drizzles. Use all white coating and big round eyes. Simple and cute.
Which one would you try first? Comment below!
Serving Your Spooky Crew
These cookies are a party on a plate. Pile them high on a black platter. Scatter some candy corn around them. For a real show, stand them up in a mug filled with crushed Oreo “dirt.” They’ll look like they’re climbing out!
What to drink? For grown-ups, a glass of cold milk with a shot of coffee liqueur is nice. For everyone, a big pitcher of cold apple cider is perfect. The tartness cuts the sweet. Which would you choose tonight?
Keeping Your Mummy Cookies Fresh & Spooky
Let’s talk about storing these sweet little mummies. They keep best in a single layer. Use a container with a tight lid. You can leave them on the counter for three days.
For longer storage, the freezer is your friend. I once froze a whole batch for my grandkids’ party. They tasted perfect one week later! Just freeze them flat first on a tray. Then stack them in a freezer bag.
Batch cooking saves so much time. Double the recipe for a big crowd. This matters because it lets you enjoy the party too. You won’t be stuck in the kitchen all night.
Have you ever tried storing cookies in the freezer? Share below!
Fixing Common Mummy Cookie Troubles
First, candy coating can be too thick. If it won’t drizzle, warm it up a little. Add a tiny drop of vegetable oil. This makes it smooth and easy to pipe.
Second, cookies might slide on the wax paper. I remember when my first mummies did a little dance! Let the coating set just a minute before moving them. This gives them a firm base to stand on.
Third, the eyes might not stick. Press the M&Ms in right after drizzling. The wet coating acts like glue. Getting this right matters for a cute, friendly face. It also makes you feel like a confident kitchen wizard.
Which of these problems have you run into before?
Your Mummy Cookie Questions, Answered
Q: Can I make these gluten-free?
A: Yes! Use your favorite gluten-free vanilla sandwich cookies. The rest is the same.
Q: Can I make them ahead?
A: Absolutely. Make them up to three days before. Store them as I mentioned earlier.
Q: What if I don’t have mini M&Ms?
A: Chocolate chips or sprinkles work great. Get creative with your mummy’s face!
Q: Can I double the recipe?
A: You sure can. Just melt the candy coating in separate batches. It’s easier to manage.
Q: Any fun optional tips?
A: Try adding a tiny dot of red icing for a mouth. Fun fact: The first mummy cookies I ever made had silly frowns!
Which tip will you try first?
Share Your Spooky Creations!
I hope you have so much fun with these. Making food should be joyful and simple. I love seeing your kitchen adventures.
Please show me your mummy cookie families. I would love to see their little candy eyes. It makes my day to see your photos.
Have you tried this recipe? Tag us on Pinterest! Use our handle @GrandmasCozyKitchen. Happy cooking!
—Lena Morales.

Mummy Cookies: Mummy Cookies A Spooky Halloween Treat
Description
A fun and spooky Halloween treat featuring vanilla cookies wrapped in white candy coating to look like mummies, with mini M&M eyes.
Ingredients
Instructions
- Begin by melting candy coating as directed on package.
- Place cookie in melted candy using a fork and making sure all sides are coated. Set on waxed paper and repeat for all cookies.
- Let candy coating set (in the fridge for half hour) or on the counter for at least 1 hour.
- Melt more candy coating and place in a ziploc bag. Snip edge and drizzle over cookies. Add mini M&Ms as eyes. Let set. ENJOY!
Notes
- Nutrition per cookie: Calories: 317kcal | Carbohydrates: 41g | Fat: 15g | Saturated Fat: 13g | Sodium: 55mg | Potassium: 10mg | Sugar: 37g | Vitamin A: 5IU | Calcium: 6mg | Iron: 0.3mg


Leave a Reply