My First Mint Trifle Disaster
I made my first mint trifle for a church potluck. I was so nervous. I used green food coloring, but I used too much.
The whole thing turned a bright, electric green. It looked like a science experiment! I still laugh at that. But you know what? Everyone ate it anyway. They loved the taste.
Why We Layer Desserts
This matters more than you think. A trifle is all about the layers. You get a little bit of everything in one spoonful.
Soft cake, creamy mint, crunchy cookies. It’s a party in your mouth. Each layer is a happy surprise. What’s your favorite part of a layered dessert? Is it the crunch or the cream?
The Magic of the Mint
That minty smell is so fresh. It reminds me of my grandma’s garden. She grew mint by her back door.
We would pick a leaf and chew it. Doesn’t that smell amazing? The mint in this dessert wakes up all the chocolate. Fun fact: The mint plant is part of the same family as basil and lavender!
Let’s Build It Together
First, bake your chocolate cake. Let it cool completely. This is important. A warm cake will make the pudding runny.
Now, make the mint filling. Whisk the pudding and milk. Add a few drops of mint flavor and a little green color. Then, fold in the Cool Whip. It becomes so fluffy and light.
The Best Part: Crushing Cookies
Put the Oreos in a bag. Grab a rolling pin. Now, crush them! It’s a great way to get out any grumpy feelings.
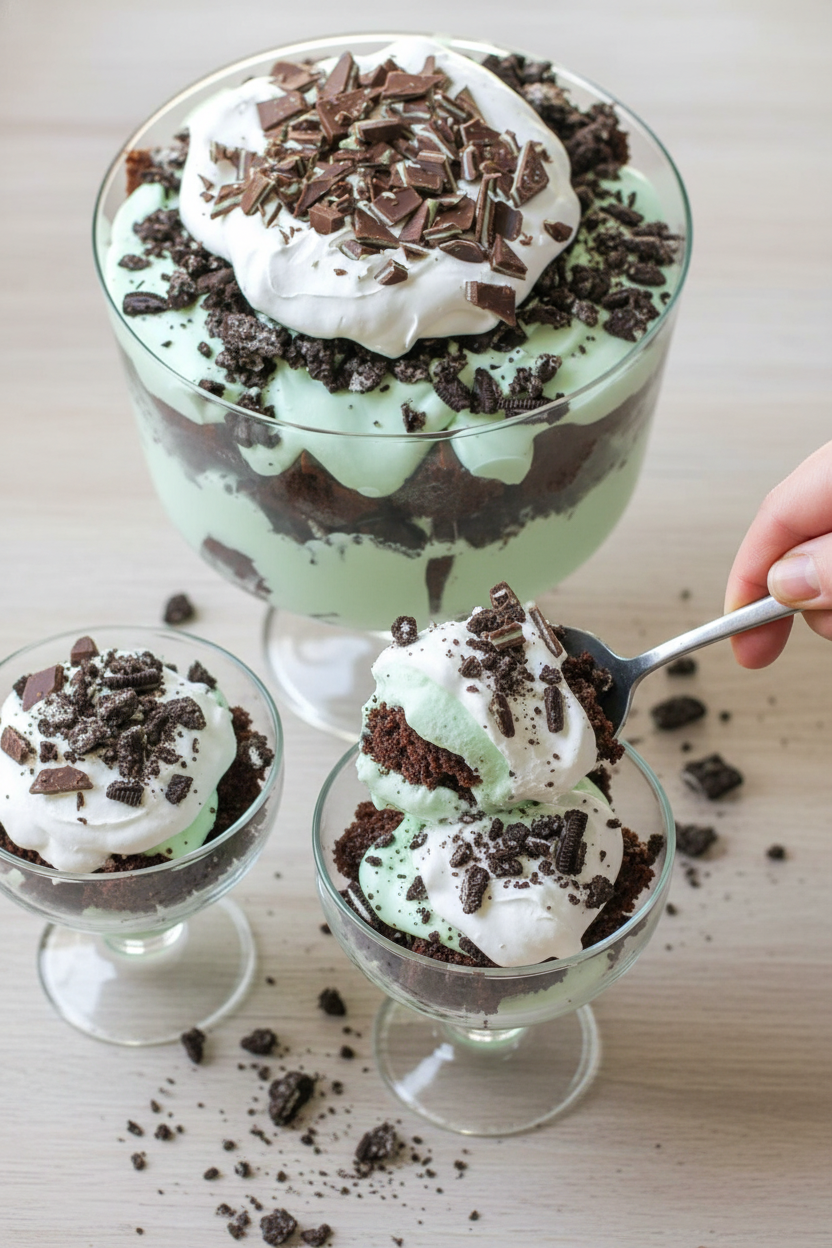
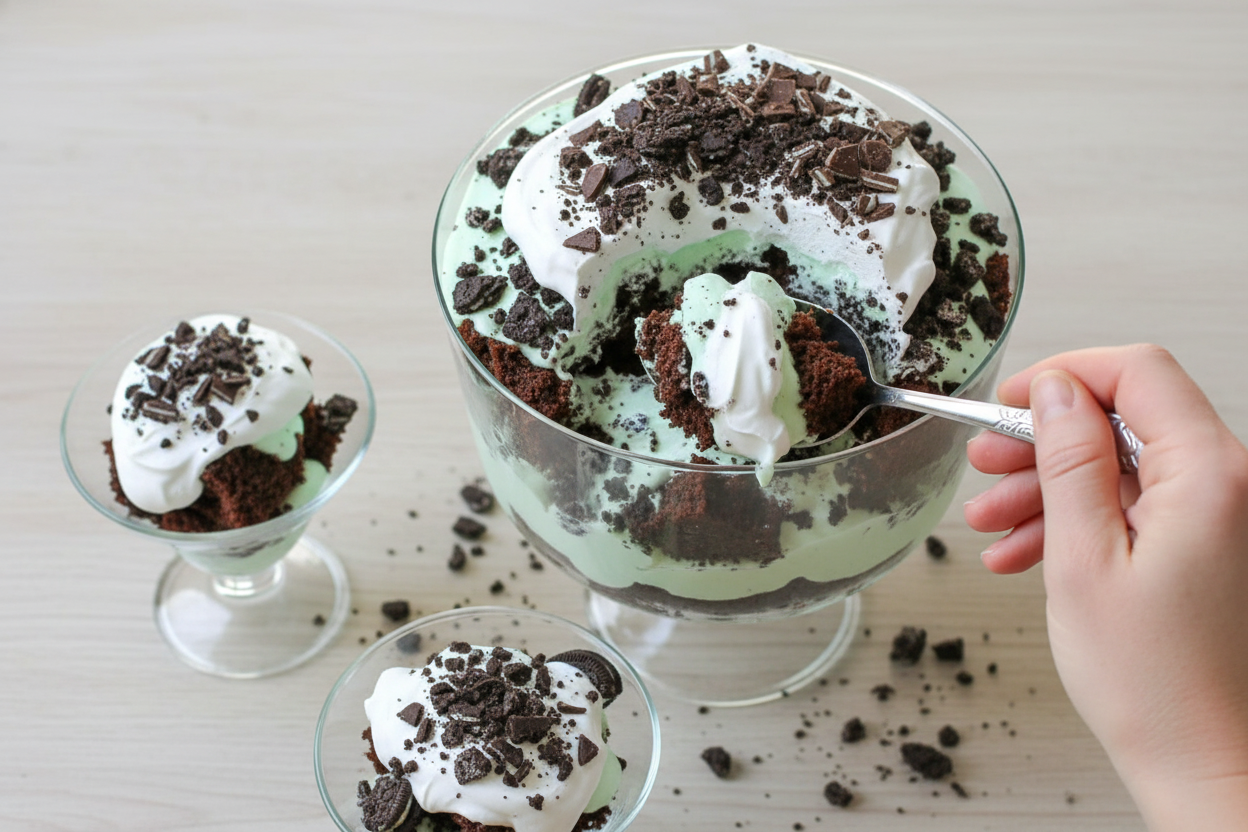
Listen to that crunch. Now, start layering in your bowl. Cake, mint cream, cookies. Then do it again. Top it with more cream and those chopped Andes mints. This step matters because you are the artist. Your trifle will be beautiful.
The Waiting Game
You must let it chill. I know, it’s hard to wait. But this is the secret. The flavors need to get to know each other.
After an hour or two, the cake soaks up the minty cream. It becomes so soft and wonderful. What’s the hardest dessert for you to wait for? Share your stories with me.
Ingredients:
| Ingredient | Amount | Notes |
|---|---|---|
| chocolate cake mix plus ingredients on back | 1 box | |
| vanilla pudding mix or white chocolate pudding mix | 6.6 oz | |
| milk | 3 cups | |
| creme de menthe syrup or candy flavoring | 2-3 drops | |
| food coloring | as needed | green recommended |
| cool whip | 1 small container | divided |
| oreos | 1 package | |
| andes mints | 15 | chopped |
My Magical Minty Trifle
Hello, my dear! Let’s make a dessert that feels like a party. This mint trifle is cool, creamy, and full of chocolate. It reminds me of the after-dinner mints my Abuela always had. Doesn’t that smell amazing? I love how the layers look in a big glass bowl. It’s like building a sweet, tasty tower. Everyone will want a scoop. I still laugh at the time my grandson tried to eat it straight from the fridge. His face was pure joy!
Here is how we build our tower of yum. Follow these simple steps. I promise it’s easy.
Step 1: First, bake your chocolate cake. Use the mix and follow the box. Let it cool completely in the pan. This part needs patience. A warm cake will make our layers soggy. Once cool, cut it into little squares. I use a butter knife for this.
Step 2: Now, make the magic mint filling. Whisk the pudding mix and milk together. Add a few drops of that mint syrup. I add a tiny drop of green food coloring, too. It makes it look like a minty cloud! Fold in most of the Cool Whip. (My hard-learned tip: save that one cup of Cool Whip for the very top!).
Step 3: Let’s crush some Oreos! Put them in a big bag. Use a rolling pin to smash them. My grandkids love to help with this part. It’s a great way to get out a little energy. You want big crumbs and little crumbs. Do you like the cookie creme filling, or just the chocolate wafers? Share below!
Step 4: Time to layer! Start with half the cake squares. Then spread half the mint filling. Sprinkle half the Oreo crumbs. Repeat all of that. You will have two beautiful layers. The top gets the saved Cool Whip and chopped Andes mints. Chill it for a few hours. This wait is the hardest part.
Cook Time: 30 minutes
Total Time: 3 hours 30 minutes (includes chilling)
Yield: 12 servings
Category: Dessert
Three Fun Twists to Try
This recipe is like a favorite story. You can tell it a little differently each time. Here are some fun ideas for your next trifle. They are all delicious in their own way.
Peppermint Patty: Use peppermint extract instead of creme de menthe. Add crushed candy canes on top for Christmas.
Cookies and Cream: Skip the mint flavor. Use chocolate pudding instead. Add extra crushed Oreos between every layer.
Fudgy Brownie: Use brownie bites instead of cake squares. The fudgy texture is so rich and wonderful.
Which one would you try first? Comment below!
Serving It Up Sweet
This trifle is a star on its own. But I love making a meal feel special. For serving, use a big glass bowl so everyone can see the layers. You can also use pretty individual cups. A little extra mint on the plate looks so fancy. It always makes people smile.
What to drink with it? A cold glass of milk is always perfect. For the grown-ups, a small cup of coffee with cream is nice. The bitter coffee tastes great with the sweet mint. Which would you choose tonight?
Keeping Your Mint Trifle Fresh and Tasty
This trifle is best kept in the fridge. Cover it tightly with plastic wrap. It will stay good for about three days.
You can freeze it for a month, too. Use a freezer-safe container. Thaw it overnight in your refrigerator before serving.
I once tried to freeze it in a pretty glass bowl. The glass cracked! Now I always use plastic for freezing. This matters because good storage saves your dessert and your dishes.
You can bake the cake a day early. Just store the squares in a bag. This makes assembly so fast when friends visit.
Have you ever tried storing it this way? Share below!
Simple Fixes for Common Trifle Troubles
Is your pudding too runny? Let it set in the fridge first. A firm pudding makes clean, pretty layers.
Crushing Oreos can be messy. Put them in a strong bag first. I use my rolling pin, just like for pie dough.
I remember when my cake was too warm. It made the layers soggy. Letting it cool completely is a key step.
Getting the layers right matters for flavor. You get a perfect bite every time. Fixing small problems builds your cooking confidence, too.
Which of these problems have you run into before?
Your Mint Trifle Questions, Answered
Q: Can I make this gluten-free? A: Yes! Use a gluten-free cake mix and gluten-free cookies.
Q: How far ahead can I make it? A: Assemble it the morning before your party. The flavors get even better.
Q: What can I use instead of creme de menthe syrup? A: A few drops of peppermint extract works great. Fun fact: Peppermint and spearmint are different plants!
Q: Can I make a smaller version? A: Absolutely. Just halve all the ingredients. Use a smaller dish.
Q: Any optional tips? A: Add a sprinkle of chocolate shavings on top. It looks so fancy.
Which tip will you try first?
Wrapping Up From My Kitchen to Yours
I hope you love making this minty treat. It always brings smiles to my table. Cooking is about sharing joy and sweet memories.
I would love to see your creation. Show me your beautiful layers. Have you tried this recipe? Tag us on Pinterest!
Happy cooking!
—Lena Morales.

Mint Trifle: Mint Trifle Recipe Easy Dessert Ideas
Description
A refreshing and easy layered dessert with chocolate cake, mint pudding, Oreos, and Andes mints. Perfect for any occasion.
Ingredients
Instructions
- Begin by making your chocolate cake according to instructions on back in a 9×13 pan. Once done, let cool completely and then cut into 1 – 1½ inch squares. Set aside.
- Make mint filling by whisking together pudding mix and milk in a large bowl. Once combined, add creme de menthe syrup/flavoring, food coloring and all but 1 cup of your cool whip. Mix well. Set aside.
- Add Oreos to a gallon bag and crush. I use a rolling pin to break them up.
- Begin layering your dessert by adding half your cake squares to the bottom. Then add half of your mint filling along with half of the crushed oreos.
- Add the rest of your cake squares, mint filling, and then Oreos.
- Top with the last of your cool whip and chopped Andes.
- Chill for at least 1-2 hours before serving.
Notes
- For best results, ensure the cake is completely cool before assembling to prevent the layers from becoming soggy.


Leave a Reply