My First Kitchen Disaster
I once tried to make these for my grandson’s birthday. I was so excited. I didn’t let the black ears set first. What a mess! Red and black melted together into a purple puddle. I still laugh at that.
It taught me a good lesson. Cooking is like a dance. You must follow the steps in order. This matters because patience makes the magic happen. Have you ever had a kitchen mess turn into a funny memory? Tell me about it!
Why We Make Food Fun
These aren’t just cookies. They are little bites of joy. Shaping food into characters makes everyone smile. It turns a simple snack into a celebration.
This matters, especially with kids. When food is fun, they want to help. They feel proud of what they made. That pride is the best ingredient of all. *Fun fact: The first Oreo was sold in 1912! That’s over 110 years of cookie fun.*
Let’s Get Our Hands Ready
First, lay out your Oreos. Melt the black candy for the ears. Use a spoon to add two little dots on top. Let them get completely hard. This is the most important step!
While you wait, get your white sprinkles ready. Put them in a small bowl. Doesn’t that red candy smell amazing when it melts? Now, dip the bottom of each cookie in the red. Place it on parchment paper. The red is Mickey’s famous pants.
The Magic of Tiny Details
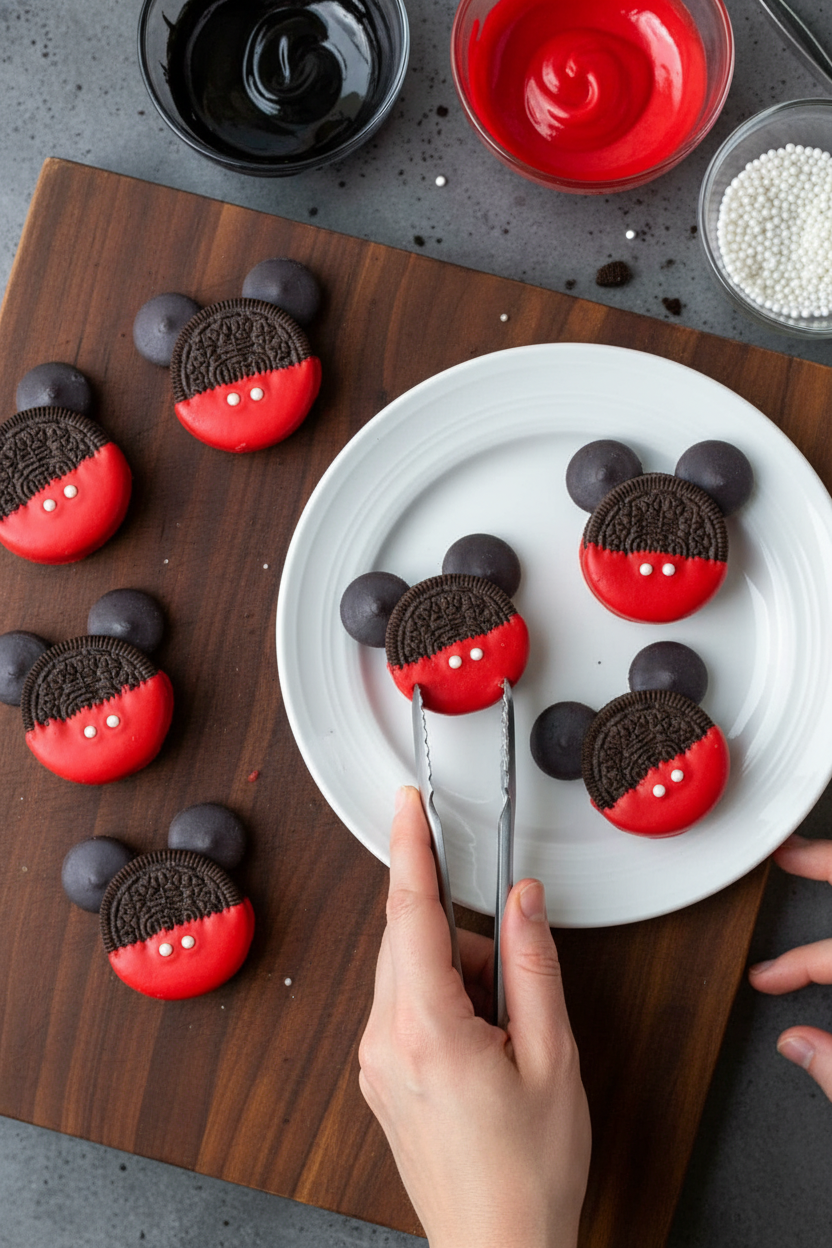
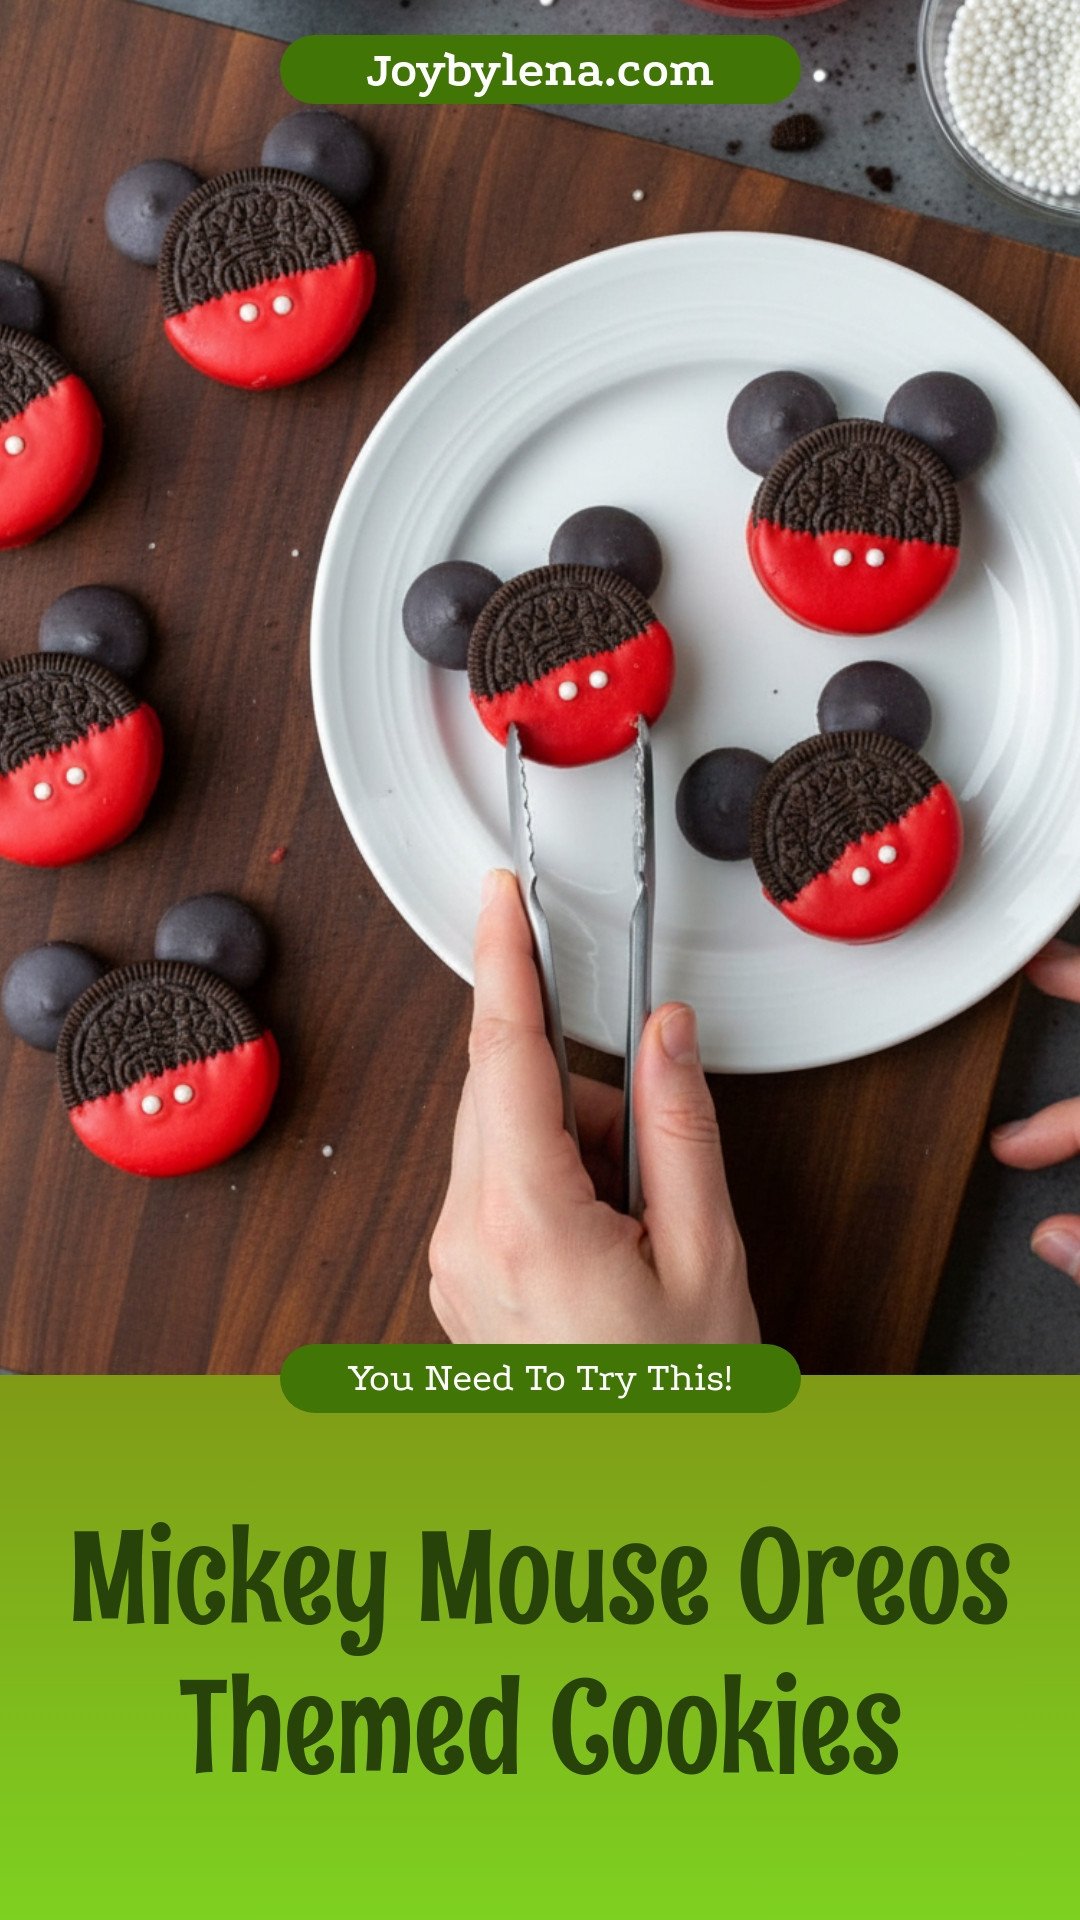
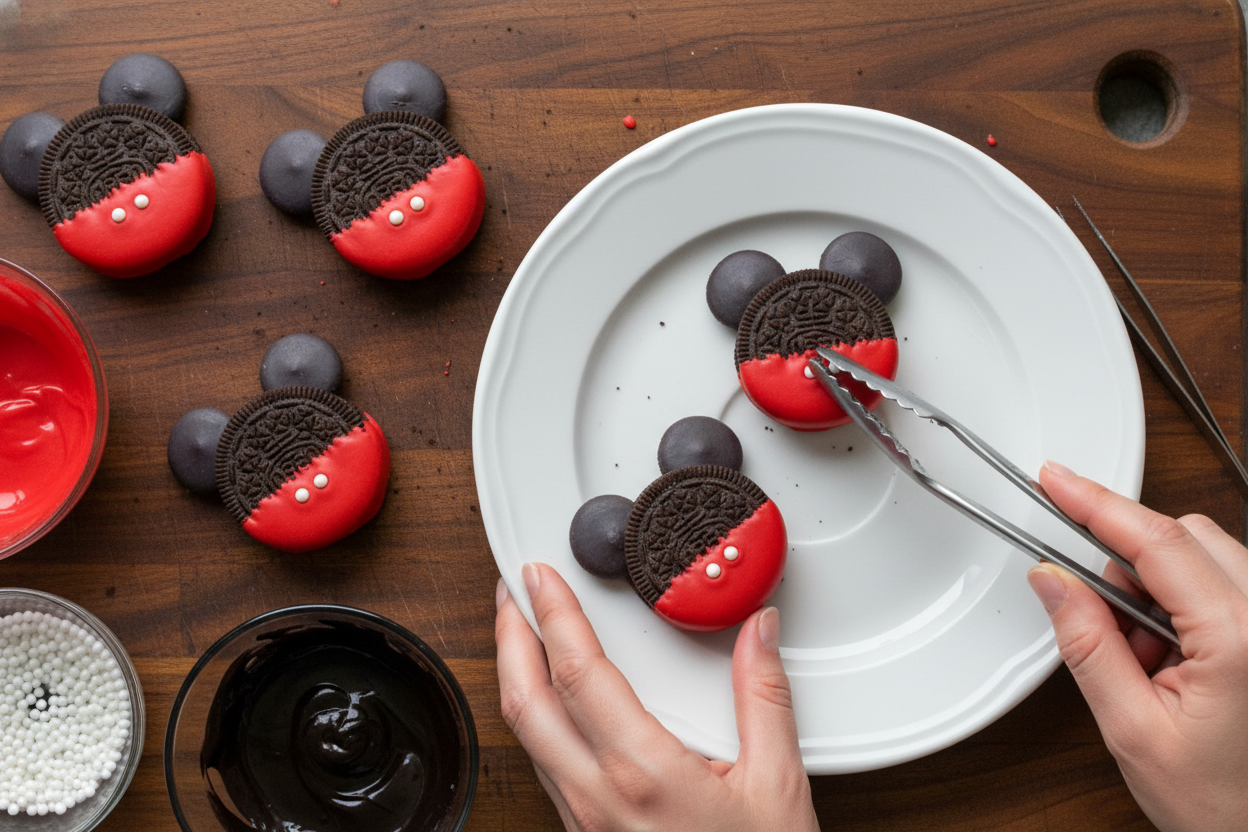
This next part needs a steady hand. Use your tweezers to pick up two white sprinkles. Place them on the black ears for buttons. It’s like giving Mickey his final touch.
This small detail makes all the difference. It shows you cared. Food made with care always tastes better. Do you think you’ll use tweezers or try it with your fingers? I’d love to know your method!
Sharing the Sweetness
Let your cookies set completely. Then, pile them on a big plate. Watch faces light up when you bring them out. The “oohs” and “aahs” are the best reward.
Making food for others is an act of love. It connects us. These silly cookies can start a happy conversation. What’s your favorite treat to make and share with friends? Mine will always be these happy little Oreos.
Ingredients:
| Ingredient | Amount | Notes |
|---|---|---|
| Oreos | 36 | |
| Candy Melts (Red Wilton) | 1/2 bag | |
| Candy Melts (Black Wilton) | 1/2 bag | |
| White Ball Sprinkles | 72 | |
| Tweezers | if needed | Optional tool for placing sprinkles |
Mickey Mouse Oreos: A Sweet Little Project
Hello, my dear! Come sit with me. Today we’re making magic with Oreos. We’ll turn them into Mickey Mouse. My grandson showed me this idea. I still laugh at that. He knows I love a simple, happy treat. Doesn’t that sound fun? Let’s make some memories together. Just follow these easy steps.
Step 1: First, get your black candy melts ready. Melt them just like the package says. Now, take an Oreo. Carefully add two little black dots on top for ears. This makes Mickey’s famous silhouette. Let them dry completely on some parchment paper. (My hard-learned tip: Let these ears dry fully before the next step. Or they might slide!)
Step 2: Next, pour your white ball sprinkles into a small bowl. Set them aside for later. Now, melt your red candy melts. Microwave them for 30 seconds, then stir. Repeat until it’s smooth and shiny. Doesn’t that color look cheerful? It reminds me of a big, happy balloon.
Step 3: Here’s the fun part. Carefully hold your Oreo by its edges. Dip just the bottom half into the red candy. Coat it nicely. Then place it back on the parchment paper. The red coat is Mickey’s famous shorts! Can you see him taking shape?
Step 4: Now for the buttons. Use tweezers or your very steadiest fingers. Pick up two white sprinkles. Place them on the red shorts. They are his pearly buttons! This part needs a little patience. But it’s worth it. What other character could we make with cookies? Share below!
Step 5: Let your cookies set completely. This takes about 15 minutes. The candy coating will get hard. Then you can share them! I love seeing faces light up. These are perfect for a movie night. Enjoy your delicious, happy creation.
Cook Time: 20 minutes
Total Time: 35 minutes
Yield: 36 cookies
Category: Dessert, Snack
Three Fun Twists to Try
Once you master Mickey, you can play! Try these fun ideas. Use different colors and sprinkles. Make them your own. Cooking is about joy, after all.
Minnie Mouse Magic: Use pink candy melts for her dress. Add little white polka dots with sprinkles.
Holiday Mickey: For Christmas, use green melts. Use red sprinkles for the buttons. So festive!
Sparkly Night Sky: Use blue melts. Before it dries, add tiny silver sprinkles. It looks like a starry night.
Which one would you try first? Comment below!
Serving Them Up with Style
These cookies are a party themselves. But you can make them extra special. Place them on a big red plate. It looks so classic. You could also stick a popsicle stick in the cream. Then stand them up in a cup. A cookie bouquet! Isn’t that clever?
For drinks, I have two ideas. A cold glass of milk is always perfect. For the grown-ups, a creamy chocolate stout pairs nicely. It’s like a dessert in a glass. Which would you choose tonight?
Keeping Your Mickey Mouse Oreos Perfect
These cookies are best enjoyed the day you make them. The candy coating stays nice and crisp. You can store leftovers in a single layer.
Use a container with a tight lid. Place parchment paper between layers if you stack them. They will keep for about three days.
I do not recommend freezing them. The coating can get sticky when it thaws. I learned this the hard way with some Valentine’s treats once!
You can make the whole batch ahead of a party. This saves you time on the big day. Planning ahead makes hosting so much more fun.
Have you ever tried storing it this way? Share below! Good storage keeps your treats fresh and delicious for your guests.
Easy Fixes for Cookie Troubles
First, candy melts can be too thick. If so, add a tiny bit of vegetable oil. Stir it in until the mixture is smooth like paint.
Second, the sprinkles might not stick. Your coating needs to be wet. I remember once my coating dried too fast. I had to work quicker next time!
Third, the ears might slide. Let the black ears set completely first. This gives them a strong base for the red dip.
Fixing small problems builds your kitchen confidence. You learn that mistakes are just lessons. It also makes the final treat look perfect.
Which of these problems have you run into before? Knowing the fix helps everything turn out great.
Your Quick Questions, Answered
Q: Can I make these gluten-free? A: Yes! Use gluten-free sandwich cookies. Check your candy melts are gluten-free too.
Q: Can I make them ahead? A: Absolutely. Make them the day before your party. Store them as I mentioned earlier.
Q: What if I don’t have tweezers? A: Use a toothpick or dry fingers. Just be patient and careful.
Q: Can I double the recipe? A: You can, but work in small batches. Melt only half the candy at a time.
Q: Any optional tips? A: Fun fact: The original Mickey Mouse cartoon was black and white, then red shorts! Try yellow melts for buttons.
Which tip will you try first? Little changes can make the recipe your own.
Share Your Kitchen Magic
I hope you have fun making these cute cookies. They always bring a smile. Cooking is about sharing joy with people you love.
I would love to see your creations. Did you use different colors? Your version might inspire another young cook.
Have you tried this recipe? Tag us on Pinterest! You can find me at @LenasCozyKitchen. I can’t wait to see your Mickey Mouse treats.
Happy cooking! —Lena Morales.
Mickey Mouse Oreos Themed Cookies
Description
Create these fun and festive Mickey Mouse Oreos, perfect for parties and Disney-themed events.
Ingredients
Instructions
- Begin by carefully adding black melts to the tops of the Oreos as ears. Set aside.
- Place white ball sprinkles in a bowl and set aside.
- Place red melts in a microwavable bowl for 30 seconds. Take out and stir and repeat until all melted.
- Carefully grab Oreos and dip bottoms in candy mix and then set aside on parchment paper.
- Using tweezers (or steady hands) add sprinkles to the Oreos. Let set and ENJOY!
Notes
- Nutrition per serving: Calories: 73kcal | Carbohydrates: 10g | Fat: 3g | Saturated Fat: 1g | Sodium: 58mg | Potassium: 25mg | Sugar: 7g | Calcium: 3mg | Iron: 1mg


Leave a Reply