The Best Mistakes in the Kitchen
My grandson, Miguel, tried to make these once. He used crunchy peanut butter. It was a happy accident. The little peanut bits gave a nice crunch. I still laugh at that.
Why does this matter? Cooking is not about being perfect. It is about making something with your own hands. Those little mistakes can become your family’s secret recipe. What is your favorite kitchen mistake that turned out great?
Why We Make Them at Home
Store-bought candies are fine. But homemade ones taste of love. You know every single thing that goes inside. That feels good.
You can use the peanut butter your family likes best. You control the sweetness. This is why it matters. Food is better when you make it with care. Doesn’t that smell amazing when the chocolate melts?
A Little Story of Peanut Butter & Chocolate
This combo is a classic for a reason. It is like a hug for your taste buds. The salty peanut butter and sweet chocolate just sing together.
Fun fact: A man named H.B. Reese made the first cup in the 1920s. He was a dairy farmer and candy maker. He just wanted to make a treat. I think he would love our homemade version. Do you prefer milk chocolate or dark chocolate for dipping?
Let’s Get Our Hands Sticky
First, melt your butter and peanut butter. Stir it until it is smooth. Then, mix in the powdered sugar and vanilla. Your arms might get a little tired. That is how you know it is working!
Freeze that mix for 15 minutes. Then roll it into little balls and flatten them. This part is fun and a little messy. Perfect for little helpers. Do you like to roll the balls or flatten them more?
The Magic Chocolate Coat
Melt your chocolate slowly. Stir it the whole time so it does not burn. Then, the fun part begins. You get to dress up your peanut butter patties.
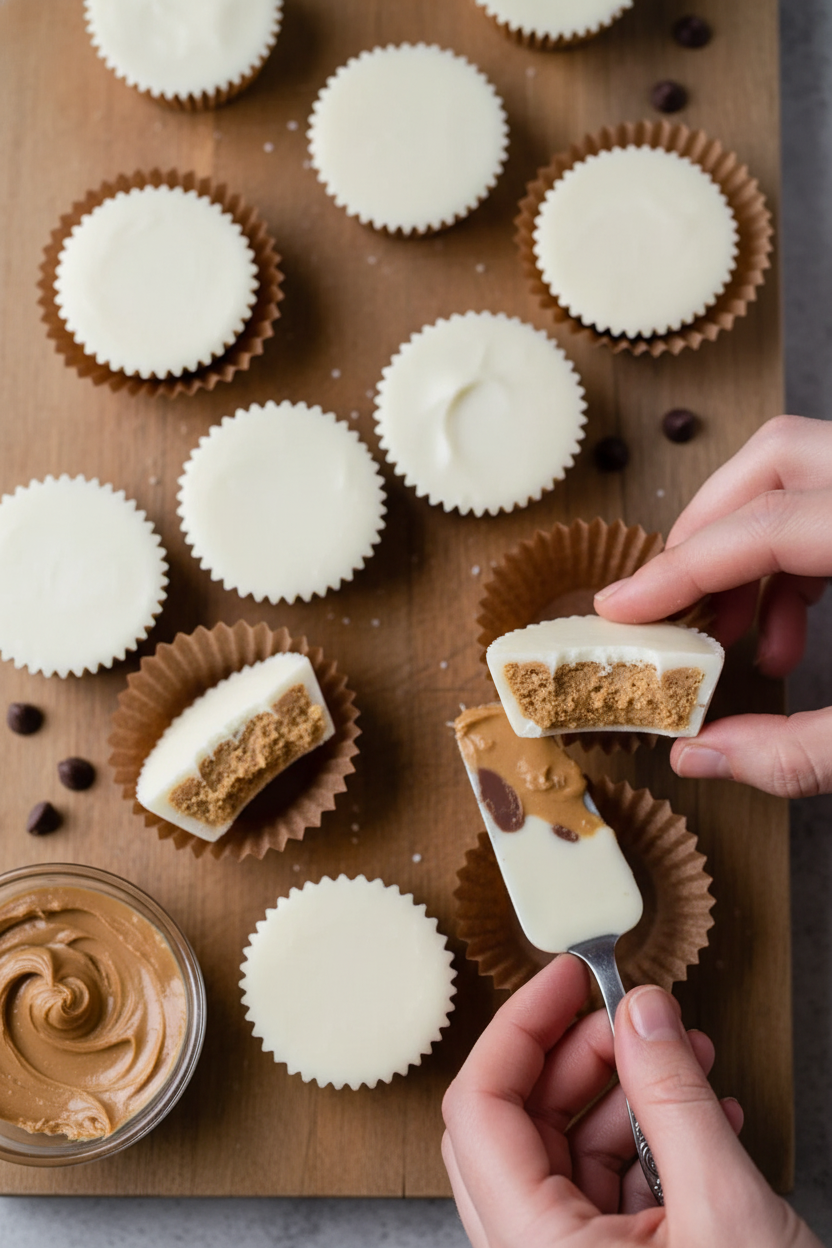
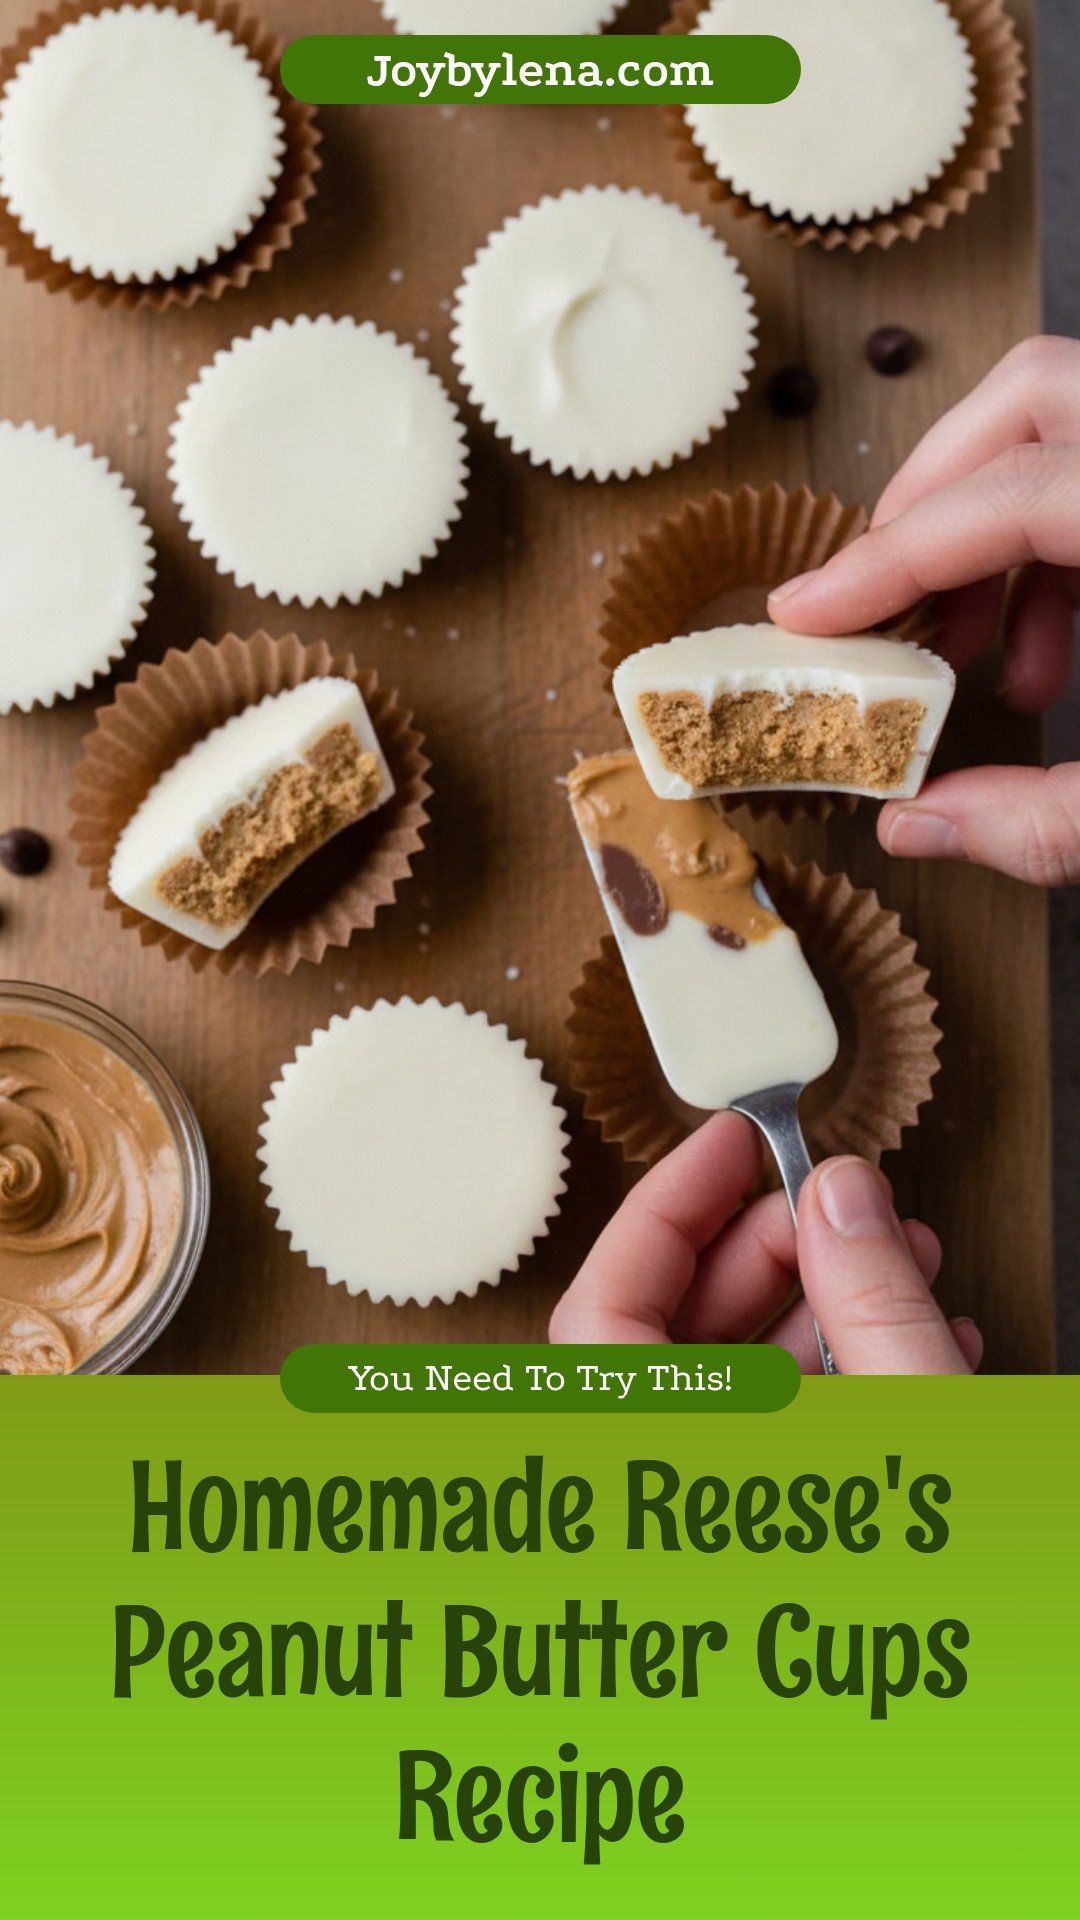
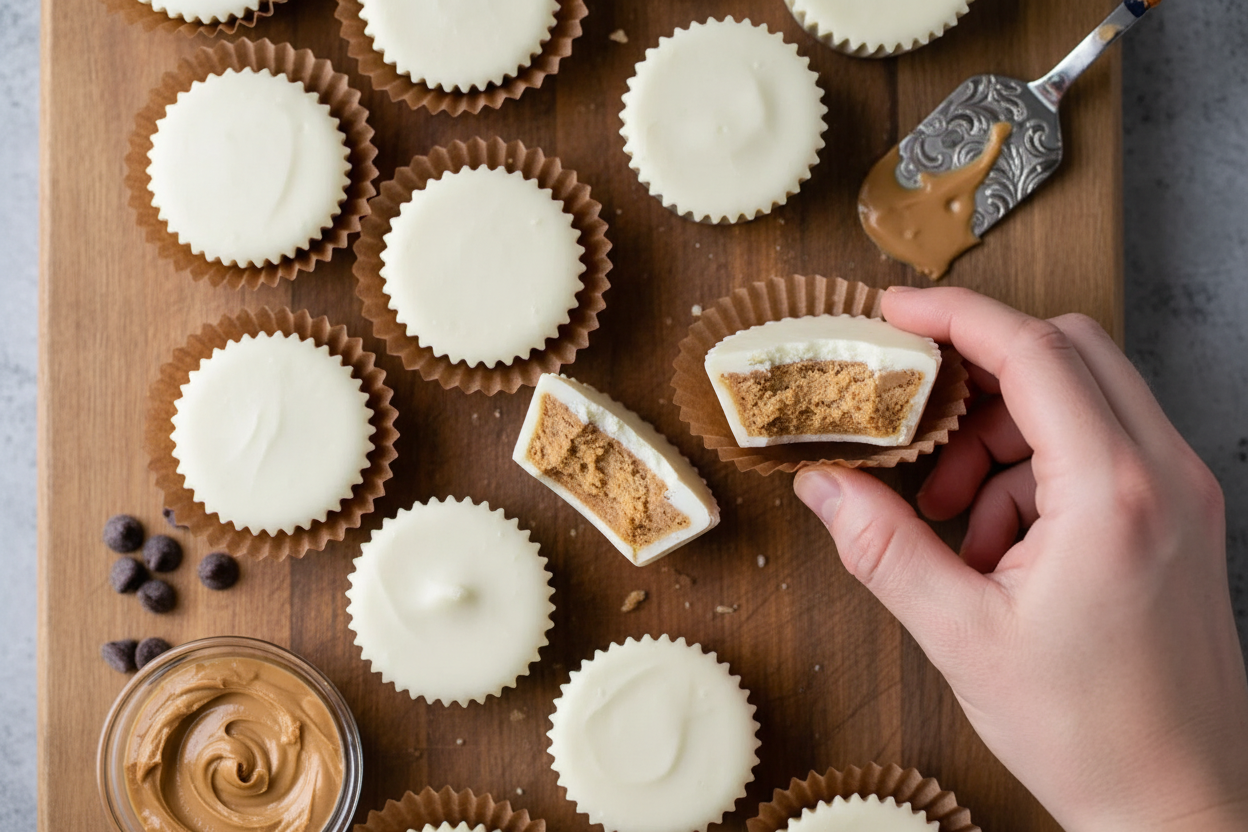
A little chocolate in the liner, add your patty, then more chocolate on top. The light bang on the counter settles everything. Then, the hard part. You must wait for them to set in the fridge. That wait is always the longest ten minutes. But it is so worth it.
Ingredients:
| Ingredient | Amount | Notes |
|---|---|---|
| Creamy peanut butter | 1 cup | |
| Butter | 1/4 cup | softened |
| Vanilla extract | 1 tsp | |
| Powdered sugar | 1 1/2 cups | |
| Chocolate chips or candy quick | 2 packages |
My Homemade Peanut Butter Cups
Hello, my dear! Come sit. Let’s make something sweet. Today we are making peanut butter cups. They are even better than the store-bought ones. I promise. My grandson Marco taught me this recipe. He was ten. I still laugh at that.
We get to make the filling first. It is like edible play-dough. Doesn’t that smell amazing? It is just peanut butter, butter, and sugar. The secret is a little vanilla. It makes everything taste like home. Here is how we do it, step-by-step.
Step 1: Put your peanut butter and soft butter in a bowl. Heat them for one minute. Stir them until they become one creamy friend. Be careful, the bowl might be warm. Let it cool for a minute. I always burn my tongue testing it.
Step 2: Now, stir in the powdered sugar and vanilla. It will get thick and hard to stir. That is perfect. Use your hands if you need to. (A hard-learned tip: mix the sugar in slowly, or you will have a sweet cloud all over your kitchen!). Then, put the bowl in the freezer. Wait fifteen minutes.
Step 3: Take the peanut butter mix out. Roll little balls, then flatten them into small discs. They do not need to be perfect. Set them on a plate. Quick question: do you like crunchy or creamy peanut butter? Share below!
Step 4: Melt your chocolate chips in a pot. Use very low heat. Stir it the whole time. Chocolate can burn if you look away. I learned that the hard way. Once it is smooth, spoon a little into a cupcake liner. This is the chocolate “pool” for our peanut butter.
Step 5: Place a peanut butter disc in each liner. Cover it with more melted chocolate. Gently tap the pan on the counter. This helps the chocolate settle. Then, into the fridge they go. In ten minutes, you have magic. The waiting is the hardest part.
Cook Time: 30 minutes
Total Time: 45 minutes
Yield: 36 peanut butter cups
Category: Dessert, Candy
Three Fun Twists to Try
Once you master the classic, try a twist. It is so much fun. Here are three ideas my family loves. They make the cups feel brand new.
Crunchy Time: Add crushed pretzel bits to the peanut butter filling. It gives a wonderful salty crunch.
Berry Surprise: Place one tiny, dried raspberry in the center of the peanut butter. It is a tart little secret.
Double Chocolate: Use white chocolate instead of regular for the coating. It looks pretty and tastes so creamy.
Which one would you try first? Comment below!
Serving Them Up Right
These treats are perfect all by themselves. But you can make them extra special. For a party, put them in colorful mini cupcake liners. Serve them on a big platter with some fresh orange slices. The citrus smell is lovely with chocolate.
What to drink? A cold glass of milk is the classic choice. It always is. For the grown-ups, a small glass of cream sherry is nice. It tastes like raisins and nuts. It sips slowly with the chocolate. Which would you choose tonight?
Keeping Your Peanut Butter Cups Perfect
These treats are best kept cool. Store them in the fridge for up to two weeks. You can also freeze them for three months.
Just layer them between wax paper in a sealed container. I once forgot a batch in the freezer for a month. They were still delicious and creamy when thawed.
Batch cooking saves so much time. Make a double batch of the peanut butter filling. Roll all the centers at once before freezing.
This matters because life gets busy. Having a sweet treat ready is a little gift to yourself. Have you ever tried storing it this way? Share below!
Easy Fixes for Common Troubles
Is your peanut butter mixture too sticky? Add a bit more powdered sugar. This helps it hold its shape. Your hands will stay cleaner too.
Is your chocolate seizing or getting lumpy? Heat it very slowly. I remember when I rushed this and made a grainy mess. Low heat and constant stirring are key.
Are the layers not sticking together? Lightly bang the tin on the counter. This settles the chocolate around the peanut butter. It makes a perfect seal.
Fixing small problems builds your kitchen confidence. It also makes your food taste and look its best. Which of these problems have you run into before?
Your Quick Questions, Answered
Q: Is this recipe gluten-free? A: Yes, if you use gluten-free chocolate chips. Always check your labels.
Q: Can I make these ahead? A: Absolutely! They are perfect for making days before a party.
Q: What can I swap for butter? A: For a dairy-free version, use coconut oil. The texture will be a little different.
Q: Can I make a smaller batch? A: Yes, just cut all the ingredients in half. It works perfectly.
Q: Any fun optional tips? A: Try a sprinkle of sea salt on top before the chocolate sets. Fun fact: A little salt makes sweet flavors taste even sweeter! Which tip will you try first?
From My Kitchen to Yours
I hope you love making these as much as I do. It is such a happy recipe. Seeing those homemade cups brings me joy.
I would love to see your creations. Sharing food stories connects us all. Have you tried this recipe? Tag us on Pinterest! You can find me at @LenasCozyKitchen.
Thank you for spending time in my kitchen today. Happy cooking!
—Lena Morales.
Homemade Reese’s Peanut Butter Cups Recipe
Description
Make your own classic candy at home with this easy recipe for creamy peanut butter cups covered in rich chocolate.
Ingredients
Instructions
- Melt butter and peanut butter in microwave for 1 minute. Stir until blended.
- Add powdered sugar and vanilla. Mix well, then freeze for 15 minutes.
- Grab a small ball of PB mixture, roll into a ball and then flatten. Set aside.
- Melt chocolate in a pot on low heat until smooth (stirring the entire time).
- Pour 1 – 2 tbsp of melted chocolate into a cupcake liner in a muffin tin. Add the rounded, flattened peanut butter and top with 1 – 2 more tbsp melted chocolate.
- Help flatten chocolate by lightly banging on counter. Refrigerate 10 minutes or until your chocolate has set.


Leave a Reply