My First Cheesecake Fiasco
Let me tell you about my first cheesecake. I was so nervous. I didn’t let the cream cheese get warm first. My poor mixer groaned. The batter was full of little lumps. I baked it anyway. It tasted good, but it looked like the moon! I still laugh at that.
Room temperature ingredients matter. They blend smoothly. This gives you that perfect, creamy bite. Cold cream cheese fights you. Trust me on this. It makes all the difference.
Why We Use a Water Bath
That foil and hot water step seems tricky. But it is a gentle hug for your cake. The steam keeps the oven moist. This stops the top from cracking. It helps the cake cook evenly, too.
Without it, the edges can get tough. The center might sink. We want it all smooth and dreamy. The water bath is our secret for perfection. Have you ever tried baking with a water bath before?
The Magic of Patience
The hardest part is waiting. You must let it cool slowly. Then it needs a whole night in the fridge. This waiting time is not just for setting. It lets all the flavors become friends.
If you slice it warm, it will be a mess. The texture needs time to firm up. I know it’s tempting. But good things come to those who wait. What’s the hardest recipe you’ve had to be patient for?
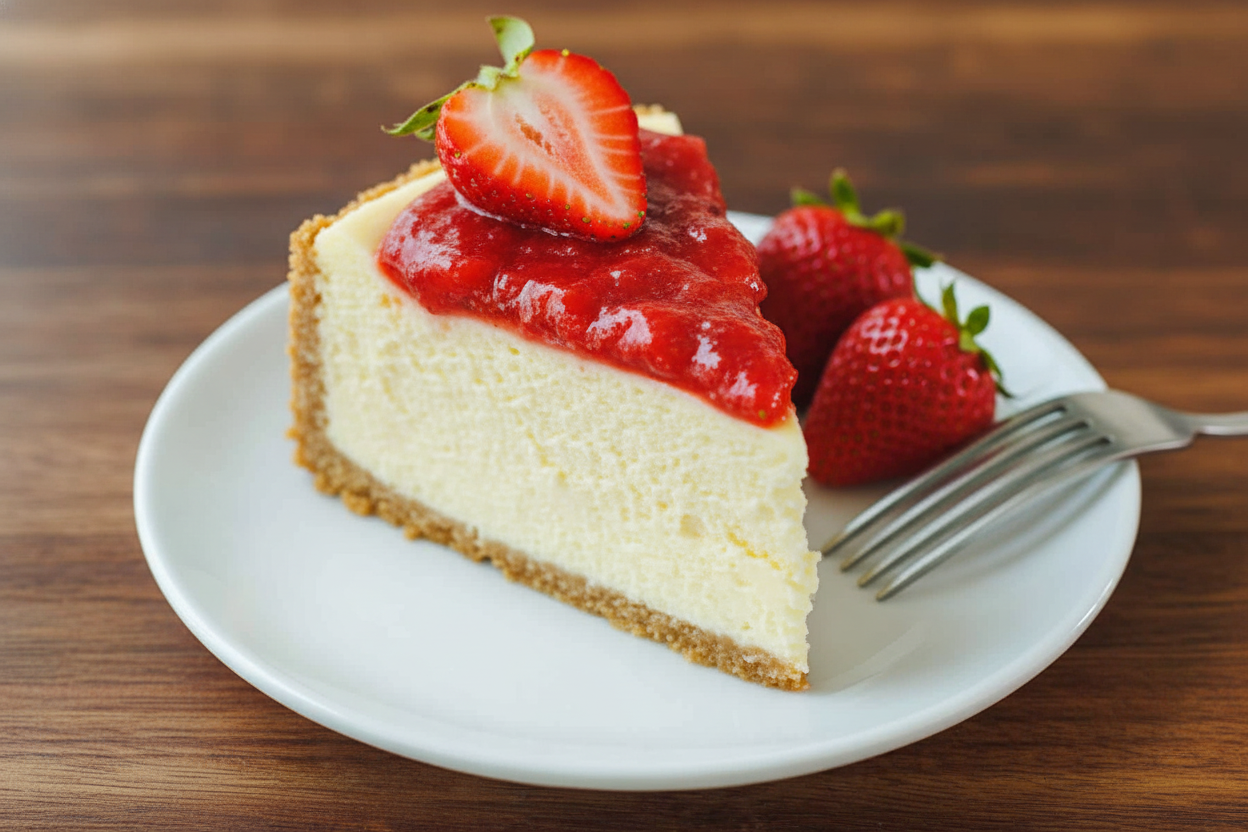
Sweet Strawberry Stories
The strawberry topping is my favorite part. Cooking them with a little sugar and lemon is magic. It makes a shiny, ruby-red sauce. Doesn’t that smell amazing? It tastes like summer in a spoon.
Fun fact: Strawberries are the only fruit with seeds on the outside! I love using some cooked and some fresh berries. The fresh ones give a juicy crunch. The sauce soaks in with sweet flavor. It’s the best of both worlds.
Making It Your Own
This recipe is a wonderful base. You can change the topping. Use blueberries or raspberries instead. You could even mix a little lemon zest into the filling. Make it your family’s special dessert.
Food is about love and memory. This cheesecake might become your tradition. That matters more than a perfect top. What fruit would your family love on top? Tell me your idea!
Ingredients:
| Ingredient | Amount | Notes |
|---|---|---|
| Graham cracker crumbs | 2 cups | from 15-16 whole crackers |
| Unsalted butter, melted | 8 Tbsp | |
| Granulated sugar (for crust) | 2 Tbsp | |
| Cream cheese, room temperature | 2 lb (4 packages) | 8-oz each |
| Granulated sugar (for cheesecake) | 1 cup | |
| Large eggs, room temperature | 5 | |
| Sour cream | 1/4 cup | |
| Vanilla extract | 1/2 Tbsp | |
| Strawberries, sliced | 1 lb | rinsed and hulled, plus 1/2 lb more to garnish |
| Granulated sugar (for topping) | 1/3 cup | or more to taste |
| Lemon juice | 1 Tbsp | from 1/2 lemon |
My Easy Strawberry Cheesecake, Just Like Abuela Made
Hello, my dear! Come sit. Let’s make a special cheesecake. It reminds me of summer afternoons with my own grandma. She always said good food takes patience. But this recipe is friendly, I promise. Doesn’t that smell amazing? We’ll go step-by-step together.
Step 1: First, make the crust. Crush your graham crackers until they look like sand. Mix them with the sugar and melted butter. Press it firmly into your pan. I use a cup to press it flat. Bake it for just 8 minutes. Let it cool completely. (A hard-learned tip: Let the crust cool! A warm crust makes a soggy bottom.)
Step 2: Now, the creamy filling. Your cream cheese must be soft. Beat it with sugar for a full 5 minutes. It should look like fluffy clouds. Add the eggs, one at a time. Mix slowly after each one. This keeps it smooth. Finally, mix in the sour cream and vanilla. I still laugh at the time I forgot the vanilla. What’s your favorite baking flavor? Share below!
Step 3: The secret is the water bath. Wrap your pan tightly in foil. Place it in a bigger pan. Pour hot water around it. This gentle heat is the magic. It cooks the cheesecake without cracks. Carefully put it in the hot oven. The first bake is short and hot.
Step 4: Now, we wait. Turn the oven way down. Let it bake slow and low for over an hour. The center should jiggle a little, like soft jelly. Then, let it rest in the warm water. This is the hardest part! You must let it cool completely. Then, it chills in the fridge overnight. Patience makes perfect slices.
Step 5: The next day, make the strawberry topping. Cook sliced berries with sugar and lemon juice. It will bubble and smell so sweet. Let it cook until it’s thick and shiny. Cool it down. When you serve, add fresh berries on top. Drizzle that gorgeous red sauce everywhere. Every bite is a happy memory.
Cook Time: About 1 hour 30 minutes, plus cooling
Total Time: Overnight
Yield: 12 slices
Category: Dessert, Cheesecake
Let’s Mix It Up! Fun Twists on the Classic
Once you know the basics, you can play! Here are three fun ideas. Try one next time. It makes baking your own adventure.
Blueberry-Lemon Swirl: Use blueberry jam instead of strawberries. Swirl it into the batter before baking. Add lemon zest to the filling. So bright and sunny!
Chocolate Cookie Crust: Swap graham crackers for chocolate wafer crumbs. Add a handful of mini chocolate chips to the filling. A chocolate lover’s dream.
Summer Peach Topping: In late summer, use ripe peaches. Cook them just like the strawberries. Add a pinch of cinnamon. It tastes like a hug.
Which one would you try first? Comment below!
Serving Your Beautiful Cheesecake
Presentation is part of the joy. For a pretty plate, add a dollop of whipped cream. A single mint leaf looks so elegant. You could even serve it with a shortbread cookie on the side. For drinks, I have two favorites. A glass of cold milk is always perfect. For the grown-ups, a little sweet Moscato wine pairs beautifully. The bubbles cut through the rich cream. Which would you choose tonight?

Keeping Your Cheesecake Happy
Let’s talk about keeping your beautiful cheesecake fresh. First, always chill it completely. Cover it tightly and it will last five days in the fridge. You can freeze slices for a sweet treat later. Wrap each slice in plastic, then foil. It keeps for two months this way.
Thaw a frozen slice overnight in your refrigerator. I never reheat my cheesecake. It is best served cold and creamy. My first cheesecake was a gift for my neighbor. I learned to wrap it well for the short walk over!
Batch cooking is a wonderful time-saver. You can make the crust and filling ahead. Store them separately in the fridge for one day. This matters because it makes a big project feel easy. You can enjoy the process without rushing. Have you ever tried storing it this way? Share below!
Cheesecake Troubles? Easy Fixes!
Even grandmas have kitchen troubles sometimes. First, a cracked top. This often happens from baking too hot or cooling too fast. The water bath helps prevent this. If it cracks, just cover it with yummy strawberry topping.
Second, a soggy crust. Always bake your crust first. Let it cool completely before adding the filling. I remember my first soggy crust. I was too excited and poured the filling in right away!
Third, a cheesecake that won’t set. Patience is the secret ingredient. It must chill overnight. This matters for perfect texture. Fixing small problems builds your cooking confidence. Which of these problems have you run into before?
Your Cheesecake Questions, Answered
Q: Can I make this gluten-free? A: Yes! Use gluten-free graham crackers for the crust. It works perfectly.
Q: How far ahead can I make it? A: Make the whole cheesecake two days before. The flavors get even better.
Q: What can I use instead of sour cream? A: Plain Greek yogurt is a great swap. It adds the same nice tang.
Q: Can I make a smaller one? A: You can halve the recipe. Use a 7-inch pan. Bake time may be less.
Q: Any optional tips? A: Add a little lemon zest to the filling. Fun fact: The acid in lemon makes the strawberry flavor pop! Which tip will you try first?
From My Kitchen to Yours
I hope you love making this special dessert. It is a recipe full of sweet memories for me. Sharing food is how we share love. I would be so thrilled to see your creation.
Please share a photo of your beautiful work. Let’s build a community of happy bakers together. Have you tried this recipe? Tag us on Pinterest! I can’t wait to see your kitchen magic.
Happy cooking!
—Lena Morales.

Easy Strawberry Cheesecake Recipe Video Tutorial
Description
A classic, creamy baked cheesecake with a graham cracker crust and a sweet homemade strawberry topping.
Ingredients
For the Crust:
For the Cheesecake:
For the Strawberry Topping:
Instructions
- Prep: Preheat the oven to 350˚F with a rack in the center of your oven. Line the bottom of a 9-inch springform pan with parchment for an easier release.
- In a medium bowl, combine graham crackers with sugar then stir in melted butter. Mix until moistened. Press crumbs into your prepared pan, going 3/4 of the way up the sides. Bake in the center of the oven at 350˚F for 8 minutes then cool to room temperature.
- Increase the oven to 450˚F. Place 2 sheets of extra-wide heavy-duty foil on the counter. Set the springform pan in the center and fold the foil up the sides of the pan ensuring there are no rips. Fan the foil out slightly at the tops to keep the rim clear for rising.
- In the bowl of a stand mixer fitted with a paddle attachment, beat cream cheese and 1 cup sugar on medium/high speed for 5 minutes until completely smooth, scraping down the bowl as needed.
- Reduce speed to medium and add eggs one at a time, letting them incorporate between each addition and scraping down the bowl as needed.
- Reduce speed to low and add sour cream and vanilla and mix just until incorporated. Pour batter over the cooled crust.
- How to Bake Cheesecake in a Water Bath: Boil a pot of water (boil more than you think you’ll need). Set your foil-wrapped cheesecake pan in a deep roasting pan. Pour hot water around the edges about halfway up the sides of the springform pan.
- Carefully transfer the cheesecake to the center rack of the oven and bake at 450˚F for 15 minutes then reduce heat to 225˚F and, without opening the door, bake an additional 65-75 minutes or until the center of the cheesecake wobbles slightly when you jolt the pan.
- Remove the cheesecake from the oven and let it rest in the roasting pan with water for 45 minutes then transfer the pan to a wire rack to cool completely. Cover and chill in the refrigerator overnight to fully set before slicing.
- How to Make Strawberry Topping: In a medium saucepan, combine chopped strawberries, lemon juice, and sugar. Set over medium heat and bring to a boil. Reduce the heat and continue simmering, stirring occasionally for 20-23 minutes, or until the sauce is thickened. Cool to room temperature then refrigerate until serving.
- When ready to serve the cheesecake, garnish the top with fresh halved or quartered strawberries. Serve slices of cheesecake generously drizzled with the strawberry sauce topping.
Notes
- For the best results, ensure all ingredients are at room temperature before mixing. The overnight chill is crucial for the perfect cheesecake texture.


Leave a Reply