My Little Salami Secret
I have a funny story about these salami cups. My grandson Leo calls them “meat bowls.” He made them for a school project once. He was so proud. I still laugh at that.
This recipe is my secret for last-minute guests. It looks fancy but is so simple. You just shape, bake, and fill. That’s it. Why does this matter? Because good food should bring joy, not stress.
How to Make Your Meat Bowls
First, heat your oven to 400. Then, take your big salami slices. Drape each one over a muffin cup. Gently press it down. It will make little folds like a pie crust.
Bake them for about 8 minutes. Watch them get crispy. They will hold their shape. Let them cool on a rack. Now, the fun part is the filling.
The Magic of the Filling
While the cups cool, make your filling. Toss the diced cheese and tomatoes together. Add the chopped peppers and olives. A little olive oil makes it shine.
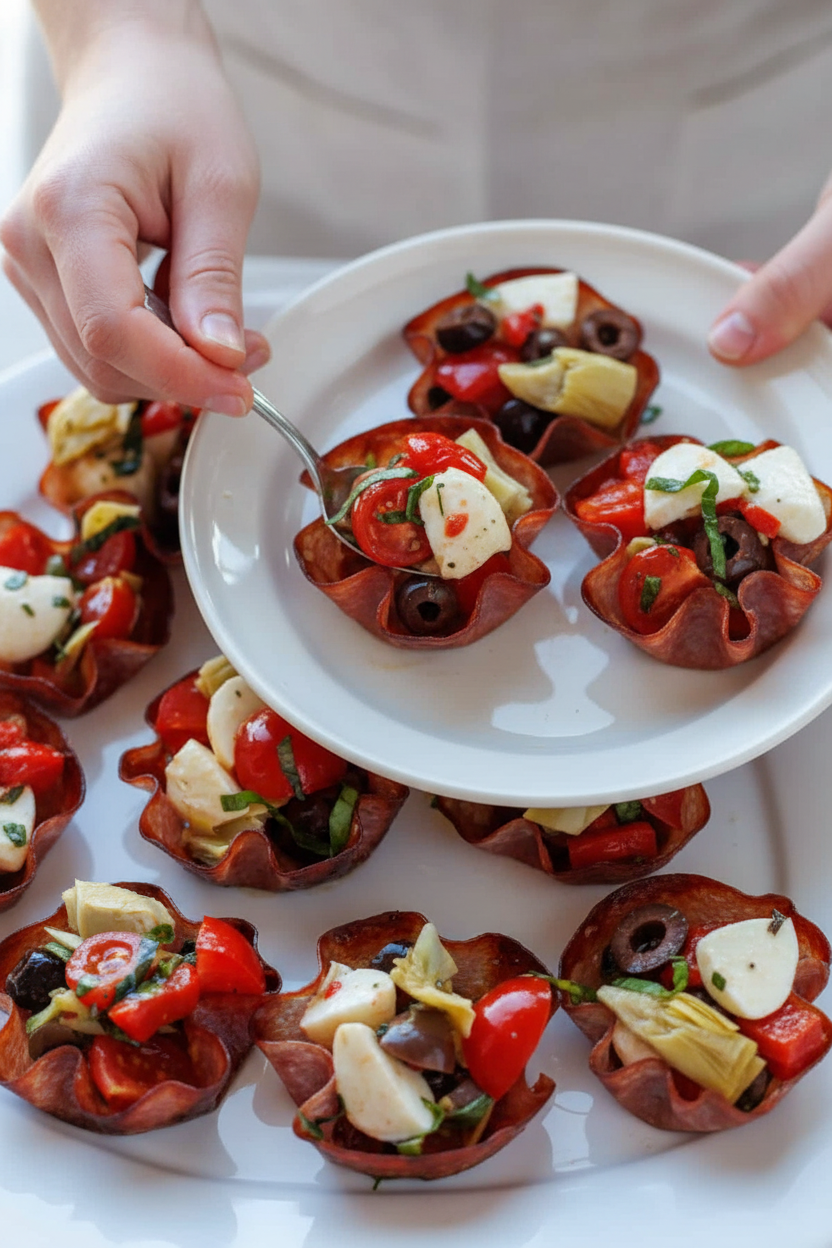
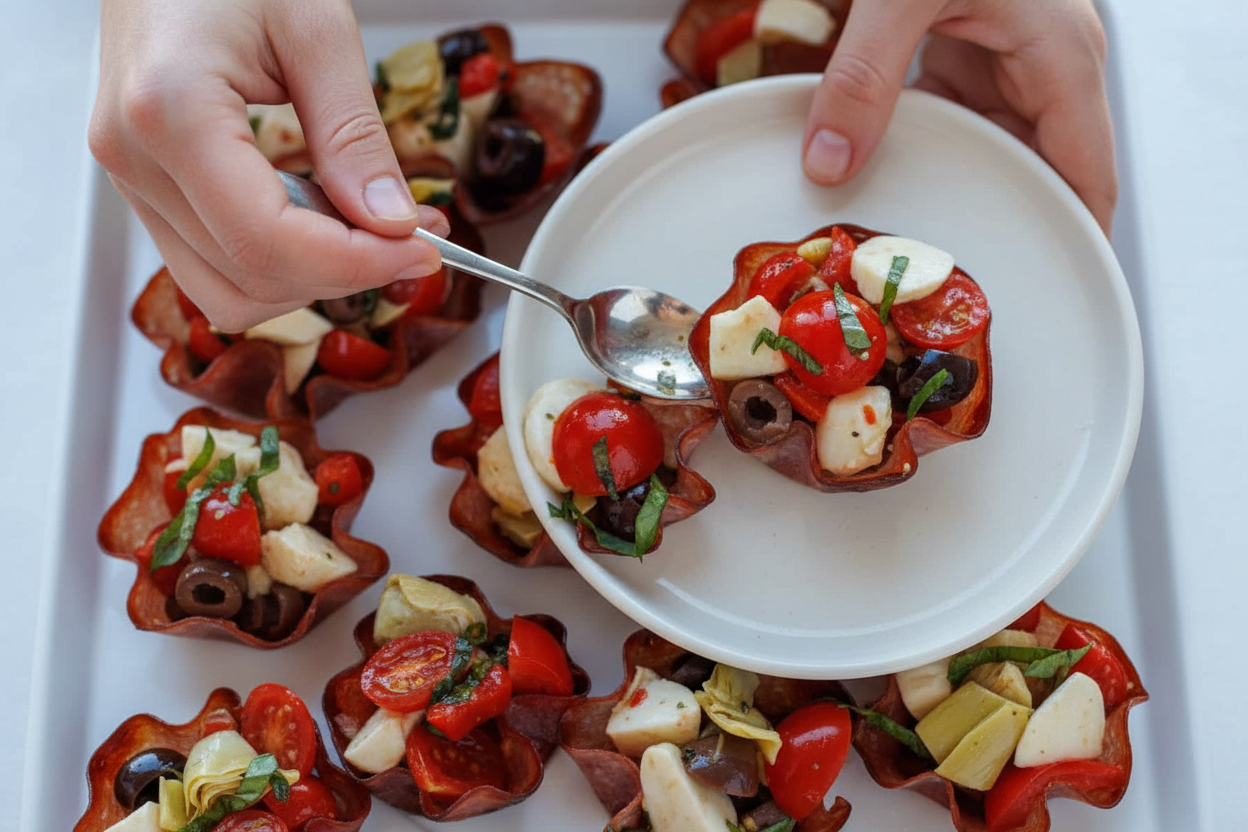
Fun fact: The salty salami and creamy mozzarella are best friends. They balance each other perfectly. Doesn’t that smell amazing? Now, spoon the mix into your crispy cups. Top with fresh basil.
Why This Recipe is a Keeper
This matters for two big reasons. First, you can change the filling with what you have. No artichokes? Use roasted mushrooms. Second, it teaches you how heat changes food. The salami goes from soft to a sturdy cup.
It’s a little science lesson in your oven. What’s your favorite “clean out the fridge” ingredient to add?
Let’s Talk Party Food!
These are perfect for game day or a birthday. You can make the cups ahead of time. Store them in a container. Fill them right before people arrive.
They are a hit every single time. Do you have a go-to appetizer for parties? I’d love to hear about it. Maybe I’ll try yours next!
Your Turn in the Kitchen
So, will you try these “meat bowls”? I promise they are easier than they look. The video shows you just how to press the salami into the pan.
Tell me, will you make the classic version first? Or will you get creative with your own filling mix? Share your plans with me. Cooking is always more fun when we share stories.
Ingredients:
| Ingredient | Amount | Notes |
|---|---|---|
| salami slices (large) | 24 slices | 4 inches in diameter, regular or spicy |
| fresh mozzarella cheese | 1/2 cup (4 oz) | diced |
| cherry tomatoes | 1/2 cup | quartered |
| marinated bell pepper | 1/3 cup | well drained and coarsely chopped |
| pitted kalamata olives | 1/4 cup | chopped, optional |
| extra virgin olive oil | 1 Tbsp | |
| fresh basil leaves | 1/4 cup | thinly sliced |
| marinated artichoke hearts | 1/3 cup | optional, well-drained, coarsely chopped |
Little Salami Baskets: A Party in Your Palm
Hello, my dear! Come sit. Let’s make something fun. These little salami cups are like tiny edible baskets. You fill them with bright, tasty things. I first made these for my grandson’s birthday. He said they looked like party hats for his fingers. I still laugh at that. They are perfect for a busy day. You just bake, fill, and enjoy. Doesn’t that smell amazing? The salty salami gets all crispy in the oven. It makes your whole kitchen feel warm and happy.
Now, let’s get our hands busy. Here is how we make our little flavor baskets. Follow these simple steps.
Step 1: First, turn your oven on to 400°F. Let it get nice and hot. Grab your muffin tin. We don’t need any oil or paper. Just lay one big slice of salami over each cup. Gently push it down to make a little bowl. It will get all wrinkly on the sides. That’s good! That’s what holds the shape.
Step 2: Slide the tin into the hot oven. Bake for about 7 to 9 minutes. Watch them carefully. You want the edges to get crispy. They should hold their shape when you touch them. (My hard-learned tip: Let them cool in the tin for 5 minutes first. Then move them to a rack. If you grab them too soon, they can tear!)
Step 3: While the cups cool, let’s make the filling. Chop your tomatoes, peppers, and olives if you’re using them. Toss them all in a bowl with the cheese. Add that lovely olive oil. Give it a gentle stir. I like to add the basil last. It keeps its pretty green color and fresh smell.
Step 4: Now for the best part! Spoon your colorful filling into each crispy salami cup. Be generous! The little cups are stronger than they look. Do you think spicy salami or regular salami would taste better here? Share below! Arrange them on a big plate. Maybe add one more basil leaf on top. They are ready to make everyone smile.
Cook Time: 7-9 minutes
Total Time: 25 minutes
Yield: 24 salami cups
Category: Appetizer, Snack
Three Fun Twists to Try
You can play with this recipe. It’s like a little kitchen game. Change the filling to match your mood. Here are three of my favorite ideas.
Breakfast Basket: Fill a cooled cup with scrambled eggs. Add a tiny piece of avocado on top.
Pizza Party: Use pepperoni instead of salami. Fill with pizza sauce and shredded mozzarella. Bake until the cheese melts.
Garden Fresh: Skip the meat. Press a large basil leaf into the muffin cup first. Then add a slice of zucchini to make the cup. Bake the same way.
Which one would you try first? Comment below!
Serving Your Little Masterpieces
These cups are stars all on their own. But you can make them extra special. Serve them on a big wooden board. Let people help themselves. Put a small bowl of marinara sauce in the middle for dipping. It’s so good. For a pretty plate, add some green lettuce leaves underneath. The red cups pop right off the green.
What should we drink? For the grown-ups, a chilled glass of Pinot Grigio wine is lovely. It’s light and crisp. For a fun treat for everyone, try sparkling lemonade with a sprig of mint. Which would you choose tonight? Just remember, the best part is sharing them with people you love.
Keeping Your Salami Cups Fresh and Tasty
These little cups are best eaten right away. But you can store them for a day. Just keep them in the fridge in a sealed container. I don’t recommend freezing them. The salami gets too chewy.
You can batch-cook the salami cups ahead of time. Bake them and let them cool completely. Store them separate from the filling. This keeps them crisp. Assemble them just before your guests arrive.
I once made a whole batch for a party. I assembled them the night before. They got soggy! Now I keep things separate. This matters because a little planning makes hosting easy. You get to enjoy your own party.
Have you ever tried storing it this way? Share below!
Simple Fixes for Common Salami Cup Troubles
First, if your salami cups are soggy, you baked them too little. They need crisp edges to hold shape. Bake them a minute or two longer next time.
Second, if the filling is too wet, drain your ingredients well. Pat those marinated peppers dry. I remember a very juicy batch once. The oil pooled in the bottom of the cups!
Third, if the cups tear, your salami might be too thin. Look for the large, 4-inch slices. Getting this right matters for your confidence. A sturdy cup feels like a win. It also matters for flavor. A crisp cup holds the juicy filling perfectly.
Which of these problems have you run into before?
Your Quick Salami Cup Questions, Answered
Q: Is this recipe gluten-free? A: Yes, it is naturally gluten-free. Just check your salami label to be sure.
Q: Can I make it ahead? A: Bake cups and chop filling ahead. Keep them apart in the fridge. Assemble right before serving.
Q: What are easy ingredient swaps? A: Use pepperoni instead of salami. Try feta instead of mozzarella. Use any chopped veggies you like.
Q: How do I double the recipe? A: Simply double all the ingredients. You will need two muffin tins, or bake in batches.
Q: Are the olives and artichokes needed? A: No, they are optional! The recipe is very flexible. Fun fact: The word “salami” comes from an Italian word for salt.
Which tip will you try first?
From My Kitchen to Yours
I hope you love making these fun salami cups. They remind me of happy times with my grandkids in the kitchen. Cooking should be simple and joyful.
I would love to see your creations. Share a photo of your finished snack plate. It makes my day to see your kitchen adventures.
Have you tried this recipe? Tag us on Pinterest!
Happy cooking!
—Lena Morales.
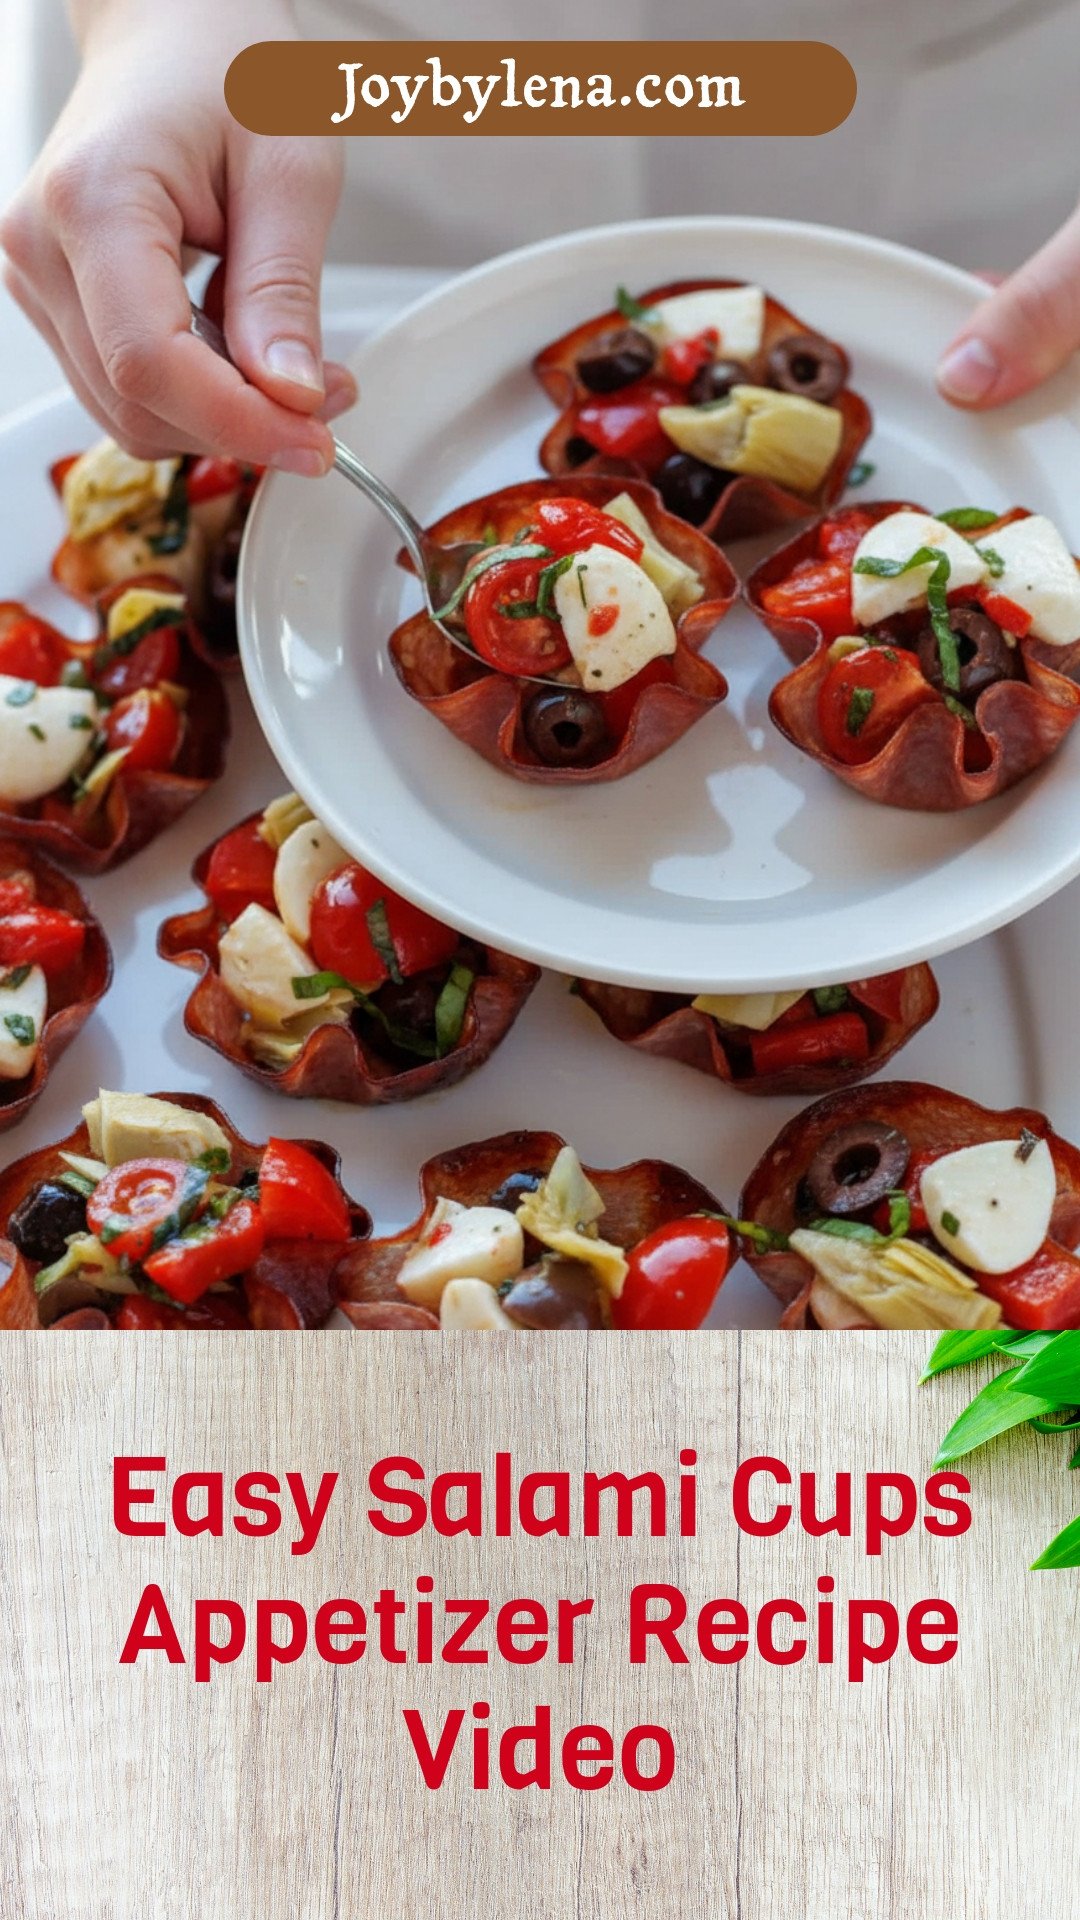
Easy Salami Cups Appetizer Recipe Video
Description
These easy salami cups are a perfect, savory appetizer. Crispy baked salami shells are filled with a fresh mozzarella, tomato, and marinated vegetable mixture.
Ingredients
Instructions
- Preheat your oven to 400°F.
- Lay one slice of salami over each cup of a standard muffin or cupcake tin. Push the salami into the cups creating little pleats on the sides.
- Bake for 7-9 minutes or until salami is crisp at the edges and holds its shape. Remove from the oven and let cool for 5 minutes and then transfer to a wire cooling rack to cool completely.
- In a mixing bowl, combine the filling ingredients and olive oil and gently toss to combine.
- Divide the filling between the cups. Garnish with fresh basil leaves if desired and serve.
Notes
- Nutrition Per Serving (1 salami cup): Calories: 55, Total Fat: 5g, Saturated Fat: 2g, Polyunsaturated Fat: 0.4g, Monounsaturated Fat: 2g, Cholesterol: 9mg, Sodium: 278mg, Potassium: 47mg, Total Carbohydrates: 1g, Dietary Fiber: 0.2g, Sugars: 0.1g, Protein: 3g, Vitamin A: 88IU, Vitamin C: 2mg, Calcium: 16mg, Iron: 0.2mg


Leave a Reply