My First Mint Disaster
Let me tell you about my first time making these mints. I was so excited. I didn’t let the cream cheese get soft enough. My poor mixer groaned and danced across the counter! I still laugh at that. The dough was full of lumps. It was a mess.
But you know what? We ate them anyway. My grandkids said they tasted great, even if they looked funny. This matters because cooking isn’t about being perfect. It’s about trying and sharing. So don’t worry if your first batch isn’t pretty. What was your first kitchen mess-up? I’d love to hear your story.
Why These Mints Feel Special
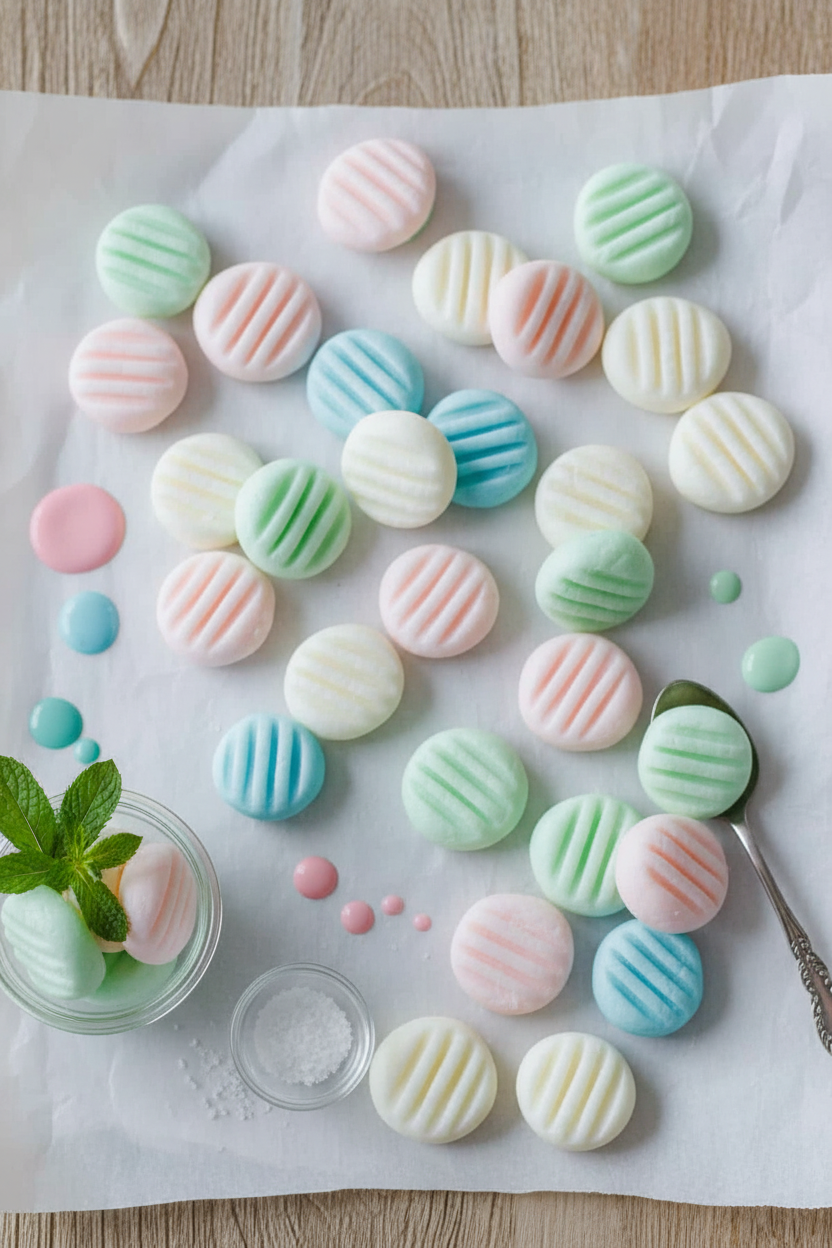
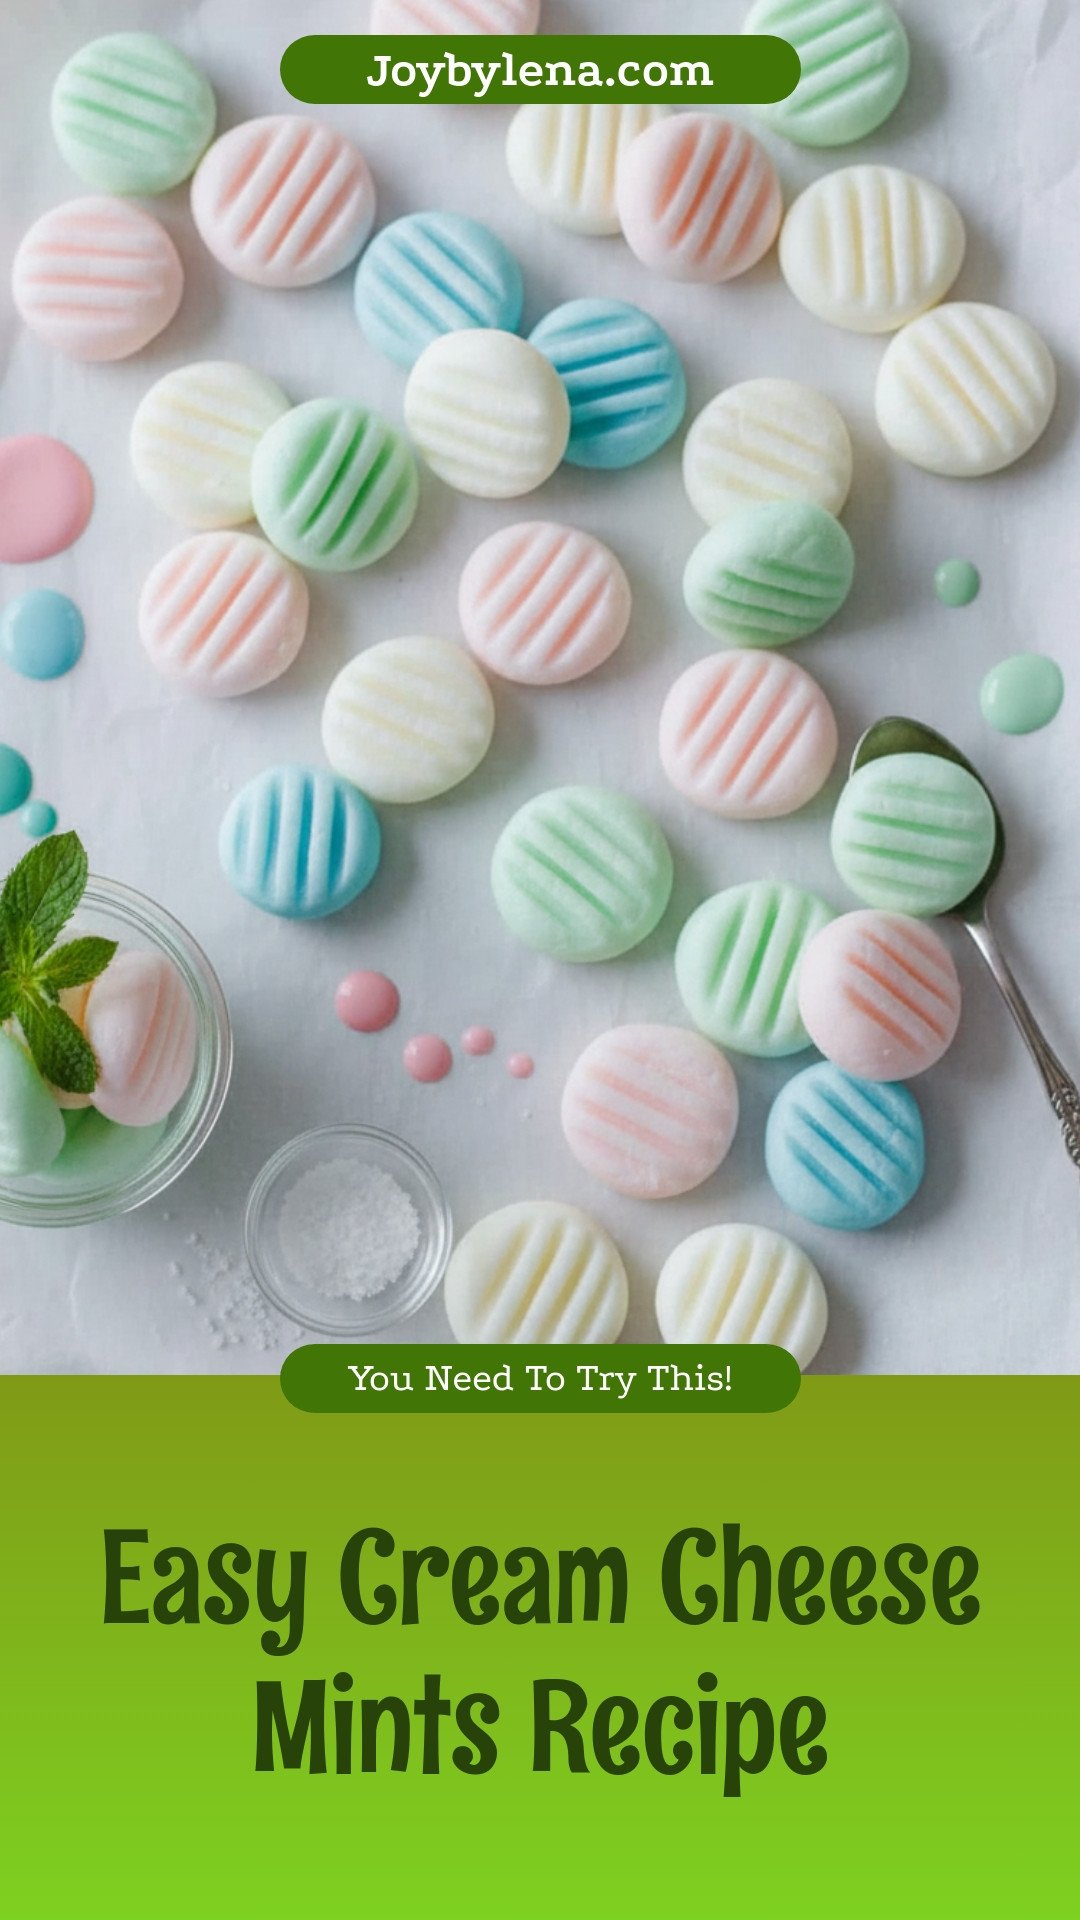
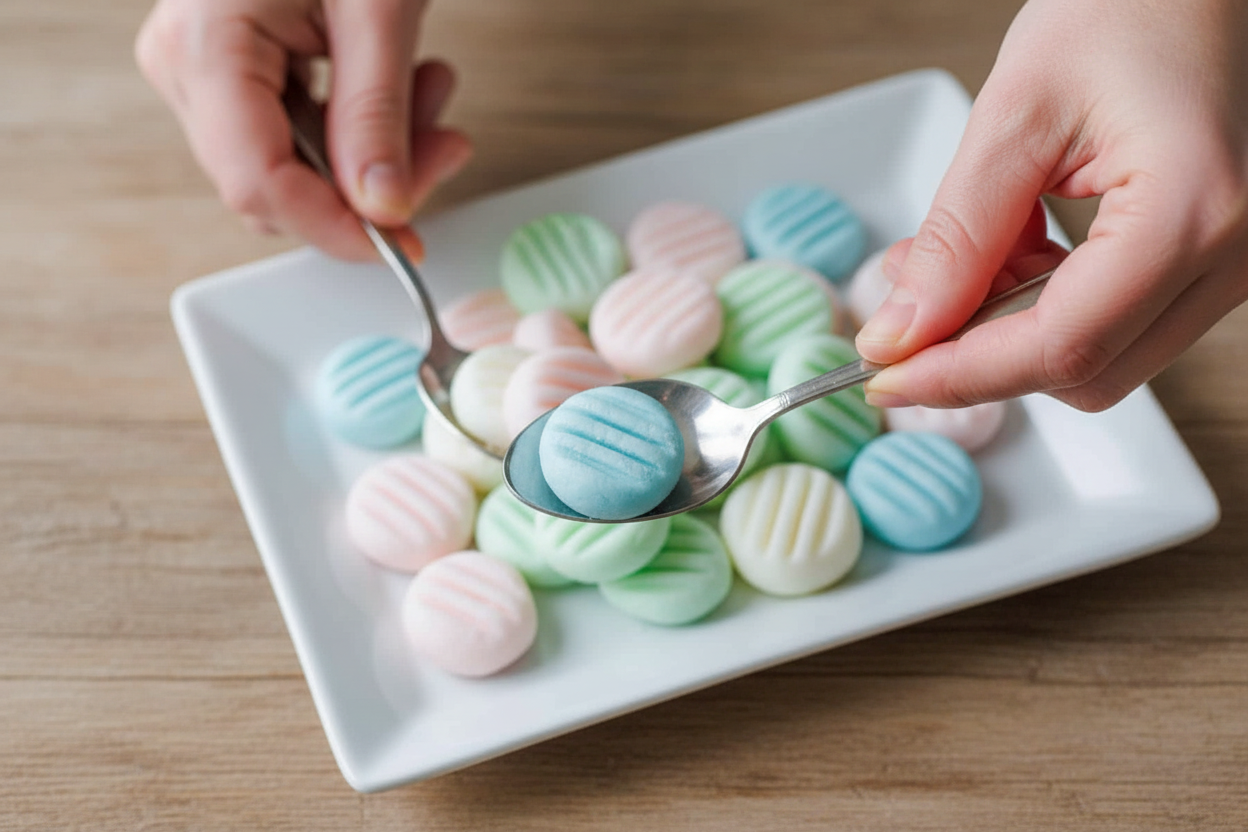
These aren’t just candies. They are little bites of care. You make them with your own hands. You choose the colors. You press them with a fork. That personal touch is everything. Doesn’t that smell amazing? The peppermint fills your whole kitchen.
Giving someone food you made yourself is a gift of time. It says, “I thought of you.” This matters more than a store-bought box. It creates a memory. Fun fact: The fork press isn’t just pretty. It helps the mint dry evenly so it doesn’t crack!
Getting Your Dough Just Right
Here is my best tip. Let that cream cheese and butter get really soft. Leave them on the counter for an hour. They should feel like thick pudding. This makes mixing so much easier. Your arms will thank you.
Add the sugar slowly, like the recipe says. It feels like it will never mix in. But be patient. It will come together into a soft, sweet dough. Keep the dough you aren’t using under a damp towel. This keeps it from drying out while you work.
The Fun Part: Colors & Shapes
This is where you can play. I love making a pastel rainbow for spring. Use just a tiny drop of gel color. You can always add more. What color would make you smile? Pink for a party? Green for St. Patrick’s Day?
You don’t have to use a fork to press them. Try the bottom of a glass. Or use a cute cookie stamp. Making them look special is half the fun. Do you prefer classic white mints or bright, colorful ones?
A Treat That Waits for You
The best part? These mints get better with a little wait. Let them sit out for a few hours. They form a gentle crust. The inside stays wonderfully soft. Then you can keep them in the fridge for weeks.
I always keep a container ready. You never know when you’ll need a sweet bite. Or when a neighbor stops by for coffee. Having something homemade to share is a wonderful feeling. It makes a house feel like a home.
Ingredients:
| Ingredient | Amount | Notes |
|---|---|---|
| Cream cheese | 8 oz | softened, full fat |
| Unsalted butter | 2 Tbsp | softened |
| Powdered sugar | 8 cups (about 2 lb) | plus more for pressing |
| Fine sea salt | 1/4 tsp | |
| Peppermint extract | 1 1/2 tsp | or to taste |
| Gel food coloring | optional |
My Creamy Dreamy Mints
Hello, sweetie! Let’s make some mints. These remind me of my wedding day. My Tía Rosa made hundreds for the party. I still laugh at that. Her kitchen was a snowy, minty wonderland. Now, I make them for holidays and happy Tuesdays. They are soft, sweet, and so simple. You just need a mixer and a little patience. Doesn’t that smell amazing? The peppermint makes the whole kitchen feel fresh.
Step 1:
Let your cream cheese and butter get soft. Leave them on the counter for an hour. This is the most important step. If they are cold, your dough will be lumpy. Trust your grandma on this one. I once tried to rush it. What a messy, lumpy disaster that was!
Step 2:
Beat the soft cheese and butter together. Use your mixer’s flat paddle. Mix until it looks like smooth, creamy clouds. Now add the salt and two cups of powdered sugar. Mix it on a slow speed. Otherwise, you’ll get a sugar storm all over your counter. (Hard-learned tip: put a kitchen towel over your mixer to catch the puff!)
Step 3:
Add the peppermint extract. I love that cool smell! Then, add the rest of the sugar. Do it one big spoonful at a time. Let each one mix in before adding more. This keeps everything smooth. Scrape the bowl’s sides with a spatula. Keep mixing for a few minutes. The dough will become stiff and lovely.
Step 4:
Want pretty colors? Split the dough into bowls. Add a tiny drop of gel color. Stir it in with a spoon. Start with less! You can always add more. Pastel colors are so pretty for spring. What color would make you smile? Pink, blue, or sunny yellow? Share below!
Step 5:
Time to roll! Take a small bit of dough. Roll it into a tiny ball, like a marble. Make sure it’s smooth with no cracks. Put the balls on a parchment paper sheet. Keep the dough you aren’t using covered. A damp cloth over the bowl works perfectly. This stops it from drying out.
Step 6:
Flatten your mints. Dip a fork into powdered sugar. Gently press it onto each ball. It makes a cute little pattern. It also keeps the fork from sticking. Repeat until all your dough is used. Let them sit out for two hours. This lets them dry just a little. Then, you can store them in the fridge. They keep for weeks!
Cook Time: 2–3 hours (mostly resting)
Total Time: 3 hours
Yield: About 100 mints
Category: Dessert, Candy
Three Sweet Twists to Try
These mints are like a blank canvas. You can dress them up for any party. Here are my favorite ideas. They are all so easy and fun.
Fruit Swirl:
Use strawberry or orange extract instead of peppermint. A drop of pink or orange coloring makes them look like little fruits.
Chocolate Dip:
Let your plain mints dry. Then, dip just half of each one into melted chocolate. Let it harden. Oh, it’s so good.
Confetti Party:
Mix in some rainbow sprinkles with the dough. Roll and press as normal. It’s instant confetti inside every mint!
Which one would you try first? Comment below!
Serving with a Smile
These mints are perfect little treats all by themselves. But I love to make things special. Put them in a pretty glass bowl by the door. Guests can grab one as they leave. You can also scatter them on a dessert table. They look lovely next to a chocolate cake. For a party, place each mint in a tiny paper cup. It feels so fancy and thoughtful.
What to drink? For a grown-up party, a glass of cold champagne is nice. The bubbles and mint are a happy pair. For everyone, I love a big pot of herbal tea. Peppermint tea is perfect, of course. Or a cup of hot cocoa. The mint makes the chocolate taste even richer. Which would you choose tonight?
Keeping Your Mints Fresh and Ready
These mints last a long time. Let them dry for two hours first. Then, pop them in the fridge for a month. You can also freeze them for six months. I always make a double batch. It saves so much time later.
I remember my first batch. I left them out uncovered. They got hard and dusty! Now I use an airtight container. It keeps them soft and perfect. Storing food well means less waste. It also means a sweet treat is always ready for guests.
Have you ever tried storing it this way? Share below!
Simple Fixes for Common Mint-Making Troubles
Is your dough too sticky? Add a bit more powdered sugar. Is it too dry and cracking? Mix in a tiny drop of milk. I once added the extract too fast. The smell was so strong it made me sneeze!
Why does this matter? Fixing small problems builds your kitchen confidence. Getting the texture right also makes the mints melt in your mouth. Fun fact: Pressing with a sugared fork gives them that classic, pretty look.
Are your colors not mixing in well? Use gel food coloring, not liquid. Liquid can make the dough wet. Which of these problems have you run into before?
Your Quick Mint Questions Answered
Q: Are these mints gluten-free?
A: Yes! Powdered sugar and cream cheese are naturally gluten-free.
Q: Can I make them ahead?
A: Absolutely. They are perfect for making days before a party.
Q: What can I use instead of peppermint?
A: Try a little almond or vanilla extract for a different flavor.
Q: Can I halve the recipe?
A: You can. Just use half of each ingredient.
Q: Any optional tips?
A: Roll some in colored sugar for extra sparkle. Which tip will you try first?
From My Kitchen to Yours
I hope you love making these sweet little mints. They always remind me of family celebrations. I would be so happy to see your creations. Sharing food stories connects us all.
Have you tried this recipe? Tag us on Pinterest! Use @LenasCozyKitchen so I can find your photos. Thank you for cooking with me today.
Happy cooking!
—Lena Morales.
Easy Cream Cheese Mints Recipe
Description
These classic, melt-in-your-mouth cream cheese mints are easy to make with just a few ingredients. Perfect for parties, holidays, or as a sweet treat.
Ingredients
Instructions
- In the bowl of a stand mixer fitted with your paddle or flat beater attachment, beat together cream cheese and butter until smooth.
- With the mixer on, add salt then add 2 cups powdered sugar and beat on medium/low speed until incorporated. Add peppermint extract and the remaining powdered sugar a heaping Tablespoon at a time, letting it incorporate between each addition and continue mixing until well blended then mix for a couple minutes longer, scraping down the bowl as needed.
- If you are coloring the mints, divide the dough into separate bowls for each color. Stir in gel color to reach desired color. Start with 1 drop or less if a light pastel color is preferred.
- Working with 1/4 of the dough at a time, roll the mints into balls (about 1 teaspoon or small cookie scoop each) and set them on a parchment-lined baking sheet. When rolling the dough, roll until the seams disappear so the dough is less likely to crack. Set balls on the prepared baking sheet 2 inches apart.
- Keep the remaining dough covered as you roll so it doesn’t dry out. Once the first batch of dough is rolled, dip a fork in powdered sugar which prevents sticking and press over the top of the mints to flatten them. Repeat rolling and pressing the remaining batches of mints.
- Let dry and rest at room temperature for at least 2 hours then transfer to an airtight container and refrigerate for up to a month or freeze for up to 6 months.
Notes
- Nutrition Per Serving (1 mint): Calories: 50, Total Fat: 1g, Saturated Fat: 1g, Trans Fat: 0.01g, Polyunsaturated Fat: 0.04g, Monounsaturated Fat: 0.3g, Cholesterol: 3mg, Sodium: 14mg, Potassium: 4mg, Total Carbohydrates: 10g, Sugar: 10g, Protein: 0.1g, Vitamin A: 39IU, Calcium: 2mg, Iron: 0.01mg.


Leave a Reply