My Kitchen Mistake
I once tried to make a fancy dessert. It was a big mess. I was so sad.
Then I remembered my dates and peanut butter. I made these bars instead. My grandkids loved them more than the fancy dessert! I still laugh at that. It taught me a good lesson. Simple food made with love is the best food.
Why These Bars Matter
These bars are not just sweet. They are real food. Dates are like nature’s candy. They give you good energy.
Peanut butter has protein. It helps you feel full. This matters because a good treat should make you feel good, not just taste good. What is your favorite “feel good” snack? Tell me in the comments.
Let’s Make Them Together
First, get your dates. Squish them together on a pan. It’s like playing with edible clay! Doesn’t that smell amazing already?
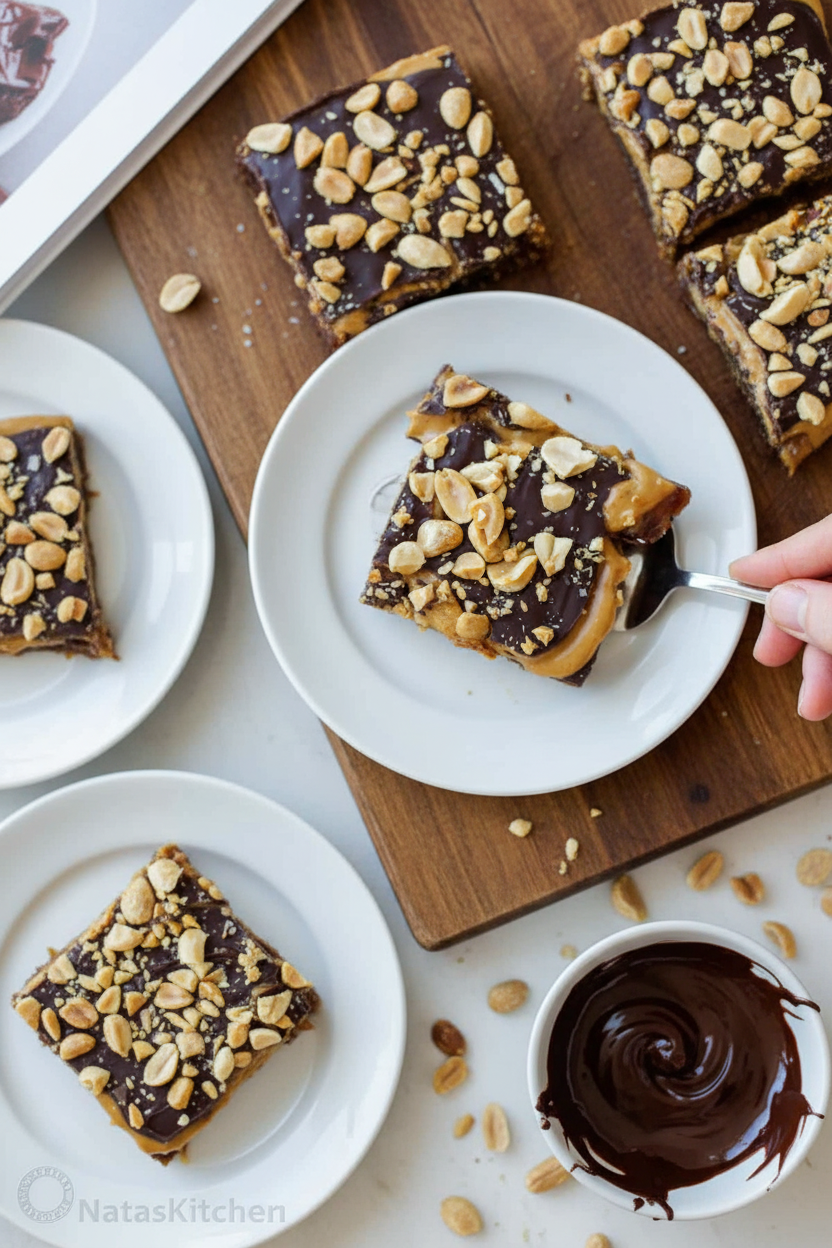
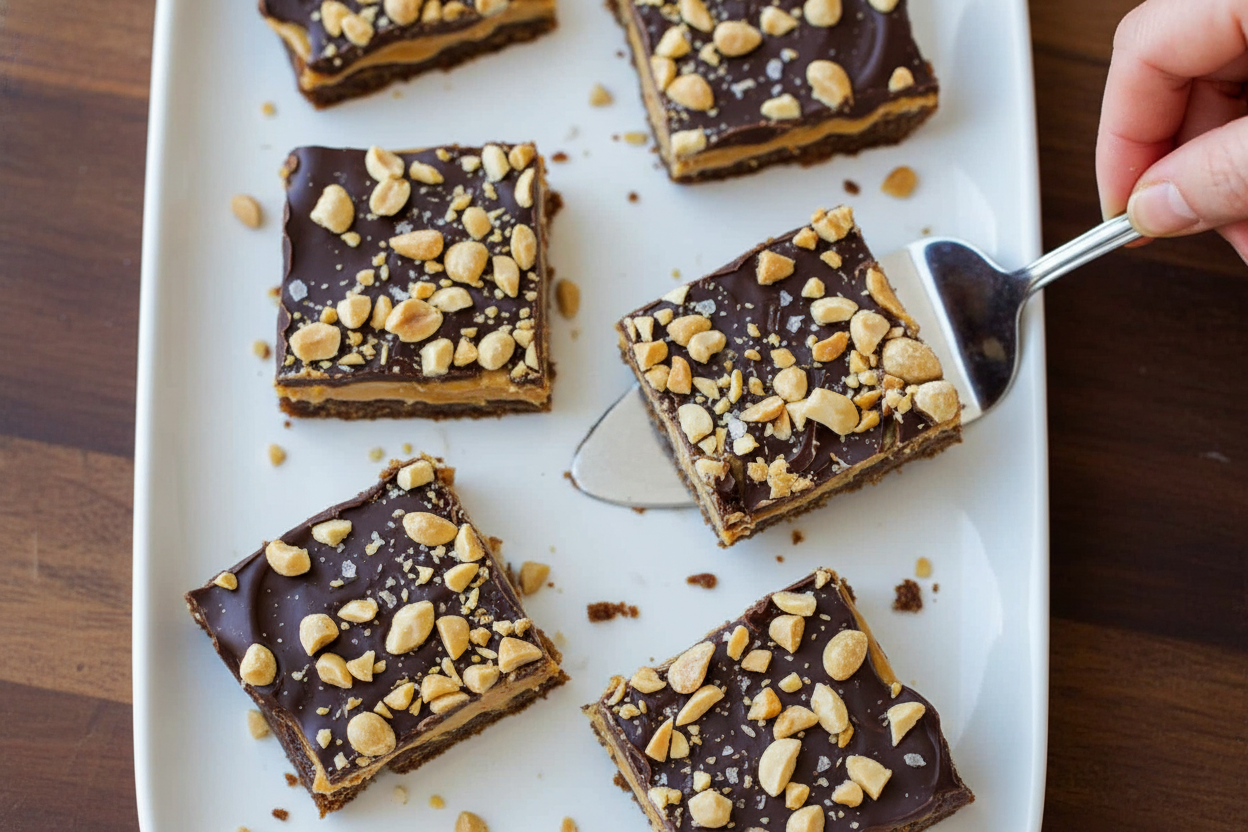
Spread the peanut butter on top. Then melt the chocolate. Be careful, it gets hot. Drizzle it all over. Now sprinkle the peanuts. Press them in gently. The salt is my secret. It makes the sweet taste even sweeter.
A Fun Little Fact
Fun fact: The Medjool date is sometimes called the “king of dates.” It is big, soft, and very sweet. People have been eating them for thousands of years!
I think that is wonderful. We are eating the same sweet fruit as people long, long ago. It connects us to history. Do you like learning the history of your food?
The Waiting is the Hard Part
You must let the bars get cold and firm. This takes about an hour. I know, it is hard to wait! But it is important.
The chocolate needs time to set. This keeps the bars from becoming a gooey mess when you cut them. Patience makes a better treat. While you wait, you can clean up. Or just dream about that first bite. Will you share these with friends or keep them all for yourself? Be honest!
Ingredients:
| Ingredient | Amount | Notes |
|---|---|---|
| Medjool dates | 20 | pitted |
| Semisweet or milk chocolate chips | 3/4 cup | |
| Natural creamy peanut butter | 2/3 cup | stirred |
| Peanuts | 1/2 cup | coarsely chopped |
| Kosher salt | 1/4 tsp | optional |
My Kitchen Trick for Candy Bar Magic
Hello, my dear. Come sit with me. Let’s make a treat that feels like a hug. We are making “Snickers” from dates. Doesn’t that sound clever? My grandson taught me this. I still laugh at that. It’s so simple and so good. You will feel like a kitchen wizard. The dates become the chewy caramel. Isn’t that amazing? Your hands might get a little sticky. That’s how you know you’re doing it right.
Step 1: The Chewy Base
First, get your dates ready. Line a baking sheet with parchment paper. Pit each date and open it up like a little book. Lay them all side by side. Now, cover them with another paper. Use a cup to press them down. You are making a sticky date rectangle. (A hard-learned tip: really press them together. No gaps allowed for our chewy base!).
Step 2: The Creamy Layer
Time for the peanut butter. Take off that top paper. Spread the peanut butter all over the dates. Try to make it nice and even. An old butter knife works perfectly here. This is the creamy layer. It smells so good already. I always sneak a tiny taste. Can you guess my favorite brand? Share below!
Step 3: The Chocolate Coat
Let’s melt the chocolate. Put the chips in a bowl. Heat them in the microwave, but stop every 30 seconds. Stir it in between. Be patient. Burnt chocolate is a sad thing. When it’s smooth and shiny, it’s ready. Pour it right over the peanut butter. Gently spread it to the edges.
Step 4: The Crunch & Chill
Now for the crunch! Sprinkle your chopped peanuts over the soft chocolate. Press them in lightly. A tiny pinch of salt on top is magic. It makes all the flavors sing. Then, the hard part. You must wait. Put the whole tray in the fridge for an hour. The chocolate needs to get firm.
Step 5: Slice & Enjoy
The fun finale. Take your tray out. The chocolate will be set. Use a big knife to cut it into bars. You made candy bars! Aren’t they beautiful? Wrap them up or share them right away. I promise they will disappear fast.
| Cook Time | 1 hour (chilling) |
| Total Time | 1 hour 20 minutes |
| Yield | 20 pieces |
| Category | Dessert, Snack |
Let’s Play with Your New Recipe
Once you master the basic bar, you can play. Cooking should be fun. Here are three twists I love. Try one next time. They are all so delicious.
- Almond Joy Twist: Use almond butter. Top with shredded coconut and almond slices.
- Salty Pretzel Crunch: Swap peanuts for crushed salty pretzels. It’s sweet and salty perfection.
- Fruity Surprise: Add a layer of thin strawberry slices under the peanut butter. So pretty and fresh.
Which one would you try first? Comment below! I love reading your ideas.
Serving Your Homemade Candy Bars
These bars are stars on their own. But let’s think about presentation. Place one on a small plate. Add a few extra peanuts on the side. For a party, stack them on a cute plate. They look so fancy. People will be so impressed.
What to drink? A cold glass of milk is the classic choice. It’s the best friend for peanut butter and chocolate. For the grown-ups, a little glass of creamy bourbon or a coffee liqueur is lovely. It sips so nicely with the rich flavors. Which would you choose tonight?
Keeping Your Snickers Bark Just Right
These bars are best kept cold. Store them in the fridge for up to a week. Use an airtight container so they stay fresh.
You can also freeze them for a month. I wrap mine in parchment paper first. This stops them from sticking together in the freezer.
No reheating is needed. Just let a frozen bar sit for five minutes. I once ate one straight from the freezer. My tooth learned a lesson that day!
Batch cooking saves you time later. Make a double batch and freeze half. You will always have a sweet treat ready for guests.
This matters because good food should be easy to enjoy later. Have you ever tried storing it this way? Share below!
Simple Fixes for Common Hiccups
First, if your dates are dry, they won’t stick. Soak them in warm water for ten minutes. Then pat them very dry before using.
Second, chocolate can seize and get clumpy. I remember when this happened to me. Always melt it slowly and stir it often.
Third, the bark might be hard to cut. Use a sharp knife. Run it under hot water and dry it before each cut.
Fixing small problems builds your cooking confidence. It also makes your food taste better every single time. Which of these problems have you run into before?
Your Quick Questions, Answered
Q: Is this gluten-free?
A: Yes, if your chocolate and peanut butter are gluten-free.
Q: Can I make it ahead?
A: Absolutely. Make it up to a week before you need it.
Q: What can I swap?
A: Use almond butter or any nut butter you love. Try different nuts on top too.
Q: Can I double the recipe?
A: You can. Just use a bigger baking sheet.
Q: Is the salt needed?
A: It’s optional. But a tiny pinch makes the chocolate taste sweeter. Fun fact: Salt helps balance sweet flavors! Which tip will you try first?
From My Kitchen to Yours
I hope you love making these sweet bars. Cooking is about sharing joy and creating memories.
I would love to see your creation. Share a photo of your finished snack. Let’s inspire each other in the kitchen.
Have you tried this recipe? Tag us on Pinterest! I always look for your beautiful pictures. Thank you for cooking with me today.
Happy cooking!
—Lena Morales.
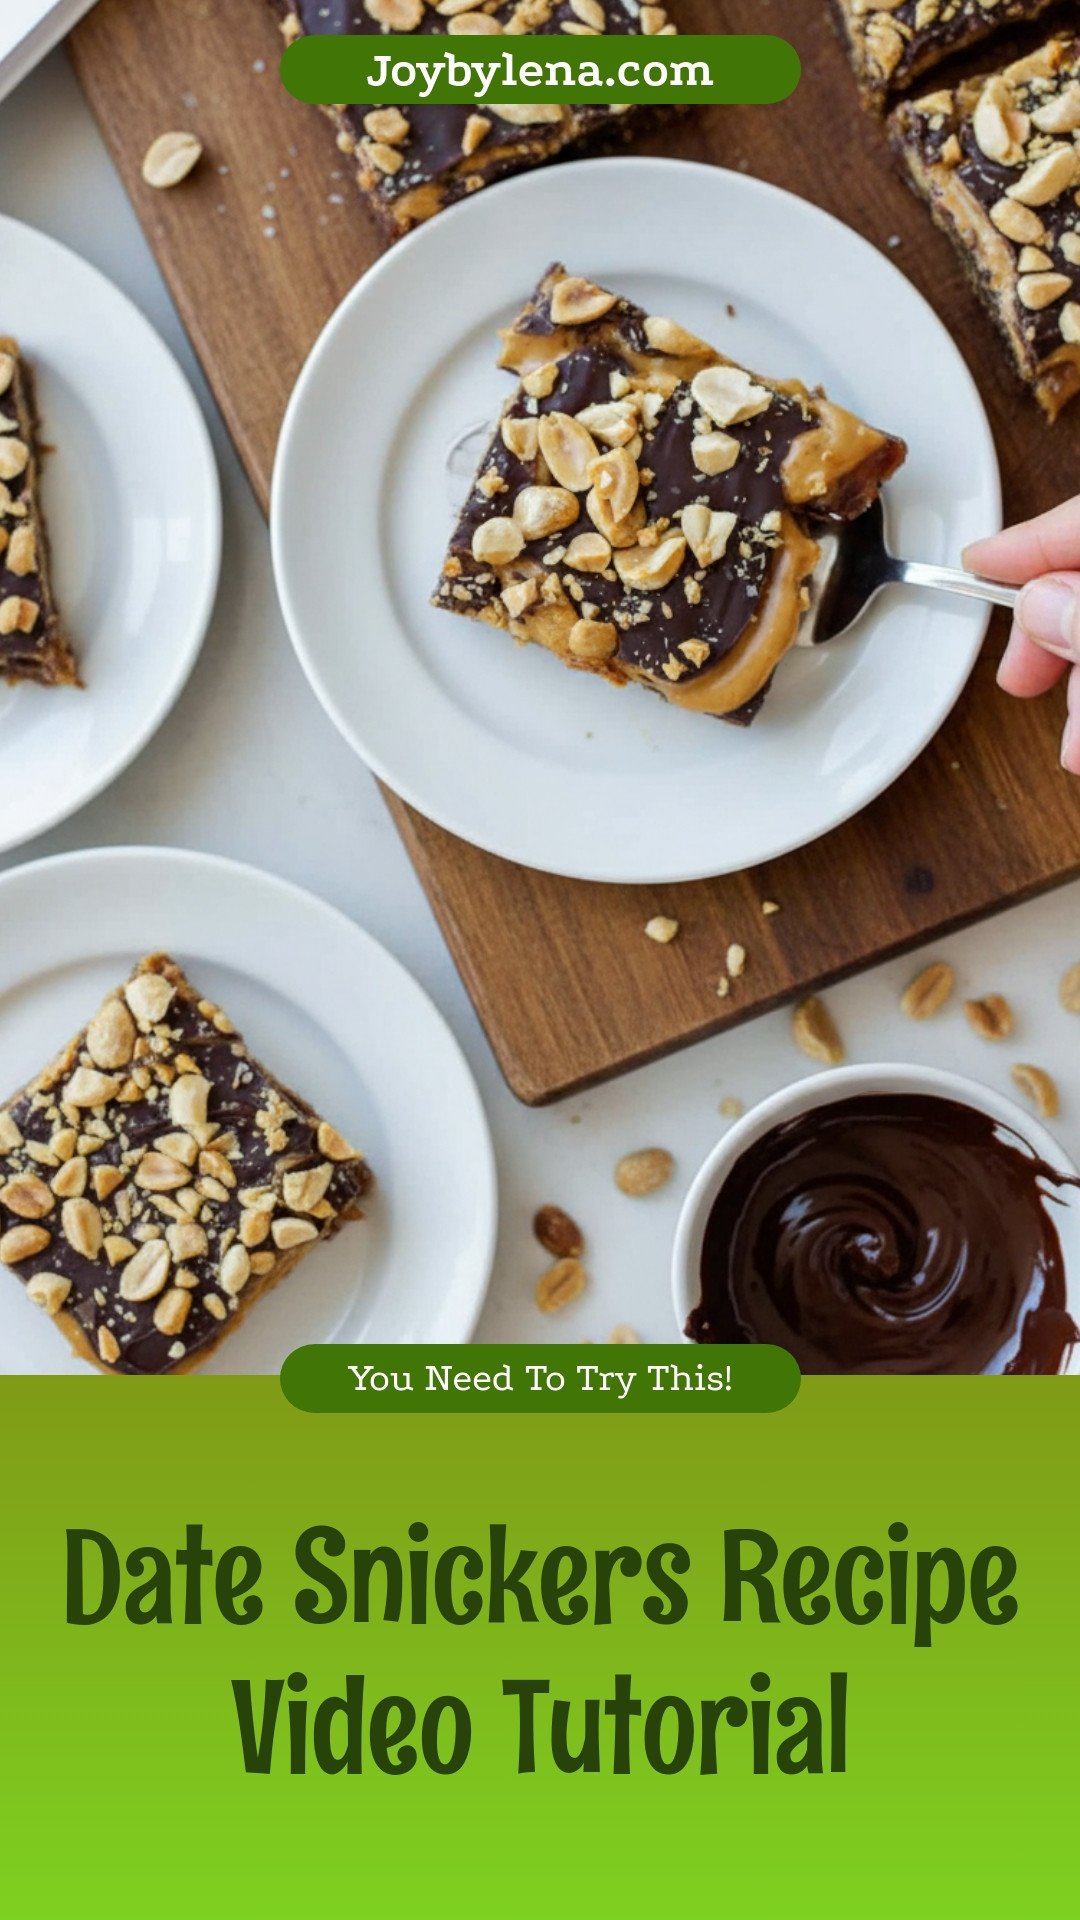
Date Snickers Recipe (VIDEO): Date Snickers Recipe Video Tutorial
Description
Make your own healthy, no-bake Snickers bars with dates, peanut butter, chocolate, and peanuts. A delicious and easy treat!
Ingredients
Instructions
- Line a baking sheet with parchment paper. Pit the dates and open them so the sticky centers are facing up. Arrange the dates side by side on the parchment paper to form a rough rectangle shape. Cover with a second sheet of parchment paper and use a rolling pin or the back of a cup to press the dates into an even layer, ensuring all spaces are filled.
- Remove the top layer of parchment paper and spread the peanut butter evenly over the dates. An offset spatula is helpful for achieving an even layer.
- In a microwave-safe bowl, heat the chocolate according to the package instructions until melted. Stir the chocolate every 30 seconds; it usually takes 60 to 90 seconds to fully melt.
- Drizzle the melted chocolate over the peanut butter, then use a spoon or offset spatula to spread it into an even layer over the peanut butter.
- While the chocolate is still soft, sprinkle the chopped peanuts on top and gently press them into the chocolate. If using, sprinkle on the kosher salt.
- Refrigerate the bar uncovered until the chocolate is firm, about 1 hour. Alternatively, you can freeze it for 30 minutes. Once the bark is set, use a knife to cut it into Snickers-sized bars.
Notes
- Store the bars in an airtight container in the refrigerator for up to one week. For a firmer texture, store them in the freezer.


Leave a Reply