My First Cheese Puff Disaster
Let me tell you about my first time. I was so nervous. I added the eggs too fast. The dough became a slippery, sloppy mess. I almost cried. My Abuela just smiled. She said, “Lena, food forgives you. Start again.” So I did.
That’s why this matters. Cooking is not about being perfect. It’s about trying. Your hands learn by doing. Now, I still laugh at that messy bowl. What was your first kitchen mess? Tell me, I’d love to hear.
Why We Cook the Dough First
You will cook the dough in a pot. This seems strange, right? You cook it before it even goes in the oven. This step is very important. It dries the dough just a little.
That dry heat makes magic later. It creates a big puff in the oven. The steam pushes the dough up and out. Fun fact: This dough is called “pâte à choux.” It is the same dough used for cream puffs! Without this step, you get a dense little biscuit. We want a cloud.
The Heart of the Matter: Cheese
Now, the good part. Cheese! Cheddar gives a familiar, cozy taste. Gruyere is my secret. It adds a nutty, grown-up flavor. Together, they sing. Doesn’t that smell amazing?
Use the cheese you love. Sharp cheddar is wonderful. Even a little parmesan works. Grate it yourself, please. The bagged kind is too dry. This matters because cheese is the star. It should taste like itself.
Watch Them Rise and Shine
The oven does the final work. You start it very hot. Then you turn it down. This high heat makes a big burst of steam. That’s what lifts them.
Do not open the oven door early. They might get sad and fall. Watch through the window. See them turn golden brown? It’s like a little show. Do you like watching things bake? It’s my favorite quiet time.
Sharing the Warmth
These puffs are best warm. The outside is crisp. The inside is soft and cheesy. They are perfect for sharing. I make them when family visits. The plate empties so fast.
Food is about connection. That’s the second reason this matters. You make something with your hands. You give it to someone you love. That is a simple, good feeling. What’s your favorite food to share with friends? Mine will always be these.
Ingredients:
| Ingredient | Amount | Notes |
|---|---|---|
| Milk | 1/2 cup | |
| Butter | 1/2 cup | cut into pieces |
| Sugar | 1/2 tablespoon | |
| Salt | 1 teaspoon | |
| All-purpose flour | 1 cup | |
| Eggs | 4 large | |
| Cheddar cheese | 1 cup | grated |
| Gruyere cheese | 1/2 cup | grated |
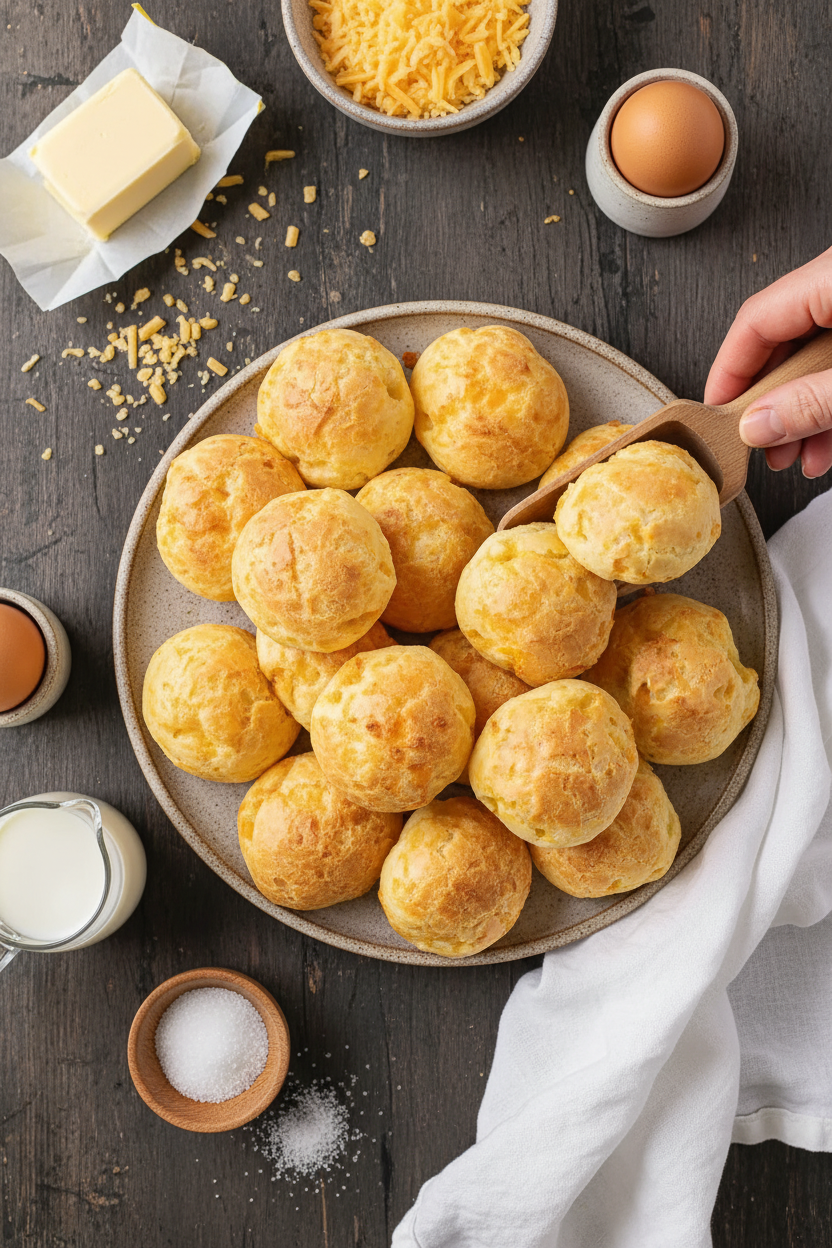
My Grandson’s Favorite Crunchy Cheese Puffs
Hello, my dear. Come sit at the counter. Let’s make my grandson Mateo’s favorite snack. He calls them “cheese clouds.” They are light, crunchy, and so cheesy. Doesn’t that smell amazing? Making them is a little kitchen magic. We cook dough on the stove first. It seems strange, but trust your grandma. I still laugh at the first time I made these. I was so nervous! But they puffed up like little golden hats. You will love them.
Here is how we make the magic happen. Follow these steps with me. Remember, cooking is about feeling, not just following. Use your senses. Is the butter bubbling? Does the dough feel smooth? That is how you know you are doing it right. Let’s begin.
Step 1: First, turn your oven to 425°F. Line your baking sheets with parchment paper. Now, grab a medium pot. Put the milk, butter pieces, sugar, and salt in it. Warm it over medium heat. Stir it often until it simmers. You will see little bubbles at the edge. (A hard-learned tip: cut your butter into small pieces. It melts faster and won’t scorch!)
Step 2: Take the pot off the heat. Dump in all the flour at once. Stir fast with a wooden spoon. It will get thick and look like a big ball. Put the pot back on low heat for 2 minutes. Keep stirring. This cooks the flour taste out. Your arm might get a little tired. Mine always does!
Step 3: Scoop that hot dough into a food processor or mixer. Let it mix for a minute to cool. Now, add the eggs one at a time. Let each egg disappear before adding the next. The dough will become shiny and smooth. What do you think the eggs do? Make it fluffy or crispy? Share below!
Step 4: Time for the best part—the cheese! Turn the mixer off. Add both grated cheeses. Fold them in gently by hand. You want every bite to have cheesy goodness. The smell is wonderful now. It reminds me of my abuela’s kitchen.
Step 5: Use a spoon or cookie scoop to make little mounds on your sheets. Give them space to puff up! Put them in the hot oven. Then, immediately turn the heat down to 375°F. Bake for 20-25 minutes. They will turn a perfect golden brown. Let them cool a bit. The crunch is worth the wait.
Cook Time: 25 minutes
Total Time: 45 minutes
Yield: About 30 puffs
Category: Snack, Appetizer
Three Fun Twists to Try
Once you master the basic puff, you can play! Here are three of my favorite twists. They are simple but change the flavor so much. Cooking should be fun, don’t you think?
- Everything Bagel Style: Mix a spoonful of everything bagel seasoning right into the dough. So savory!
- Little Pizza Puffs: Add a spoon of tomato paste and some dried oregano. Maybe a few pepperoni bits.
- Herb Garden Delight: Stir in a handful of fresh chopped chives or dill. It tastes like spring.
Which one would you try first? Comment below!
Serving Them Up with Style
These puffs are stars on their own. But I love making a pretty plate. For a party, pile them high in a basket. Tuck in some fresh rosemary sprigs. It looks so festive. For a cozy snack, serve them with a small bowl of warm tomato soup for dipping. It is pure comfort.
What to drink? For the grown-ups, a crisp glass of white wine or a light beer is lovely. For everyone, a sparkling apple cider is perfect. The bubbles cut through the rich cheese. Which would you choose tonight?
Keeping Your Cheese Puffs Perfect
Let’s keep these puffs crunchy for days. Cool them completely first. Then, store them in an airtight container. They will stay good on the counter for two days.
For longer storage, use your freezer. Place cooled puffs in a single layer on a tray. Freeze them solid for one hour. Then, pop them all into a freezer bag. This stops them from sticking together. I once put warm puffs in a bag. They turned into a soggy, sad lump!
To reheat, use your oven. Bake frozen puffs at 350°F for 5-10 minutes. This brings back their wonderful crunch. Batch cooking like this saves you time later. It means a tasty snack is always ready for you. Have you ever tried storing it this way? Share below!
Easy Fixes for Common Puff Problems
Sometimes, our snacks need a little help. First, if your dough looks greasy, do not worry. Your butter was likely too hot. Let the milk mixture cool a bit next time. This helps the dough come together smoothly.
Second, puffs can deflate after baking. This often means they needed more baking time. I remember when I took mine out too early. They looked great but quickly sank. Let them get a deep golden brown for a sturdy puff.
Third, the cheese might sink to the bottom. Always fold it in by hand at the very end. Mixing it too much can cause this. Getting these steps right builds your cooking confidence. It also makes sure every bite is full of flavor. Which of these problems have you run into before?
Your Cheese Puff Questions, Answered
Q: Can I make these gluten-free?
A: Yes. Use a good gluten-free flour blend. The results will be just as tasty.
Q: Can I make the dough ahead?
A: Absolutely. Scoop the dough onto your baking sheet. Then, freeze it solid. Bake straight from the freezer, adding a few extra minutes.
Q: What cheese can I swap?
A: Use any hard cheese you like. Parmesan or Monterey Jack work very well. *Fun fact: Gruyere is a Swiss cheese with a lovely, nutty taste.*
Q: Can I double the recipe?
A: You can. Just mix it in two separate batches. This ensures the dough has the right texture.
Q: Any optional tips?
A: Add a pinch of paprika or garlic powder. It gives the puffs a nice little kick. Which tip will you try first?
From My Kitchen to Yours
I hope you love making these crunchy puffs. They always remind me of my grandkids after school. The kitchen fills with happy chatter and the smell of cheese.
I would love to see your creations. Sharing food connects us all. It is my favorite part of writing these recipes for you. Have you tried this recipe? Tag us on Pinterest! You can find me at @LenasCozyKitchen.
Happy cooking!
—Lena Morales.


Crunchy Cheese Puffs Snack Recipes
Description
These irresistible homemade cheese puffs are light, airy, and packed with a cheesy flavor, perfect for snacking or entertaining.
Ingredients
Instructions
- Preheat the oven to 425°F. Line two baking sheets with parchment or silicone liners.
- Add the milk, butter, sugar, and salt to a medium saucepan. Bring the mixture to a simmer over medium heat, stirring frequently to prevent scorching.
- Remove the milk mixture from the heat, and add the flour. Stir until the mixture is thick and there are no flour pockets remaining. Return the mixture to the heat and cook for 2-3 minutes.
- Move the hot dough mixture to a food processor or the bowl of a stand mixer. Mix for a minute or two to allow steam to escape. With the mixer running, add the eggs one at a time, mixing well after each addition, to form a shiny and smooth dough. Fold in the grated cheese by hand.
- Using a medium cookie scoop or a tablespoon, scoop the dough into rounded mounds on the prepared baking sheets, spacing one inch apart. Place the pans in the oven, reduce the heat to 375°, and bake for 20-25 minutes, until golden brown. If you are baking pans on multiple shelves, rotate the pans halfway through baking to ensure even browning.
Notes
- Nutrition (per serving, recipe makes 30 servings): Calories: 78kcal, Carbohydrates: 4g, Protein: 3g, Fat: 6g, Saturated Fat: 3g, Cholesterol: 37mg, Sodium: 145mg, Potassium: 23mg, Fiber: 1g, Sugar: 1g, Vitamin A: 191IU, Calcium: 59mg, Iron: 1mg


Leave a Reply