The Secret is in the Sizzle
Let’s talk about the sound of a good burger. That first sizzle on the grill. It’s a happy sound. It means flavor is being born. My grandpa taught me that. He said, “Lena, listen to your food. It talks to you.” I still laugh at that.
Why does this matter? That sizzle seals in the juices. It creates a tasty crust. A quiet burger is a sad burger. So, get your grill or pan nice and hot first. Wait for that happy sound. What’s your favorite cooking sound? Is it the sizzle, or maybe the pop of popcorn?
Building Your Burger Castle
Now, the beef. Use ground chuck if you can. It has good fat for flavor. Gently shape your patties. Don’t pack them tight! Think of a fluffy cloud, not a brick. Make them a little wider than your bun. They shrink when they cook.
Here’s a mini-anecdote. My first patties were like hockey pucks. Too thick, too squeezed. My brother called them burger meatballs. We had to eat them with a fork! Now I know: gentle hands make a tender burger. Season them well with salt and pepper. Simple is best.
A Toasty Bun is a Happy Bun
Do not skip this step. Please. A soft bun is nice. But a toasted bun is magic. Spread a little butter on the cut sides. Toast them in a pan until golden. Doesn’t that smell amazing?
Why this matters? A toasted bun won’t get soggy. It adds a cozy crunch. It holds your juicy burger together. It’s the strong foundation for your tasty castle. Fun fact: Toasting bread brings out its natural, nutty sweetness. Try it and see!
The Cheese Melt Moment
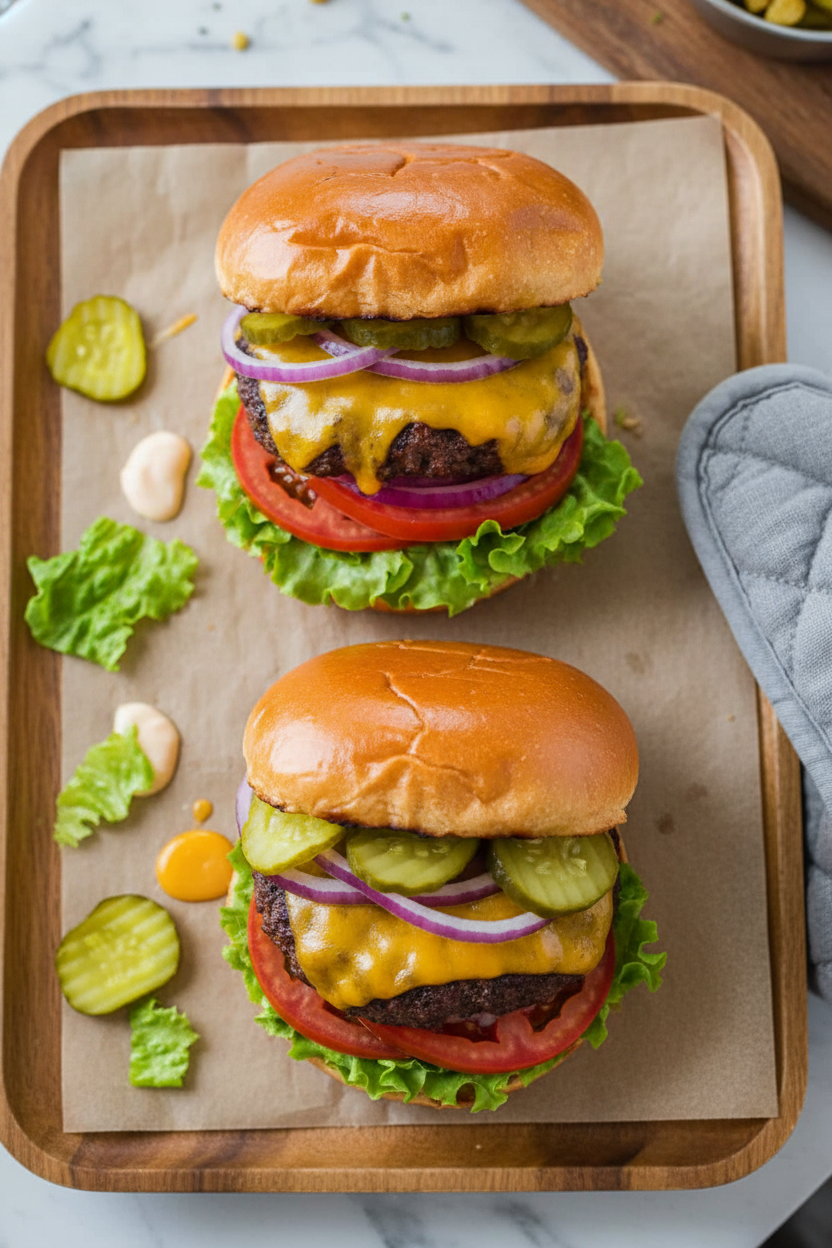
Timing is everything. Grill your patty for a few minutes. Flip it when you see juices on top. Now, watch for the perfect cheese moment. It’s the last minute or two. Lay that slice of cheddar on the hot patty.
Cover the grill or pan with a lid. Just for a minute. The steam helps the cheese melt into a gooey blanket. This makes the cheese part of the burger, not just a topping. Do you like your cheese fully melted or just a little soft? I love watching it melt.
Let It Rest and Build It Up
Patience, my friend. Take the burgers off the heat. Let them sit for five minutes. This is hard, I know. But it lets the juices settle back in. If you bite right away, all the juice runs out.
While they rest, build your plate. Toasted bun on the bottom. Crispy lettuce, a tomato slice. Then your rested, juicy burger. Add onion and pickles on top. The cool crunch with the warm meat is perfect. Why this matters? Every layer has a job. Texture and temperature make each bite an adventure. What’s your must-have burger topping? Tell me, I love new ideas.
Ingredients:
| Ingredient | Amount | Notes |
|---|---|---|
| ground chuck beef | 2 lb | 80/20 blend |
| fine sea salt | to taste | |
| freshly ground black pepper | to taste | |
| burger buns | 6 | |
| medium cheddar cheese | 6 slices | thick sliced |
| large tomato | 1 | sliced into 8 rings |
| green leaf lettuce | 12 leaves | |
| medium red onion | 1/2 | thinly sliced into rings |
| dill pickle slices | 1/2 cup |
The Secret to a Burger That Sings
Hello, my dear. Come sit. Let’s talk about burgers. A good burger is a happy memory on a plate. I learned from my Papi at our old backyard grill. The secret isn’t a fancy sauce. It’s in the little things. Like toasting the bun. That crisp sound is pure joy. Doesn’t that smell amazing? It keeps your bun strong for all those juicy toppings. Let’s make some magic together.
Step 1: First, get your toppings ready. Slice your tomato and red onion. Rinse your lettuce leaves. Have your pickles and cheese ready. Doing this first is like setting the table. It makes everything calm. You won’t be rushing when your burgers are hot. I still laugh at the time I forgot to slice the cheese. What a silly scramble that was!
Step 2: Now, let’s toast those buns. Spread a little butter on the cut sides. Place them face-down in a hot pan. Watch them turn a perfect gold. This adds so much flavor. It also stops the juice from making your bun soggy. (My hard-learned tip: you can do this right on the grill, too!).
Step 3: Time for the patties. Gently divide your beef into six balls. Flatten them gently. Make them a little wider than your bun. They shrink when they cook. Now, be generous with salt and pepper. This is your main flavor. Do you season before or after forming the patty? Share below!
Step 4: Grill time! Put your patties on a hot grill. Do not press them down. You’ll push out all the juice. Let them cook for a few minutes. Flip them when you see juices on top. Add your cheese slice at the very end. Cover the grill for a minute to let it melt into a gooey blanket. Let the burgers rest for five minutes after. This keeps them so juicy.
Cook Time: 15 minutes
Total Time: 30 minutes
Yield: 6 servings
Category: Dinner, Grilling
Let’s Shake Things Up!
The classic burger is perfect. But sometimes, you want a little adventure. Here are three fun twists my family loves. They are easy and delicious. Try one next time you fire up the grill.
The Fiesta Burger: Mix a little taco seasoning into the beef. Top with pepper jack cheese and a scoop of fresh guacamole.
The Breakfast Burger: Add a fried egg on top of your cheeseburger. The runny yolk is the best sauce. Trust me.
The Garden Party Burger: Use a big portobello mushroom cap instead of beef. Grill it just the same. So tasty.
Which one would you try first? Comment below!
The Perfect Plate
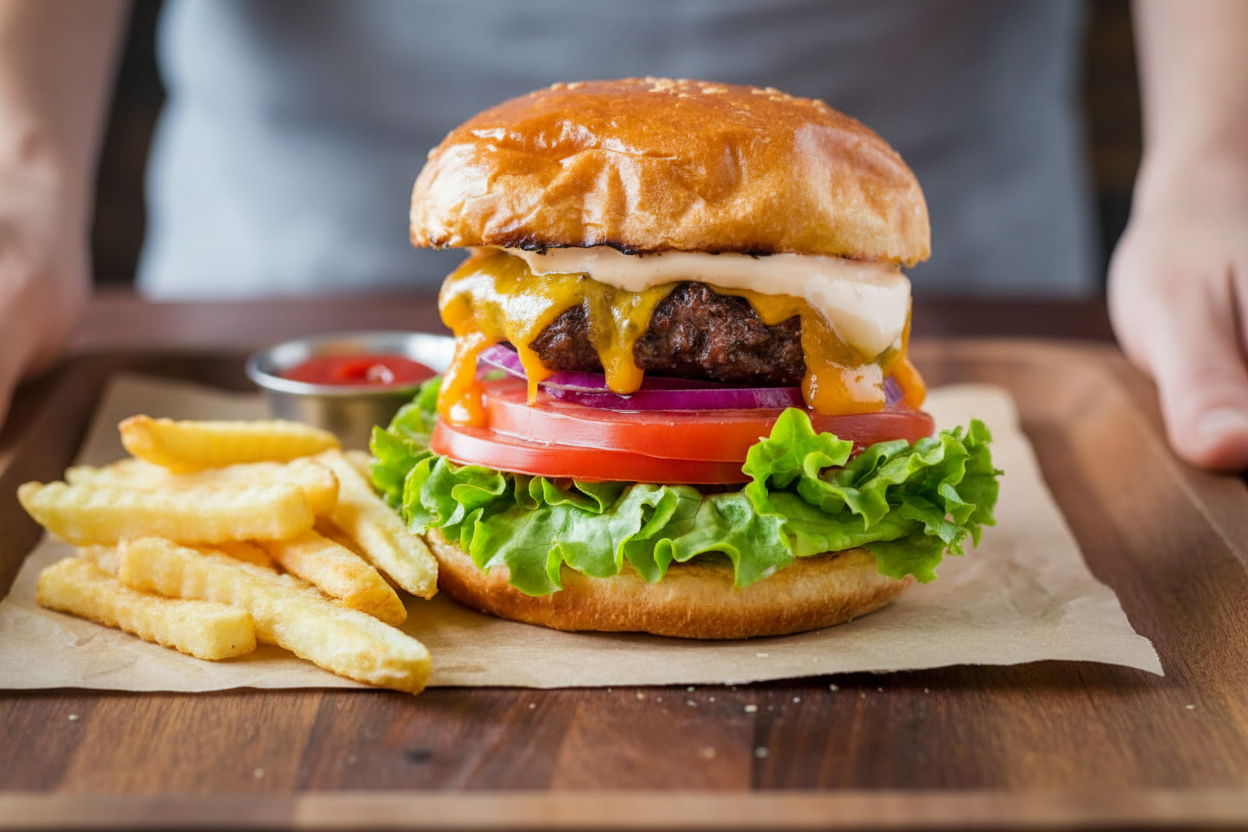
Now, what to serve with your masterpiece? A burger is a whole mood. For sides, I love crispy potato wedges. Or a simple, crunchy coleslaw. Sometimes, just some carrot sticks and ranch dip. It’s all good. For drinks, a cold root beer is my grandson’s favorite. For the grown-ups, a pale ale pairs beautifully. The bubbles cut through the rich beef.
Which would you choose tonight? A frosty mug of root beer or a chilled glass of ale? Either way, gather everyone around. The best part of any meal is the shared smiles.
Keeping Your Burgers Happy for Later
Let’s talk about storing these juicy burgers. First, cool your patties completely. Then, wrap each one tightly in plastic wrap. Pop them in the fridge for up to three days. For the freezer, use foil first, then a freezer bag. They will keep for three months. Thaw them in the fridge overnight.
To reheat, use a skillet on medium-low. Add a tiny splash of water and cover it. This keeps them moist. I once reheated one in the microwave. It turned into a hockey puck! A gentle reheat is key. Batch cooking is a lifesaver for busy nights. It means a great meal is always ready.
This matters because good food shouldn’t be wasted. A little planning brings big comfort. Have you ever tried storing it this way? Share below!
Fixing Common Burger Troubles
Is your burger dry or tough? You may have over-mixed the meat. Handle it gently, just until it holds together. A dense patty squeezes out all the good juices. This matters for a tender, juicy bite every time.
Does it puff up like a meatball? Make a small thumbprint in the center. This helps it stay flat while cooking. I remember when my first burgers looked like little domes. The thumbprint trick changed everything.
Is your bun soggy? Always toast it! A toasted bun adds crunch and flavor. It also creates a barrier against juices. This simple step makes your burger perfect. Which of these problems have you run into before?
Your Burger Questions, Answered
Q: Can I make these gluten-free? A: Yes! Use your favorite gluten-free buns. Check labels on toppings too.
Q: Can I make patties ahead? A: Absolutely. Shape them, layer with parchment paper, and refrigerate for a day.
Q: What’s a good cheese swap? A: American melts beautifully. Swiss or pepper jack are tasty too.
Q: Can I halve the recipe? A: Of course. Just use 1 pound of beef for three patties.
Q: Any optional tips? A: Let the meat sit out for 15 minutes before shaping. Fun fact: This helps it stick together better! Which tip will you try first?
From My Kitchen to Yours
I hope you love making these burgers. Cooking should be fun and full of flavor. Share your kitchen creations with me. I would love to see your masterpiece.
Have you tried this recipe? Tag us on Pinterest! Use our handle @LenasKitchenTable. Your photos make my day. Thank you for cooking with me today.
Happy cooking!
—Lena Morales.
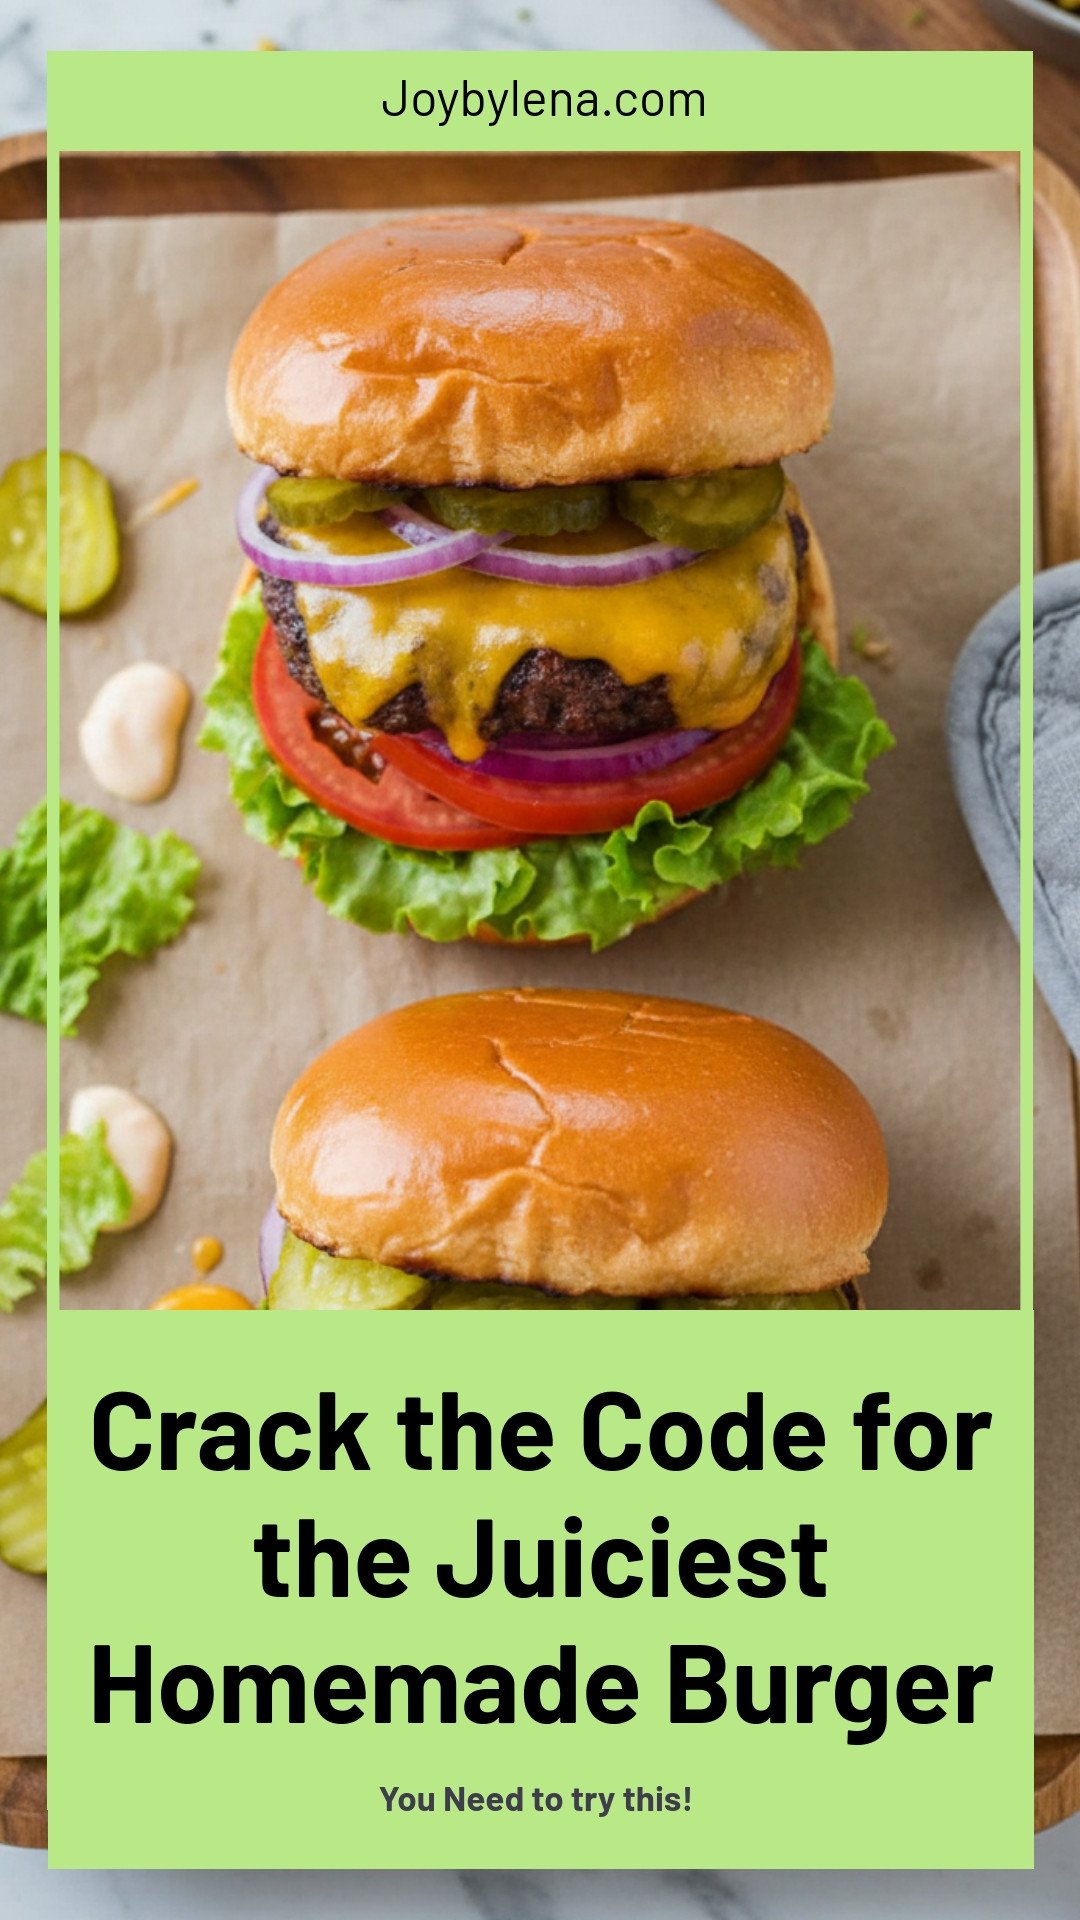
Crack the Code for the Juiciest Homemade Burger
Description
Master the art of the perfect homemade burger with this classic recipe featuring juicy beef patties, melted cheddar, and fresh toppings.
Ingredients
6 burger buns
6 slices medium cheddar cheese, (thick sliced)
1 large tomato, sliced into 8 rings
12 leaves green leaf lettuce
1/2 medium red onion, thinly sliced into rings
1/2 cup dill pickle slices
Instructions
- Prepare Toppings – Slice and prepare all of your burger toppings and sauces.
- Toast Buns – Spread the cut-side of the bun with softened or melted butter and toast the cut side on a skillet or on the grill until golden brown. You can toast the bun ahead or in the last couple of minutes with the burgers on the grill. Toasting the bun adds great flavor and prevents a soggy bun.
- Prepare Beef Patties – Preheat grill to medium heat. Divide ground beef into 6 portions (1/3 lb each) and form patties that are about 1/2″ thick and 1″ wider than the burger buns. Season patties generously with salt and pepper.
- Grill hamburger patties (indent-side-up) covered for 3-5 min each side on the grill. Flip burgers when juices are accumulating on top of the burger and you have a good sear. Apply cheese in the last 1-2 minutes of grilling then cover with the lid and cook until the internal temperature of beef reaches 155˚F for a final temperature of 160˚F on a thermometer. Rest the patties 5 minutes before serving.
Notes
- For the juiciest burger, avoid pressing down on the patties while they cook. Letting the burgers rest after grilling allows the juices to redistribute.


Leave a Reply