My First Carmelitas Mess
I first made these bars for a church picnic. I was so nervous. I thought I ruined them.
The caramel was too thick. The top was too crumbly. But everyone loved them. They were gone in minutes. I still laugh at that. Sometimes messy is just right.
Why These Layers Matter
This recipe is like building a little flavor house. The crust is the strong floor. It holds everything up.
The middle is the fun part. Chocolate, nuts, and gooey caramel live there. The top crust is the roof. It keeps all the sweet stuff inside. Each layer has a job. That matters. It makes every bite perfect.
Let’s Get Baking
First, melt your caramels with the cream. Use low heat. Stir a lot. Doesn’t that smell amazing? Set it aside when smooth.
Mix the dry stuff in a bowl. Flour, oats, brown sugar. Pour in the melted butter. It will look like wet sand. Press half into your pan. Bake it for 10 minutes. This pre-bakes the floor of our house.
What’s your favorite baking smell? Is it melting chocolate or something else?
The Best Part: Layering
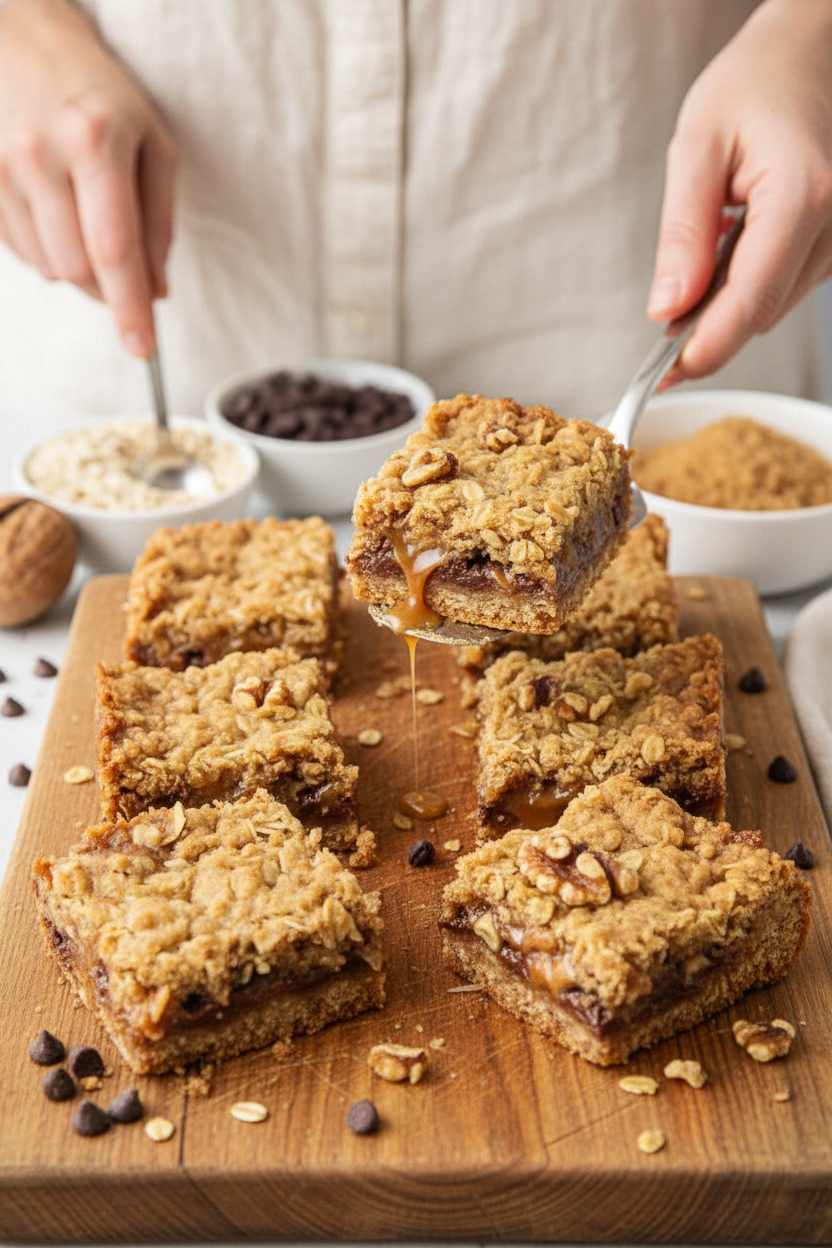
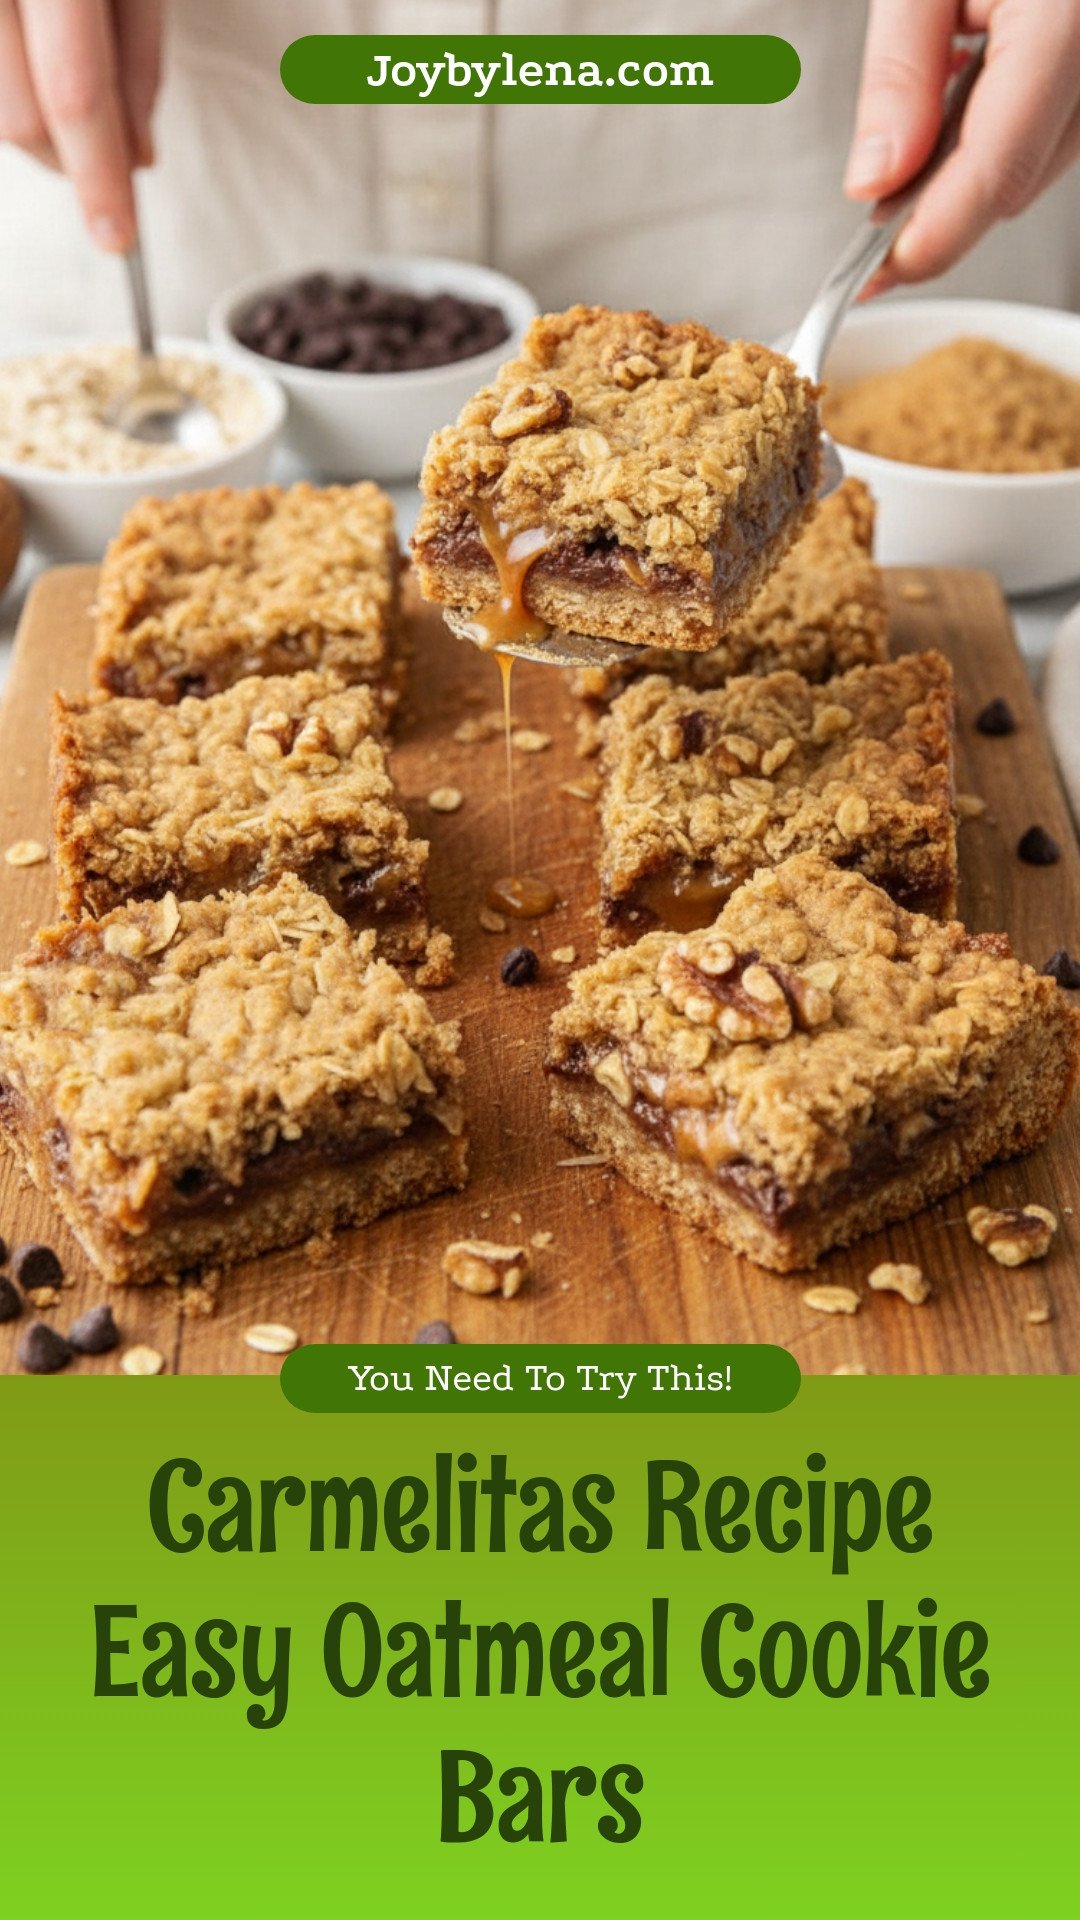
Now, the magic. Sprinkle chocolate chips on the warm crust. Add the walnuts. Then, pour that lovely caramel over everything.
Top it with the rest of the oat mix. It won’t cover everything. That’s good. The caramel peeks through. Bake until golden. Here is a fun fact: The old fashioned oats give a chewy texture. Quick oats would make it too soft.
The Hardest Step
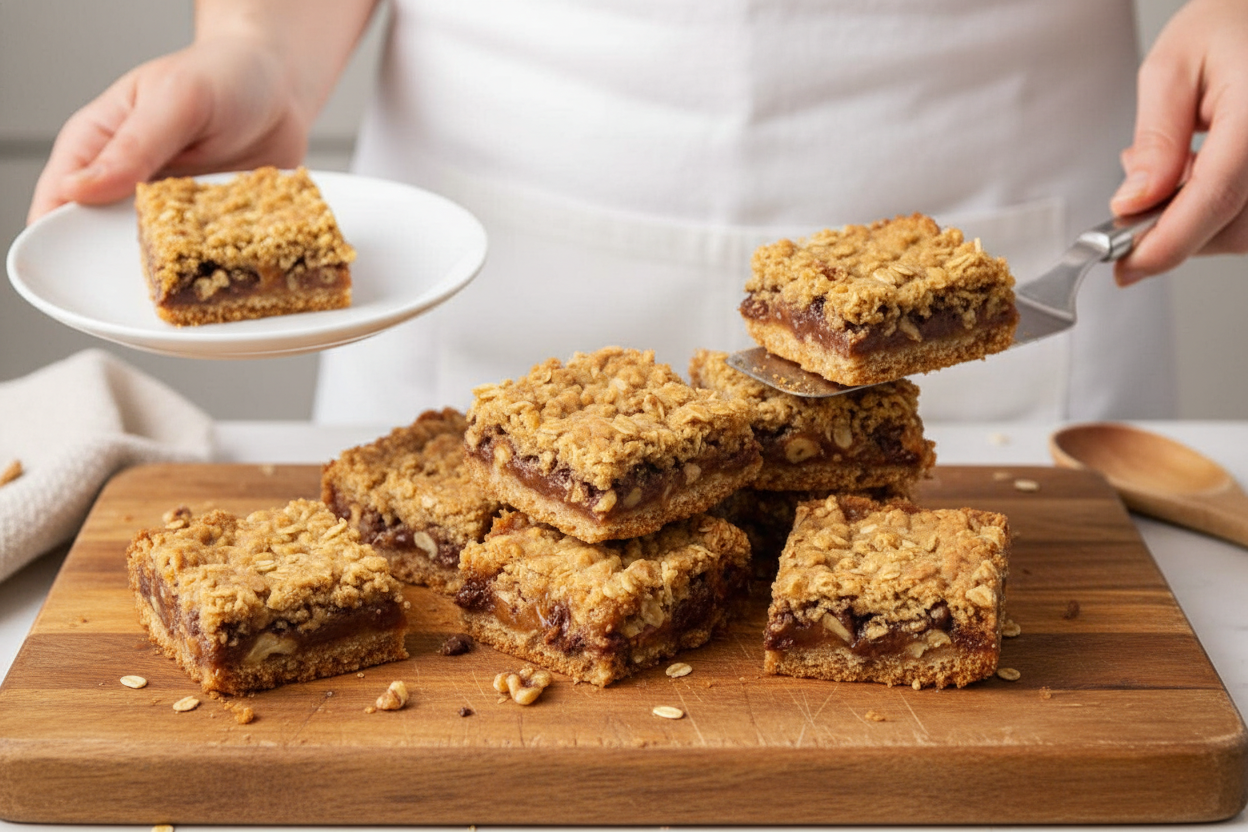
You must let them cool. I know, it’s hard. The caramel needs to set. If you cut too soon, it will run everywhere.
Wait until the pan is cool. This patience matters. It turns a puddle into a perfect bar. Then slice them up. Share them with someone you love.
Do you have a hard time waiting for treats to cool? I always do.
Make It Your Own
You can change these up. Try pecans instead of walnuts. Use dark chocolate chips. Or skip the nuts if you want.
The recipe is your friend. It likes to play. The most important thing is making it with joy. Food made with a happy heart tastes better. I truly believe that.
What add-in would you try? I’d love to hear your ideas.
Ingredients:
| Ingredient | Amount | Notes |
|---|---|---|
| Caramels or caramel bits | 11 ounce package | |
| Heavy cream or half and half | 1/2 cup | |
| All-purpose flour | 1 cup | |
| Old fashioned oats | 1 cup | |
| Brown sugar | 3/4 cup | |
| Baking soda | 1/2 teaspoon | |
| Salt | 1/4 teaspoon | |
| Butter, melted | 12 tablespoons | |
| Semi sweet chocolate chips | 6 ounces | |
| Chopped walnuts | 1/2 cup |
My Famous Carmelitas: A Sweet, Gooey Hug in a Pan
Hello, my dear! Come sit. Let’s make my famous carmelitas. These oatmeal cookie bars are pure joy. They are chewy, chocolatey, and full of caramel. I first made them for my grandson’s school bake sale. They sold out in ten minutes! I still laugh at that. Now, they are my most-requested treat. The smell alone will make your whole house feel cozy. Doesn’t that smell amazing? Let’s begin.
Step 1: First, warm your oven to 350°F. Get a 9×9 baking dish. Grease it lightly or line it with foil. This makes cleanup so easy later. Trust me on this. Now, let’s melt the caramel. Put the caramels and cream in a small pot. Use low heat and stir often. Watch it turn smooth and shiny. (A hard-learned tip: low heat is key! Burnt caramel is very sad.) Set this lovely goo aside when it’s melted.
Step 2: Time for the crust! In a bowl, mix flour, oats, brown sugar, baking soda, and salt. Pour in the melted butter. Stir until it looks like wet sand. It will clump together nicely. This is your cookie base. Press half of this mixture into your baking dish. Pack it down firmly. Bake this for just 10 minutes. Your kitchen will start to smell wonderful.
Step 3: Now for the fun part—the layers! Take the hot pan out. Sprinkle chocolate chips and walnuts over the crust. Then, slowly pour your melted caramel over everything. Try to cover it all. It’s okay if it swirls together. Finally, crumble the rest of the oat mixture on top. It doesn’t have to be perfect. Do you like more chocolate or more nuts? Share below!
Step 4: Pop the pan back in the oven. Bake for 15 to 20 more minutes. You’ll know it’s done when the top is light golden brown. Here comes the hardest part. You must let them cool completely. I know, the wait is tough! But if you cut them warm, they will be a gooey mess. Let them set for a few hours. It’s worth the wait, I promise.
Cook Time: 30-35 minutes
Total Time: About 4 hours (with cooling)
Yield: 16 rich bars
Category: Dessert, Cookie Bars
Three Fun Twists on the Classic
Once you master the basic recipe, try playing! Here are three of my favorite twists. They are all simple and delicious.
Salty-Sweet Swap: Use pretzel pieces instead of walnuts. Add a sprinkle of sea salt on the warm caramel.
Fruity Delight: Swap the chocolate chips for dried cranberries. Use white chocolate chips too, if you like.
Cookie Dough Dream: Skip the nuts. Mix mini chocolate chips right into the oat crust. It’s like a double cookie!
Which one would you try first? Comment below!
Serving Your Carmelitas with Style
These bars are fantastic all on their own. But sometimes, I like to dress them up. For a special plate, add a tiny scoop of vanilla ice cream. The warm bar and cold cream is magic. A drizzle of extra caramel looks pretty too. For a party, cut them into small squares. They are very rich, so little bites are perfect.
What to drink? A cold glass of milk is the classic choice. It cuts the sweetness just right. For the grown-ups, a small cup of strong coffee is wonderful. The bitter coffee and sweet caramel are old friends. Which would you choose tonight?
Keeping Your Carmelitas Happy
Let’s talk about keeping these bars tasty. First, cool them completely. Then, store them in a sealed container. They will stay fresh on the counter for three days.
You can freeze them for a sweet treat later. Wrap each bar tightly in plastic wrap. Then, place them all in a freezer bag. They keep for up to three months this way.
I once forgot to wrap them well. They tasted like my freezer smelled! A good seal keeps flavors pure. Thaw frozen bars on the counter before eating.
Batch cooking saves time for busy weeks. You can double the recipe easily. Use a 9×13 pan instead. This matters because a ready-made treat brings joy on tough days.
Have you ever tried storing it this way? Share below!
Fixing Common Carmelita Hiccups
Sometimes, the caramel layer can be too hard. This happens if you cook it too fast. Always melt the caramel on low heat. Stir it often until it is smooth and pourable.
The top crust might not brown nicely. Your oven might have a hot spot. I remember when my first batch burned on one side! Rotate your pan halfway through baking.
The bars can be messy to cut. If you slice them warm, they will fall apart. Let them cool completely first. This patience gives you clean, beautiful bars.
Fixing small issues builds your kitchen confidence. It also makes sure every bite is delicious. Good technique matters for flavor and fun.
Which of these problems have you run into before?
Your Carmelitas Questions, Answered
Q: Can I make these gluten-free? A: Yes! Use a good gluten-free flour blend. Make sure your oats are certified gluten-free too.
Q: Can I make them ahead? A: Absolutely. Bake them a day before you need them. Store them as I mentioned above.
Q: What can I swap for walnuts? A: Try pecans or skip nuts. Use extra chocolate chips or even pretzel pieces for crunch.
Q: Can I double the recipe? A: You can! Just use a bigger 9×13 pan. You may need to bake it a few minutes longer.
Q: Any optional tips? A: Sprinkle a little sea salt on top after baking. Fun fact: Salt makes sweet flavors taste even sweeter!
Which tip will you try first?
From My Kitchen to Yours
I hope you love making these carmelitas. Baking is about sharing warmth and sweetness. I would love to see your beautiful creations.
Share a photo of your finished bars with friends. It makes the treat taste even better. Your kitchen stories are my favorite thing to hear.
Have you tried this recipe? Tag us on Pinterest! Use @GrandmasKitchenNotes so I can find your post. Thank you for baking with me today.
Happy cooking!
—Lena Morales.
Carmelitas: Carmelitas Recipe Easy Oatmeal Cookie Bars
Description
Indulge in these easy and irresistible Carmelitas bars, featuring a chewy oatmeal cookie crust, a layer of melted chocolate and walnuts, and a gooey caramel center.
Ingredients
Instructions
- Preheat the oven to 350°F. Grease a 9 x 9 baking dish or line it with parchment or foil.
- Add the caramels or caramel bits and the heavy cream to a small saucepan. Heat the caramel over low heat, stirring frequently, until the caramels are completely melted and smooth. Remove from heat and set aside.
- In a medium bowl, mix together the flour, oats, brown sugar, baking soda, and salt. Pour the melted butter into the bowl and mix to combine.
- Press half of the oat mixture into the bottom of the prepared baking dish. Bake for 10 minutes (do not turn off the oven).
- Sprinkle the chocolate chips and walnuts over the baked crust, then pour the melted caramel over the top, spreading gently to cover. Sprinkle the remaining oat mixture over the top of the caramel (it’s okay if it doesn’t cover the caramel completely).
- Bake for 15-20 minutes, until light brown. Remove the carmelitas from the oven and cool them completely before slicing and serving.
Notes
- For clean slices, chill the bars completely before cutting. Store in an airtight container at room temperature for up to 5 days.


Leave a Reply