My First Breadstick Bones
Let me tell you about my first batch. I made them for my grandson’s Halloween party. I shaped them all, feeling so proud.
But I forgot to set the timer. Doesn’t that smell amazing? I got talking with a neighbor. We smelled them just in time. They were perfect and golden. I still laugh at that. What’s your funniest kitchen mistake?
Why Making Shapes Matters
Rolling these into bones is the best part. It is not just for looks. It makes the dough yours. You put your hands on it.
This matters. Food feels better when you make it with joy. Little hands love to help here. It turns cooking into playing. That is a good lesson for life.
The Magic of Waiting
You mix the yeast with warm water and sugar. Then you wait. It gets all foamy and bubbly. This is the yeast waking up.
Letting the dough rise twice is key. It needs time to grow. This makes the breadsticks light and soft inside. Rushing this step makes tough bread. Patience makes better food. Do you find it hard to wait for dough to rise?
A Little Tip for You
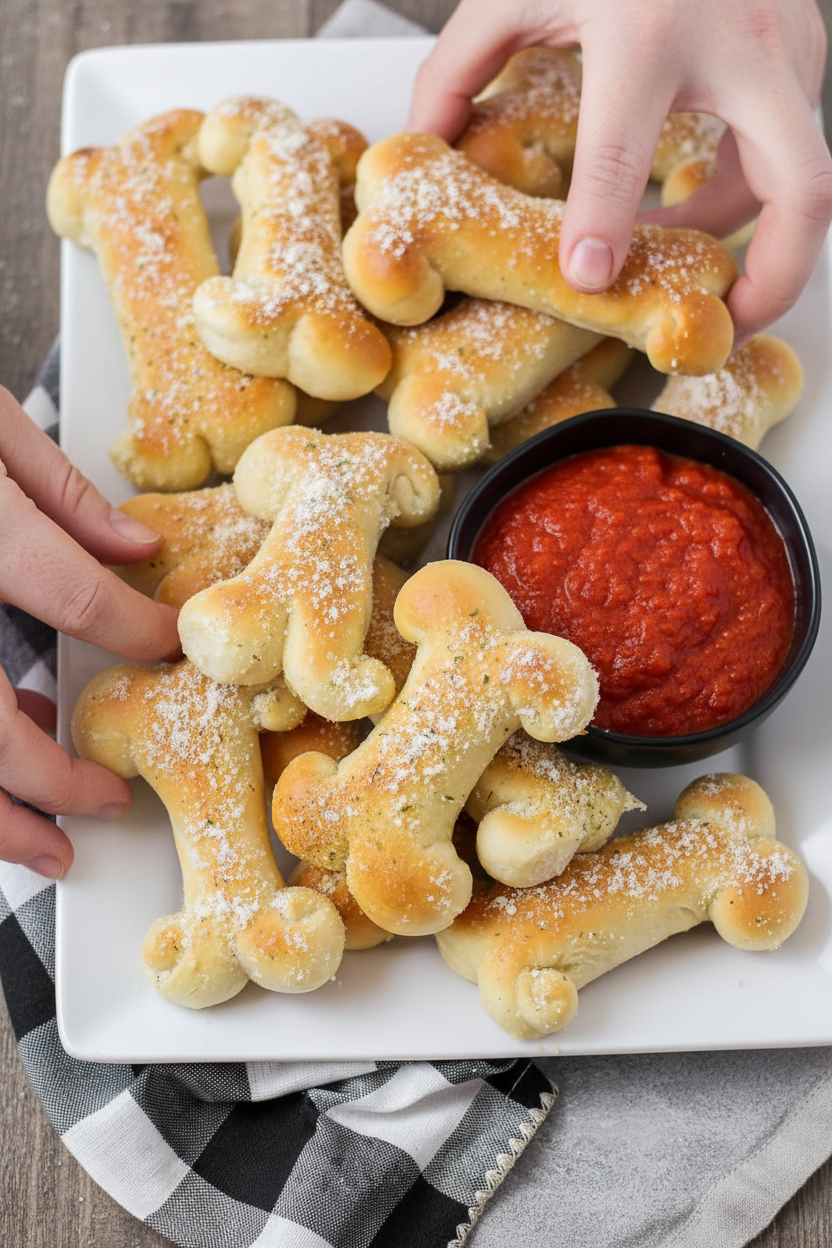
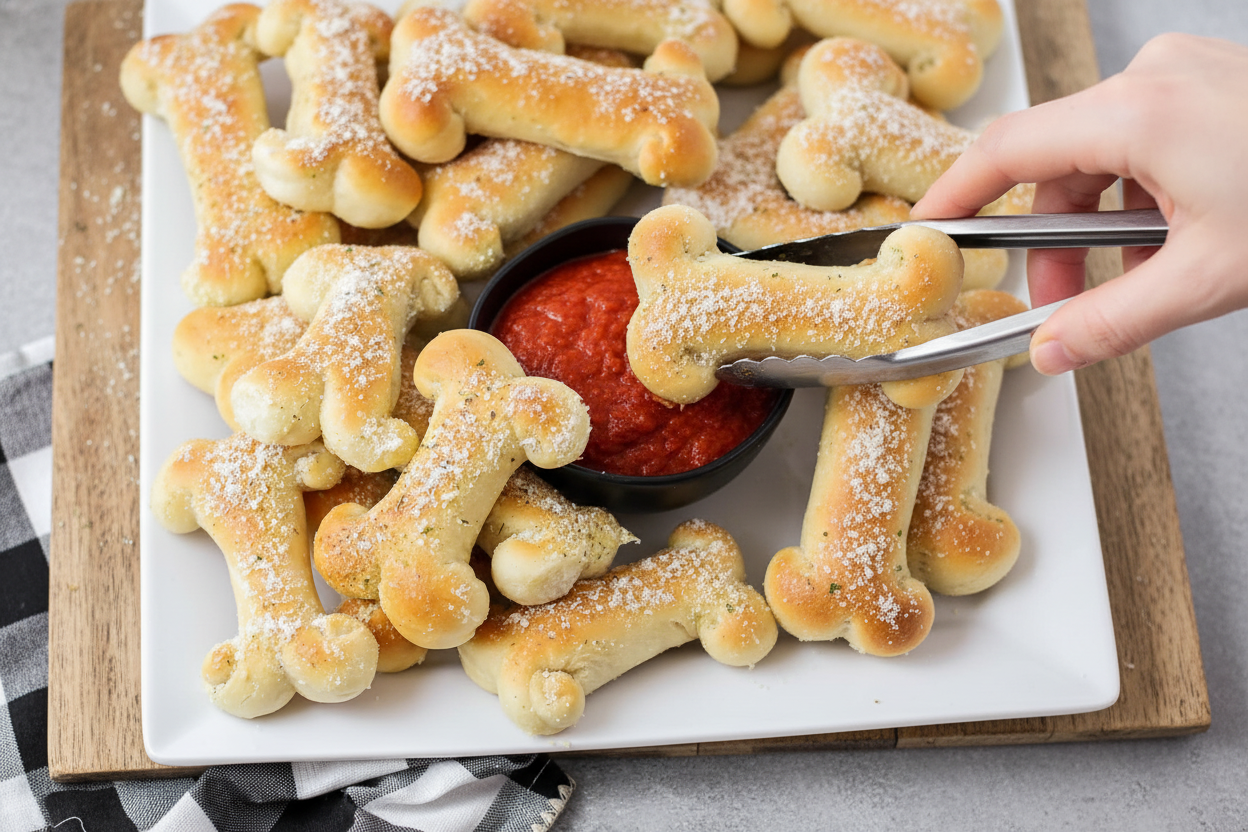
When you roll your dough rope, make the slit in the middle. Then twist each end away from the slit. Twist them in opposite directions. It makes a perfect little bone shape.
Fun fact: The butter wash after baking is my secret. It gives that shiny, tasty crust. Do you like yours more buttery or more cheesy? I always add extra parmesan.
The Best Part is Sharing
Pull one of these warm bones apart. The steam comes out. Dip it in some red marinara sauce. It is so good.
This matters too. Food is about sharing. These are fun for a party. They are also perfect for a quiet Tuesday. What movie would you watch with a plate of these? Tell me your favorite dipping sauce.
Ingredients:
| Ingredient | Amount | Notes |
|---|---|---|
| Warm Water | 1 cup + 2 tablespoons | For the breadstick dough |
| Active Dry Yeast | 1 ¼ teaspoons | For the breadstick dough |
| Sugar | 2 tablespoons | For the breadstick dough |
| Salt | 1 ½ teaspoons | For the breadstick dough |
| Canola Oil | 3 tablespoons | For the breadstick dough |
| Flour | 3-3¼ cups | For the breadstick dough |
| Butter, melted | 2 tablespoons | For the topping |
| Garlic Salt | ½ teaspoon | For the topping |
| Grated Parmesan Cheese | 1 tablespoon | For the topping |
| Marinara Sauce | As needed for serving | For serving |
How to Make Breadstick Bones for Your Best Friend
Hello, my dear. Come sit. Let’s make a special snack for your dog. These breadstick bones are so fun. I made them for my old dog, Benny. He would dance by the oven. Doesn’t that smell amazing? The dough is soft and easy to work with. You will feel like a real baker. We will shape them into little bones. It’s like playing with edible clay. Are you ready? Let’s begin.
Step 1
First, wake up the yeast. Put the warm water in a big bowl. Add the yeast and sugar. Give it a little stir. Now, just walk away for five minutes. You will see it get foamy. It looks like a tiny science experiment. This means your yeast is happy and alive. (A hard-learned tip: If your water is too hot, it will hurt the yeast. It should feel like a warm bath, not hot.)
Step 2
Next, add the salt and oil. Stir in two cups of flour. It will be very sticky. That’s okay. Now, add more flour, a little at a time. Keep mixing until the dough isn’t sticky anymore. It should feel soft like your earlobe. Knead it until it’s smooth. This part is good for your hands. I still laugh at how Benny watched every move.
Step 3
Put the dough in a greased bowl. Cover it with a clean towel. Let it take a nap for one hour. It will get big and puffy. This is called “rising.” While you wait, you can clean up. Or give your dog a belly rub. What’s your dog’s favorite trick to do for a treat? Share below!
Step 4
Now, the fun part. Gently punch the dough down. It will sigh. Divide it into 16 pieces. Roll one piece into a long rope. Then, cut a small slit near each end. Twist the dough around the slits to make bone shapes. Don’t worry if they’re not perfect. Your dog will love them anyway. Place them on a baking sheet. Let them rise again for 45 minutes.
Step 5
Heat your oven to 425°F. Bake the bones until they are golden. They will smell so good. Take them out and let them cool a bit. Brush them with melted butter. Sprinkle on the garlic salt and parmesan. Now you have a tasty treat. Let one cool completely for your pup. The rest are for your family. Serve them with marinara sauce for dipping.
Cook Time: 12-14 minutes
Total Time: About 2 hours 30 minutes
Yield: 16 breadsticks
Category: Snack, Appetizer
Three Tasty Twists to Try
Once you know the basic recipe, you can play. Here are some fun ideas. Change the topping for a different flavor. Your family will think you are a kitchen wizard. These are very simple. Just sprinkle them on before baking.
Everything Bagel Style
Mix sesame seeds, poppy seeds, and a little salt. It gives a nice crunch.
Sweet Cinnamon Sugar
Skip the garlic. Brush with butter, then roll in cinnamon and sugar. Perfect with milk.
Herb Garden Delight
Use dried rosemary and a sprinkle of sea salt. It smells like a summer garden.
Which one would you try first? Comment below!
Serving Your Breadstick Bones
These breadsticks are perfect for sharing. For dinner, I love to serve them with a big bowl of soup. Tomato soup is my favorite. The marinara sauce is great for dipping. You could also add a small salad. It makes a simple meal feel special. For a party, arrange them in a basket. Use a napkin to keep them warm. It looks so pretty.
What to drink? A cold glass of milk is always good. For the grown-ups, a light red wine goes nicely. It sips well with the garlic and cheese. Which would you choose tonight? Just remember, the plain bones are for your dog. The tasty toppings are just for people. Enjoy your time in the kitchen, my dear.
Keeping Your Breadstick Bones Fresh & Tasty
Let’s talk about keeping these treats yummy. First, cool them completely. Store them in an airtight container. They will stay soft for about two days on the counter.
Want to keep them longer? Freeze them! I wrap each bone in plastic wrap. Then I put them all in a freezer bag. They keep for a month. I once forgot a batch in my freezer for weeks. They were still perfect when my grandkids visited!
To reheat, just warm them in a 350°F oven for five minutes. This brings back that fresh-baked magic. Batch cooking saves you time for fun. It means a quick snack is always ready for you or your pup. Have you ever tried storing it this way? Share below!
Simple Fixes for Common Breadstick Troubles
Sometimes dough can be tricky. Do not worry. Here are easy fixes. First, if your dough won’t rise, check your yeast. Your water might be too hot. It should feel warm on your wrist, not hot.
Second, is your dough too sticky? Add flour slowly. Use just one tablespoon at a time. I remember when I added too much flour once. My breadsticks were like little rocks! Getting the dough right builds your cooking confidence.
Third, are your breadsticks pale? Your oven might run cool. Let it fully preheat. A golden brown color means better flavor and texture. It shows the heat worked its magic. Which of these problems have you run into before?
Your Quick Breadstick Questions, Answered
Q: Can I make these gluten-free? A: Yes! Use a good gluten-free flour blend. The dough may be a bit stickier.
Q: Can I make the dough ahead? A: Absolutely. After the first rise, punch it down. Keep it covered in the fridge overnight.
Q: What if I don’t have canola oil? A: Any mild oil works. Try vegetable or melted coconut oil. Fun fact: Some oils add a tiny bit of extra flavor!
Q: Can I double the recipe? A: You sure can. Just use a bigger bowl. Your mixer will thank you.
Q: Is the garlic salt for dogs okay? A: For people breadsticks, yes! For dog treats, skip the garlic salt. Use just butter and parmesan. Which tip will you try first?
From My Kitchen to Yours
I hope you love making these fun breadstick bones. Cooking is about sharing joy. It is about creating small, happy moments.
I would love to see your creations. Did your dog give you the happy tail wag? Did your family gobble them up? Please share your story with me. Have you tried this recipe? Tag us on Pinterest!
Thank you for spending time in my kitchen today. I am so glad you are here. Happy cooking!
—Lena Morales.

Breadstick Bones Dog Treats Recipe Guide
Description
Homemade dog treat breadsticks shaped like bones, brushed with a savory garlic butter and parmesan topping.
Ingredients
Breadsticks
Topping
For Serving
Instructions
- In a large bowl or the bowl of a stand mixer, dissolve the yeast and sugar in the warm water. Let sit until foamy and bubbly.
- Add the salt, oil, and two cups of flour, and mix to combine. Add the remaining flour, ¼ cup at a time, to form a soft dough that pulls away from the sides of the bowl. Knead until smooth, then place in a greased bowl, cover, and let rise for one hour.
- After the dough has risen, gently punch it down and divide it into 16 equal pieces.
- Roll each piece into a 12-inch rope, then cut a 2-3 inch slit on each side of the rope. Roll the dough on either side of the slit into a spiral, in opposite directions, to make a bone shape.
- Place the breadsticks on a greased or parchment-lined baking sheet. Cover and let rise for 45 minutes to an hour, until doubled in size.
- During the last 10 minutes of rise time, preheat the oven to 425°F. Bake 12-14 minutes, until golden brown.
- Remove from the oven and brush with the melted butter, then sprinkle with garlic salt, and parmesan. Serve warm.
Notes
- Nutrition per breadstick: Calories: 136kcal, Carbohydrates: 21g, Protein: 3g, Fat: 4g, Saturated Fat: 1g, Polyunsaturated Fat: 1g, Monounsaturated Fat: 2g, Trans Fat: 0.1g, Cholesterol: 4mg, Sodium: 309mg, Potassium: 31mg, Fiber: 1g, Sugar: 2g, Vitamin A: 46IU, Vitamin C: 0.001mg, Calcium: 8mg, Iron: 1mg.


Leave a Reply