The Day I Ran Out of Chocolate Chips
I was making cookies for my grandkids. I opened the pantry. No chocolate chips! I had to think fast. I saw mint M&Ms and some Oreos. I decided to try them. It was a happy accident.
We mixed everything together. The kitchen smelled like a minty chocolate dream. Doesn’t that smell amazing? The cookies came out so good. Now, it’s the only way we make them. I still laugh at that day.
Why This Recipe Works
These cookies are soft and chewy. The brown sugar helps with that. The oil keeps them moist. The crushed Oreos add a little crunch. It’s a perfect mix of textures.
This matters because texture is just as important as taste. A good cookie should be fun to eat. Have you ever had a cookie that was too hard or too dry? Not these ones!
Let’s Make Some Magic
First, heat your oven to 350 degrees. Cream the butter, oil, and sugars together. This means mix them until they are smooth. Add your eggs and beat it all until it’s fluffy.
Now, add everything else. That’s the baking soda, powder, salt, vanilla, and flour. Last, stir in your crushed Oreos. Fun fact: The first Oreo was sold in 1912! Spoon the dough onto a greased sheet.
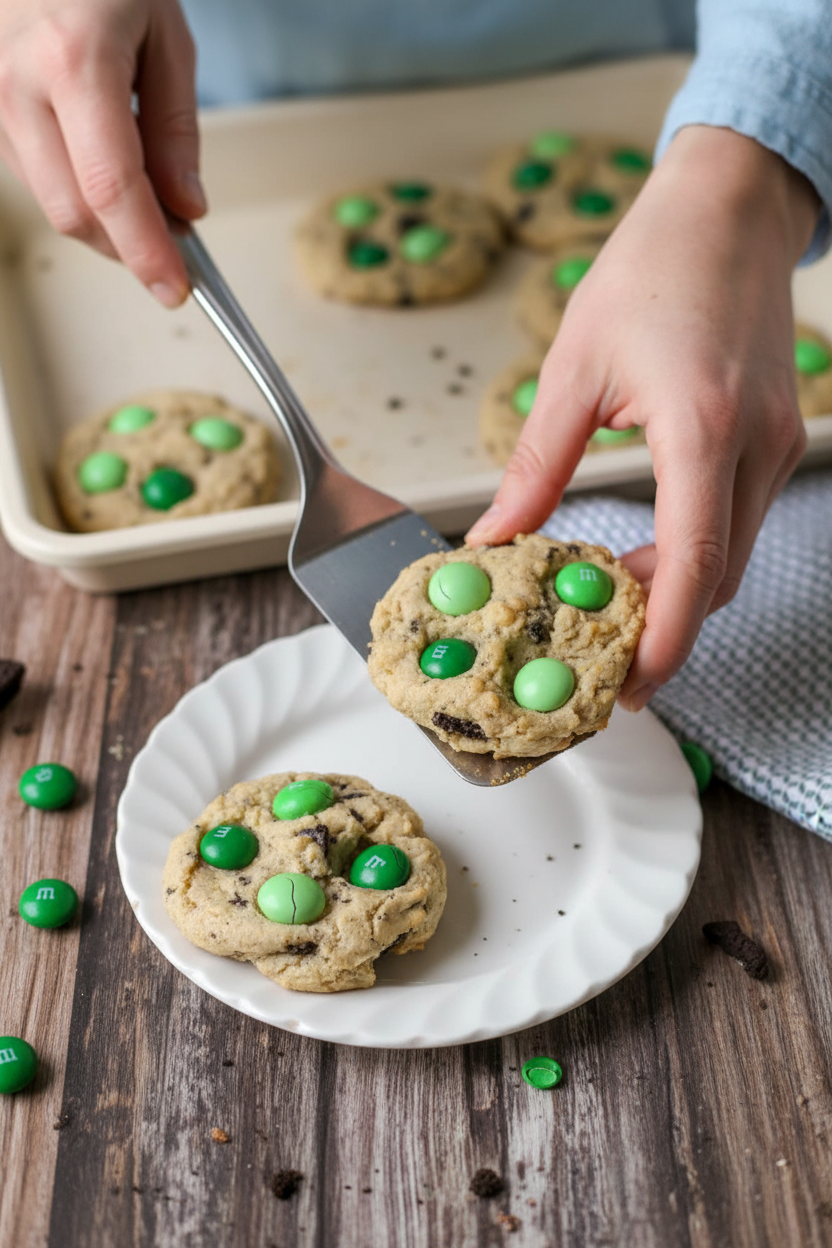
Press the mint M&Ms on top. Don’t mix them in the dough. This way, you see all the pretty colors. Bake for just 7 to 8 minutes. They will look a little soft. That’s okay! They firm up as they cool.
A Little Secret About Sharing
I always make a double batch. Why? Because these cookies make people smile. I bring them to neighbors. I take them to book club. Sharing food is sharing joy.
This matters. Food connects us. It starts conversations. What’s your favorite treat to share with friends? Tell me about it. I love hearing your stories.
Your Turn in the Kitchen
Now you try it! It’s hard to mess up. If you like more mint, use extra M&Ms. If you love crunch, add more Oreos. Make the recipe your own.
What other candy would you try in these cookies? Let me know your ideas. Did you make them with someone special? I hope you had as much fun as I do.
Ingredients:
| Ingredient | Amount | Notes |
|---|---|---|
| Brown sugar | 1 cup | |
| Sugar | 1 cup | |
| Butter or margarine | 1/2 cup | |
| Vegetable oil | 1/2 cup | |
| Eggs | 2 | |
| Baking soda | 1 tsp | |
| Baking powder | 1 tsp | |
| Salt | 1 tsp | |
| Vanilla extract | 1 tsp | |
| All-purpose flour | 3 cups | |
| Mint M&Ms | 1 bag | |
| Oreo Cookies | 1.5 sleeves | Crushed |
My Magical Mint M&M Oreo Cookies
Hello, my dear! Come sit. Let’s bake something fun. These cookies are a happy accident. I once mixed the wrong candies into my dough. Now they’re my grandson’s favorite. Doesn’t that smell amazing? The mint and chocolate is like a cool breeze. It reminds me of summer nights. I still laugh at that kitchen mix-up. It gave us a new family treasure.
Here is how we make the magic happen. Get your big bowl ready. We’ll make this easy, step-by-step. I’ll share my little secrets with you.
- Step 1: First, heat your oven to 350 degrees. Grab your big mixing bowl. Put the butter, oil, and both sugars inside. Mix them until they look creamy and smooth. It will look like light brown sand. This is the sweet start of everything.
- Step 2: Crack in the two eggs. Add the vanilla too. Now beat it all together. Watch it get fluffy and pale! It reminds me of clouds. My arm used to get tired doing this. (A hard-learned tip: use room-temperature eggs. They mix in so much better!)
- Step 3: Time for the dry team. Add the flour, baking soda, powder, and salt. Mix gently just until you see no white flour. Then, the fun part! Toss in your crushed Oreos. Stir them in carefully. You want little cookie chunks everywhere. Do you crush cookies in a bag or with a rolling pin? Share below!
- Step 4: Scoop dough onto a greased sheet. Leave space for spreading. Now, press Mint M&Ms on top of each one. Press them in slightly. They look like little gemstones. This makes every cookie extra special and pretty.
- Step 5: Bake them for 7 to 8 minutes. They might look soft in the middle. That’s perfect! They firm up as they cool. Let them rest on the sheet for a minute. Then move them to a rack. Try not to eat them all at once!
Cook Time: 8 minutes per batch
Total Time: 25 minutes
Yield: About 36 cookies
Category: Dessert, Cookies
Three Tasty Twists to Try
You can make this recipe your own. Change it up for different seasons or moods. Here are three ideas I love.
- Birthday Cookie: Use regular M&Ms and colorful sprinkles. It’s a party in every bite!
- Peanut Butter Dream: Use peanut butter Oreos. Add chopped peanuts too. So crunchy and good.
- Dark Chocolate Mint: Use dark cocoa powder in the dough. Swap in dark chocolate mint candies. It’s very grown-up and rich.
Which one would you try first? Comment below!
Serving Them Up With Style
These cookies are stars on their own. But you can make them even better. For a real treat, serve them slightly warm. Place them on a cute plate. Add a scoop of vanilla ice cream on the side. The mix of warm and cold is wonderful.
What should you drink with them? A cold glass of milk is always right. It’s the classic choice. For the adults, a little cup of coffee is nice. The bitterness balances the sweet mint. Which would you choose tonight?
Keeping Your Minty Cookies Fresh
These cookies stay soft for days. Just keep them in a sealed container. I use my old tin with the tight lid.
You can freeze the dough for later fun. Roll it into balls first. Place them on a tray until frozen solid.
Then pop the balls into a freezer bag. I once forgot I had dough saved. Finding it weeks later was a sweet surprise.
This matters because fresh cookies bring instant joy. Batch cooking lets you share that joy anytime. Have you ever tried storing it this way? Share below!
Cookie Troubles? Let’s Fix Them
First, if your cookies spread too thin, chill the dough. An hour in the fridge works wonders. This helps them keep their perfect shape.
Second, cookies too hard? You might have over-measured the flour. Spoon the flour into your cup. Then level it off with a knife.
Third, if the M&Ms crack, press them in after baking. I remember when my first batch had little cracks. They still tasted wonderful, though.
Fixing small issues builds your cooking confidence. It also makes sure every bite is delicious. Which of these problems have you run into before?
Your Quick Cookie Questions
Q: Can I make these gluten-free? A: Yes! Use your favorite gluten-free flour blend. The texture will be just a little different.
Q: Can I make the dough ahead? A: Absolutely. Make it and chill it overnight. The flavors get even better.
Q: What can I swap for Mint M&Ms? A: Plain M&Ms work great. So do chocolate chips. *Fun fact: The original M&M was created for soldiers!*
Q: Can I double the recipe? A: You sure can. Just mix in a very big bowl. You will have plenty to share.
Q: Any optional tips? A: Add a tiny pinch of extra salt. It makes the mint and chocolate taste brighter. Which tip will you try first?
From My Kitchen to Yours
I hope you love making these cookies. Baking is about creating sweet memories. I would love to see your creations.
Share a photo of your cookie tray with friends. Your kitchen stories are my favorite thing to hear. Have you tried this recipe? Tag us on Pinterest!
Happy cooking!
—Lena Morales.


Mint M&M Oreo Cookies: Mint M and M Oreo Cookies Recipe
Description
Experience the ultimate cookie mashup with these Mint M&M Oreo Cookies, featuring a soft, chewy base loaded with crushed Oreos and topped with minty M&Ms.
Ingredients
Instructions
- Preheat oven to 350 degrees F (175 degrees C).
- In a large bowl, cream together the butter, oil, brown sugar, and white sugar until smooth.
- Add the eggs, and beat until the mixture is light and fluffy.
- Add the baking soda, baking powder, salt, vanilla extract, and flour. Mix until well combined.
- Fold in the crushed Oreo cookies.
- Spoon dough onto a greased cookie sheet. Press Mint M&Ms onto the top of each cookie dough ball, slightly pressing them in.
- Bake at 350 degrees F for 7-8 minutes, or until the edges are just set.
Notes
- For best results, do not overbake. The cookies will continue to set as they cool on the baking sheet.


Leave a Reply