Why We Flatten the Bird
Let me tell you about spatchcocking. It just means flattening the turkey. My Tío Carlos taught me this. He was always in a hurry to eat. I still laugh at that.
You cut out the backbone and press the bird flat. This is the big secret. It makes the turkey cook evenly. The white meat and dark meat finish at the same time. No more dry breast while waiting for the thigh to cook! That matters because everyone gets a perfect, juicy piece.
The Butter That Loves the Meat
Now, for the fun part. We make a flavored butter. Soft butter, lemon zest, garlic, and parsley all get mashed together. Doesn’t that smell amazing? It’s like summer in a bowl.
You slide most of it right under the turkey’s skin. Be gentle, so you don’t tear it. As it roasts, that butter melts into the meat. It bastes the turkey from the inside out. This matters because flavor cooks right into every single bite. What’s your favorite herb to smell in the kitchen? Mine will always be parsley.
A Bed for the Bird
We don’t use stuffing inside the bird. Instead, we make a vegetable bed. Onion, celery, carrot, and garlic go in the pan. You pour a little water over them.
The turkey sits on top. Those veggies steam and soften. They catch all the tasty drippings. Fun fact: this veggie mix is called a “mirepoix.” It makes the most amazing juices for gravy. Do you prefer your gravy smooth or with little bits in it?
The Simple Roast
We start the oven hot to get the skin crispy and golden. Then we turn it down to cook the inside gently. Your whole kitchen will smell incredible.
The only tool you really need is a meat thermometer. Trust it, not just the clock. When the thigh reads 165°F, it’s done. Then, you must let it rest. This is the hardest part! Waiting 30 minutes lets the juices settle back into the meat. If you carve too soon, all the good juice runs onto the cutting board.
Your Turn at the Table
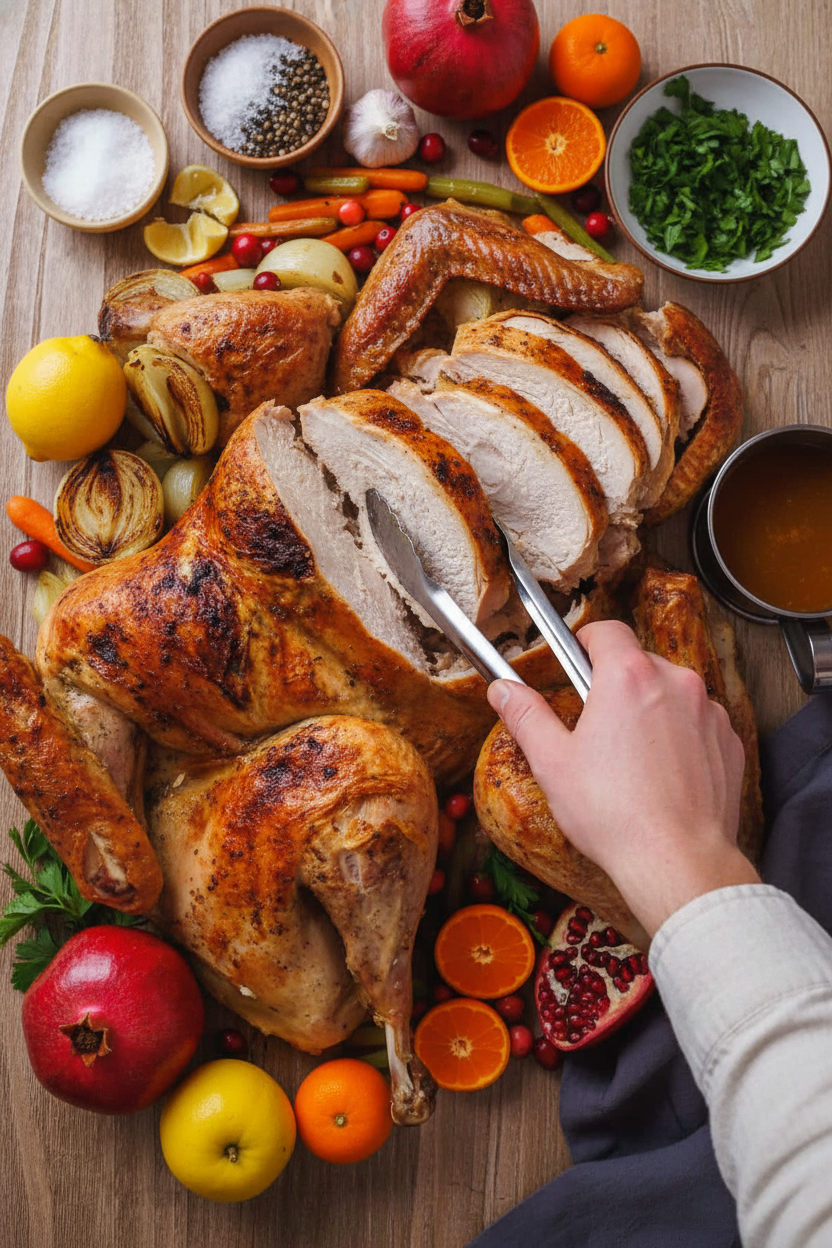
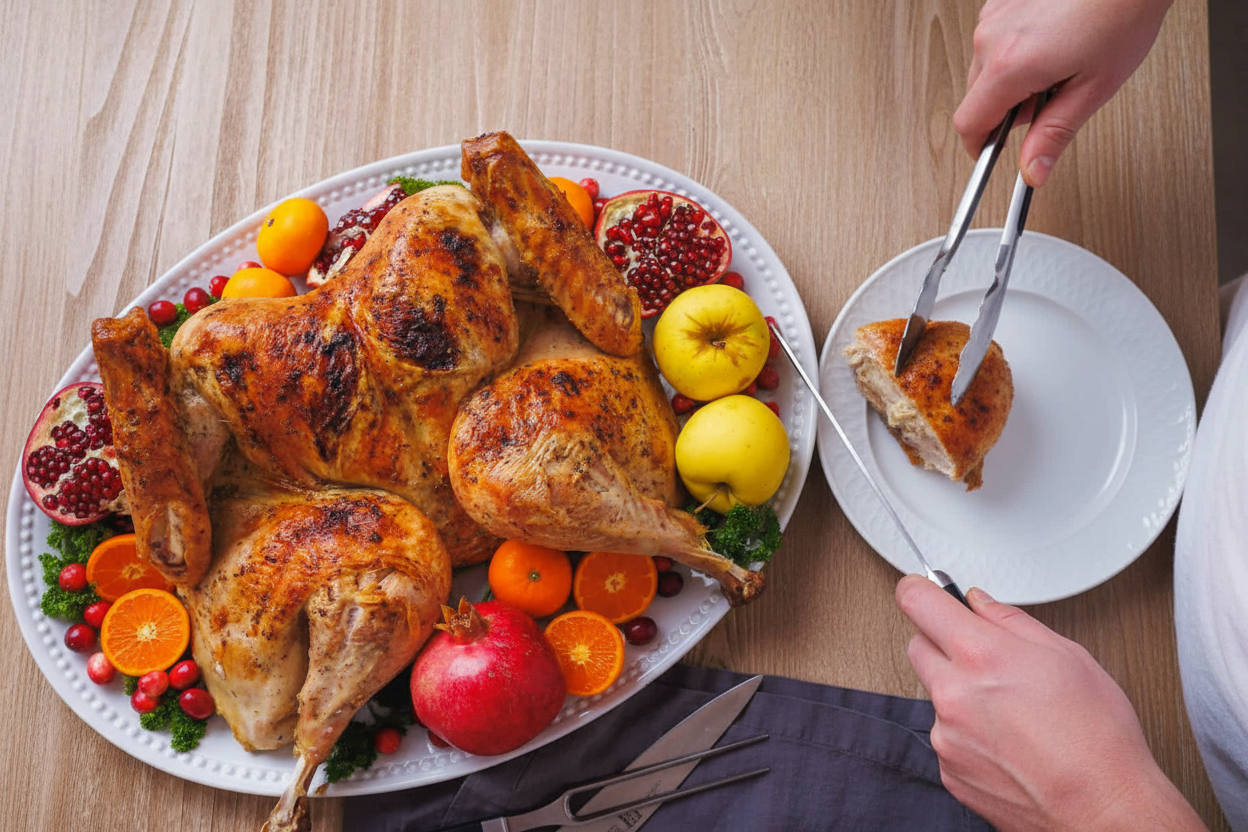
Carving a flat turkey is so easy. You just slice the breast and separate the legs. No tricky angles. Everyone can see all the beautiful meat right away.
This method changed my holiday cooking. It gave me more time with my family, not stuck in the kitchen. That’s the best gift. What’s one kitchen task that used to scare you, but doesn’t anymore? For me, it was definitely the whole turkey!
Ingredients:
| Ingredient | Amount | Notes |
|---|---|---|
| turkey | 12 lb | 11-14 lbs will work, bake time varies |
| salt & pepper | to taste | |
| unsalted butter, softened | 3/4 cup (12 Tbsp) | For the Flavored Butter |
| light olive oil | 2 Tbsp | For the Flavored Butter, plus more to drizzle |
| lemon zest | from 1 lemon | For the Flavored Butter |
| fresh lemon juice | 2 Tbsp | For the Flavored Butter |
| garlic cloves, finely minced | 3 large | For the Flavored Butter |
| fresh parsley, chopped | 1/4 cup | For the Flavored Butter |
| sea salt | 1/2 Tbsp | For the Flavored Butter |
| black pepper, freshly ground | 1/2 tsp | For the Flavored Butter |
| onion, sliced into rings | 1 large | For the ‘Stuffing’ |
| celery sticks, sliced | 3 | For the ‘Stuffing’ |
| carrot, sliced into rings | 1 | For the ‘Stuffing’, no peeling needed |
| garlic cloves, sliced | 4 | For the ‘Stuffing’, no peeling needed |
| water | 1/2 cup | For the ‘Stuffing’ |
My Favorite Way to Roast a Turkey
Hello, my dear! Come sit. Let’s talk turkey. I used to fuss over a big bird for hours. It felt like a wrestling match. Then I learned this “spatchcock” trick. It just means flattening it. This makes the turkey cook evenly and so much faster. The skin gets wonderfully crispy. I still laugh at that funny word. My grandson calls it “smash-chicken.” He’s not wrong!
Now, don’t let the cutting scare you. Good kitchen shears are your best friend here. Just follow these steps. You’ll have the most juicy, flavorful turkey ever. Doesn’t that smell amazing already? Let’s begin.
- Step 1: First, get your turkey ready. Take out the neck and giblets from inside. Pat the skin very dry with paper towels. A dry turkey means crispy skin. Place it breast-side down on a big pan. The legs should point toward you.
- Step 2: Now, we remove the backbone. Use your shears to cut close to the bone on each side. It takes a little arm power. My first time, I made my son do it! Save that backbone. We’ll use it later for flavor. (Hard-learned tip: Keep your shears sharp. Dull ones make this job a real chore.)
- Step 3: Flip the turkey over. You’ll see the breastbone. Gently press down right in the center. You will hear a little crack. This lets the turkey lie perfectly flat. See? It’s already looking more manageable.
- Step 4: Time for the secret weapon: flavored butter. Mix the soft butter, oil, lemon, garlic, and parsley. Smash it all together. Now, gently slide your fingers under the turkey skin. Push most of that butter right onto the meat. Massage the top to spread it. This keeps every bite moist. What’s your favorite herb to cook with? Share below!
- Step 5: Scatter the onion, celery, and carrot in your pan. Add water. Place the turkey on top. Brush the rest of the melted butter all over the skin. This gives it that beautiful golden color. Tuck the wings under so they don’t burn.
- Step 6: Roast it hot at first for browning. Then lower the heat to finish cooking. Always use a meat thermometer. It’s done at 165°F in the thigh. Let it rest for a full 30 minutes before you carve. This lets the juices settle back in. Trust your grandma on this one!
Cook Time: About 1 hour 30 minutes
Total Time: About 2 hours 30 minutes (with prep and rest)
Yield: 8-10 servings
Category: Dinner, Holiday
Three Tasty Twists on the Butter
The flavored butter is where you can play. Change the herbs and spices. It becomes a whole new meal. Here are three ideas I love.
- Herbs de Provence: Use thyme, rosemary, and a pinch of lavender. It smells like a summer garden.
- Smoky & Spicy: Add a teaspoon of smoked paprika and a tiny pinch of cayenne. It gives a warm, cozy kick.
- Orange & Sage: Swap lemon for orange zest. Use fresh chopped sage. It tastes like a fall holiday.
Which one would you try first? Comment below!
Serving Your Masterpiece
That turkey will be the star. But it needs a good supporting cast. I love serving it on a big platter with all the roasted vegetables from the pan. They are so sweet and tender. Add a bowl of creamy mashed potatoes for the gravy. Don’t forget something green, like simple steamed green beans.
For a drink, a chilled apple cider is perfect. The sweetness pairs so well. For the grown-ups, a glass of Pinot Noir wine is lovely. It sips nicely with the rich turkey. Which would you choose tonight?
Storing Your Turkey for Later
Let’s talk about leftovers. They are the best part. First, let the turkey cool completely. Then, take the meat off the bones. Store it in airtight containers in the fridge. It will stay good for three to four days.
You can also freeze it for later. I pack the meat in freezer bags. I squeeze out all the air first. This keeps it from getting freezer burn. It will be good for two to three months.
To reheat, place the meat in a baking dish. Add a splash of broth or water. Cover it tightly with foil. Warm it in a 325°F oven until it’s hot. This keeps it moist.
I once reheated turkey in the microwave without liquid. It turned into a dry little puck. Adding that broth makes all the difference. Storing food well means no waste and easy meals. Have you ever tried storing it this way? Share below!
Fixing Common Turkey Troubles
Sometimes, cooking brings little surprises. The skin isn’t crispy? Your oven might be too crowded. Make sure hot air can move around the pan. A higher heat at the start helps, too.
The butter is hard to spread under the skin. Just soften it first. Leave it on the counter for an hour. I remember trying to use cold butter once. It tore the skin right open. Soft butter slides in like a dream.
The vegetables at the bottom burn. Add a bit more water to the pan. Check it halfway through cooking. This creates steam and tasty juices. Fixing small problems builds your cooking confidence. It also makes your food taste so much better. Which of these problems have you run into before?
Your Turkey Questions, Answered
Q: Is this recipe gluten-free? A: Yes, it is naturally gluten-free. Just check your broth labels if you make gravy.
Q: Can I make anything ahead? A: You can make the flavored butter a day early. Keep it covered in the fridge.
Q: What if I don’t have fresh herbs? A: Use one tablespoon of dried parsley instead. It will still be delicious.
Q: Can I cook a bigger turkey? A: Yes, but it will need more time. Always use a meat thermometer to check.
Q: Any optional tips? A: Let the turkey sit out for one hour before cooking. This helps it roast evenly. Which tip will you try first?
From My Kitchen to Yours
I hope you love this recipe. It changed my holiday cooking forever. Fun fact: Spatchcocking helps the turkey cook in nearly half the usual time!
I would love to see your creation. Share a photo of your beautiful table. Your stories make my day. Have you tried this recipe? Tag us on Pinterest!
Happy cooking!
—Lena Morales.
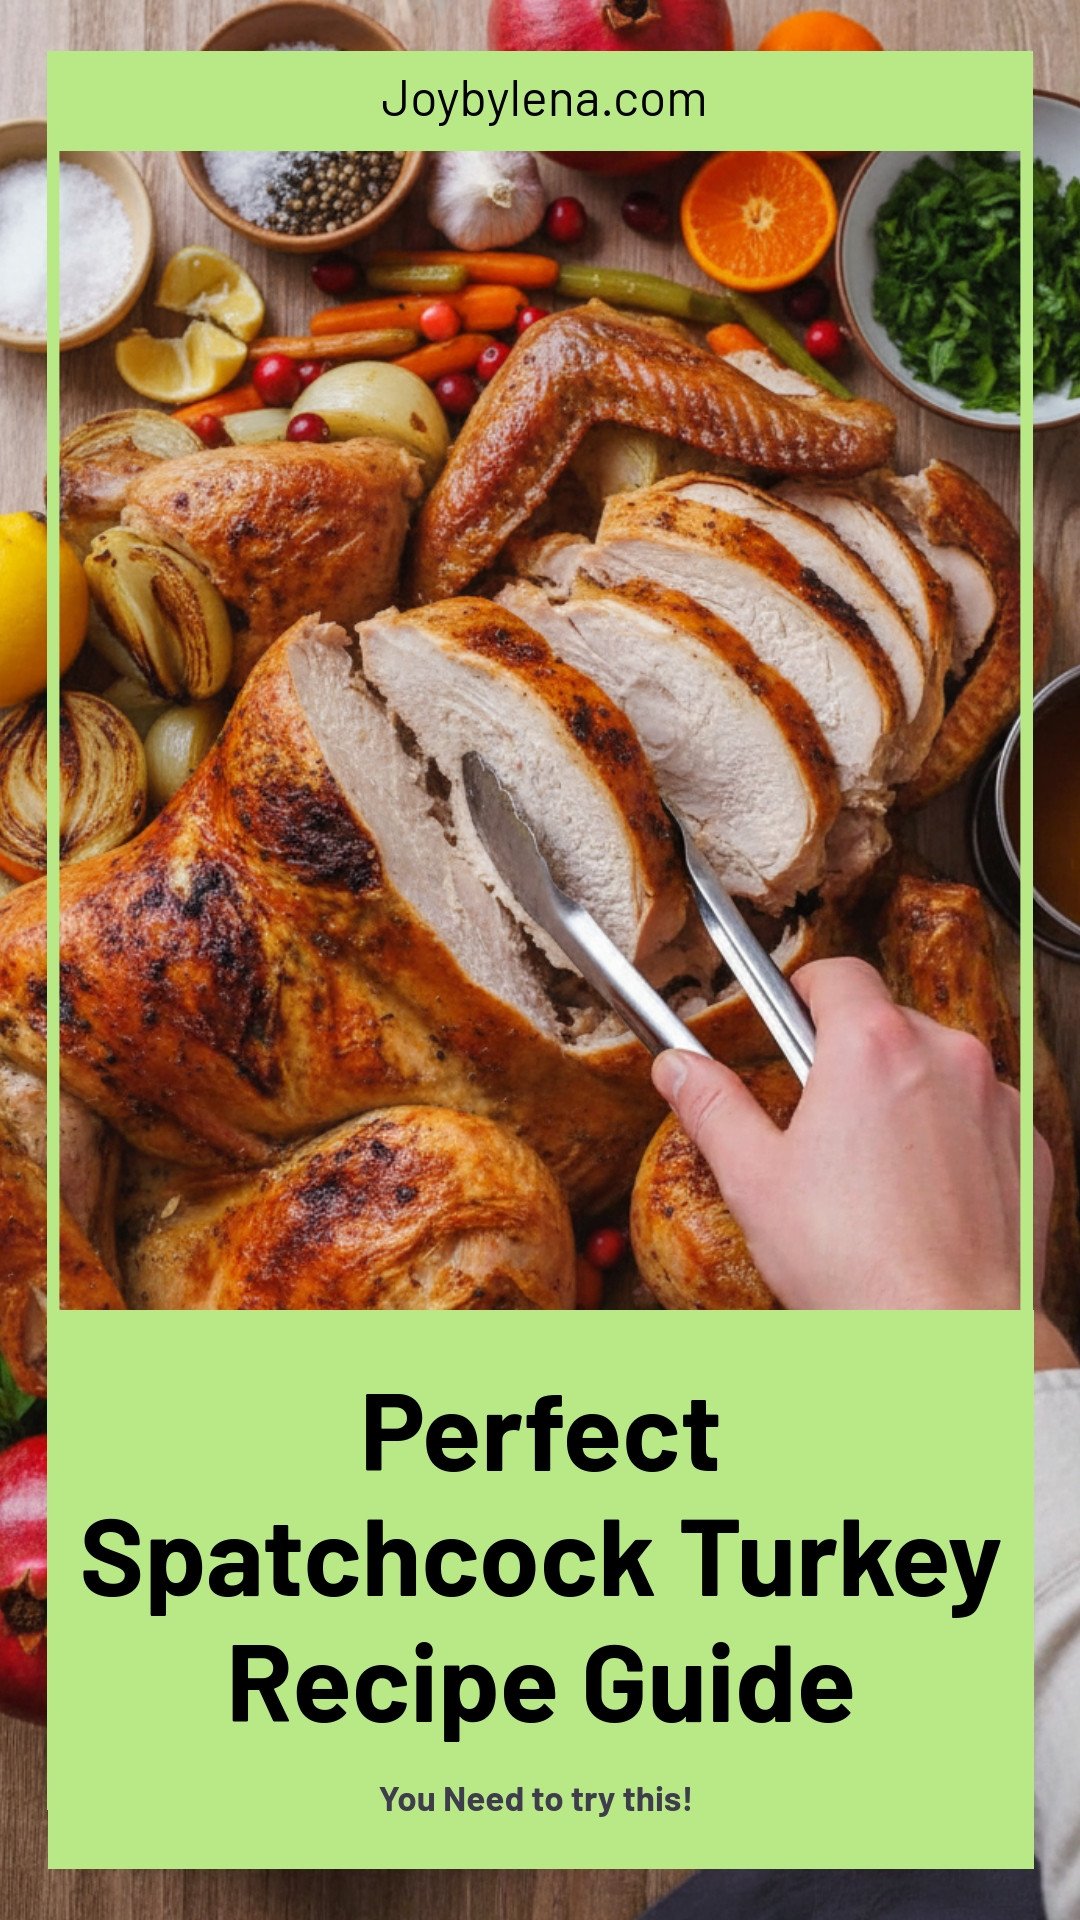
Spatchcock Turkey: Perfect Spatchcock Turkey Recipe Guide
Description
Learn how to spatchcock and roast a turkey for the most juicy, flavorful, and evenly cooked Thanksgiving centerpiece, complete with a lemon-garlic herb butter.
Ingredients
For the Flavored Butter:
For the ‘Stuffing’:
Instructions
- Prep the turkey – Remove the neck and giblets. If your turkey was brined, drain the brine, carefully rinse, and thoroughly pat dry. Set the turkey on a rimmed baking sheet, breast-side down, and legs towards you.
- Remove the spine – Identify the spine and, using sharp poultry shears, cut along both sides of the backbone to remove it. Keep your shears as close to the spine as you can, and cut through the bones going all the way up the spine. This requires some arm and hand strength. Rotate the pan and start cutting through on the other side of the spine.
- Break the breastbone – Open the turkey and you will be looking at the bottom of the breastbone. With a chef’s knife, cut a slit into the breastbone to score it – this will make the next step easier. Flip the turkey over and press down on the breastbone – You should hear a crack, allowing you to flatten the turkey.
- Prep – Preheat the oven to 425°F with a rack in the lower third of the oven. Scatter the onion slices, garlic, and parsley in a large roasting pan and pour the water over the uncooked vegetables. Set the pan aside. In a medium bowl, combine the ingredients for the flavored butter and mash together with a fork until combined, or pulse together in a food processor.
- Season – Using salt and pepper, season the bottom/inside cavity of the turkey generously (If you brined, you can skip seasoning the inside), then transfer the turkey breast-side up, to the prepared roasting pan. Tuck the wings behind the turkey so they don’t burn. If you have room, put the neck and spine in the same roasting dish to enhance the drippings.
- Add flavored butter – Slide your fingers under the skin to separate the skin from the meat. Do this from the front and the back of the turkey being careful not to tear the skin. Stuff 2/3 of the butter mixture under the skin then massage the top of the skin to spread the butter. Set the legs to face inward. Melt the remaining butter and brush over the outside of the turkey. Season the whole turkey with more salt and pepper.
- Bake at 425°F for 30 minutes to get the browning started. Reduce the heat to 400°F and roast for another 1 hour, or until the thickest part of the thigh registers at 165°F on a meat thermometer. Our 12 1/2 pound turkey took an hour and a half to fully cook. Check the temperature in several places with an instant-read thermometer.
- Rest the turkey – Remove the turkey from the oven, loosely tent it with foil, and rest the turkey for 30 minutes before carving. Spoon over the pan juices or use pan juices to make Turkey Gravy.
Notes
- Nutrition Per Serving (1 serving): Calories: 601 kcal, Carbohydrates: 3 g, Protein: 84 g, Fat: 27 g, Saturated Fat: 8 g, Polyunsaturated Fat: 6 g, Monounsaturated Fat: 9 g, Trans Fat: 0.4 g, Cholesterol: 288 mg, Sodium: 790 mg, Potassium: 927 mg, Fiber: 1 g, Sugar: 1 g, Vitamin A: 1482 IU, Vitamin C: 5 mg, Calcium: 56 mg, Iron: 4 mg.


Leave a Reply