A Cake That Floats
Let’s talk about angel food cake. It’s the cloud of the cake world. It feels light as air. I think that’s why it’s perfect for ice cream. The soft cake soaks up all that cold, sweet creaminess. Doesn’t that sound wonderful?
My grandkids call this my “magic trick” cake. You bake it in a tall, tube pan. Then you fill that same pan back up with layers. When you flip it out, it looks like a fancy bakery cake. Their eyes get so wide. I still laugh at that.
The Heart of the Matter
This cake is about more than dessert. It’s about making something special with your hands. You are building a sweet tower of joy. That matters. It turns a regular day into a little celebration.
It also teaches a good kitchen lesson. Patience. You must let the cake cool. You must freeze it overnight. Good things take time. The waiting makes the first bite even sweeter.
My Little Ice Cream Story
I remember making this for my neighbor, Ben. He was having a rough week. I used his favorite flavors: chocolate and vanilla bean. His whole face lit up when he saw it. That’s the power of food. It’s a hug you can eat.
What two ice cream flavors make you the happiest? Think about that for your cake. Maybe strawberry and cheesecake? Or cookies and cream? The choice is yours. That’s the fun part.
The Simple How-To
Make your angel food cake first. Let it cool completely. This is important. A warm cake will melt your ice cream too fast. While it cools, let your ice cream sit on the counter. It just needs to get soft enough to spread.
Now, get your hands messy. Tear the cool cake into chunks. Don’t cut it. Tearing makes rough edges. Those edges hold the ice cream better. Fun fact: The air whipped into angel food cake is why it’s so light. No butter or oil at all!
The Big Reveal
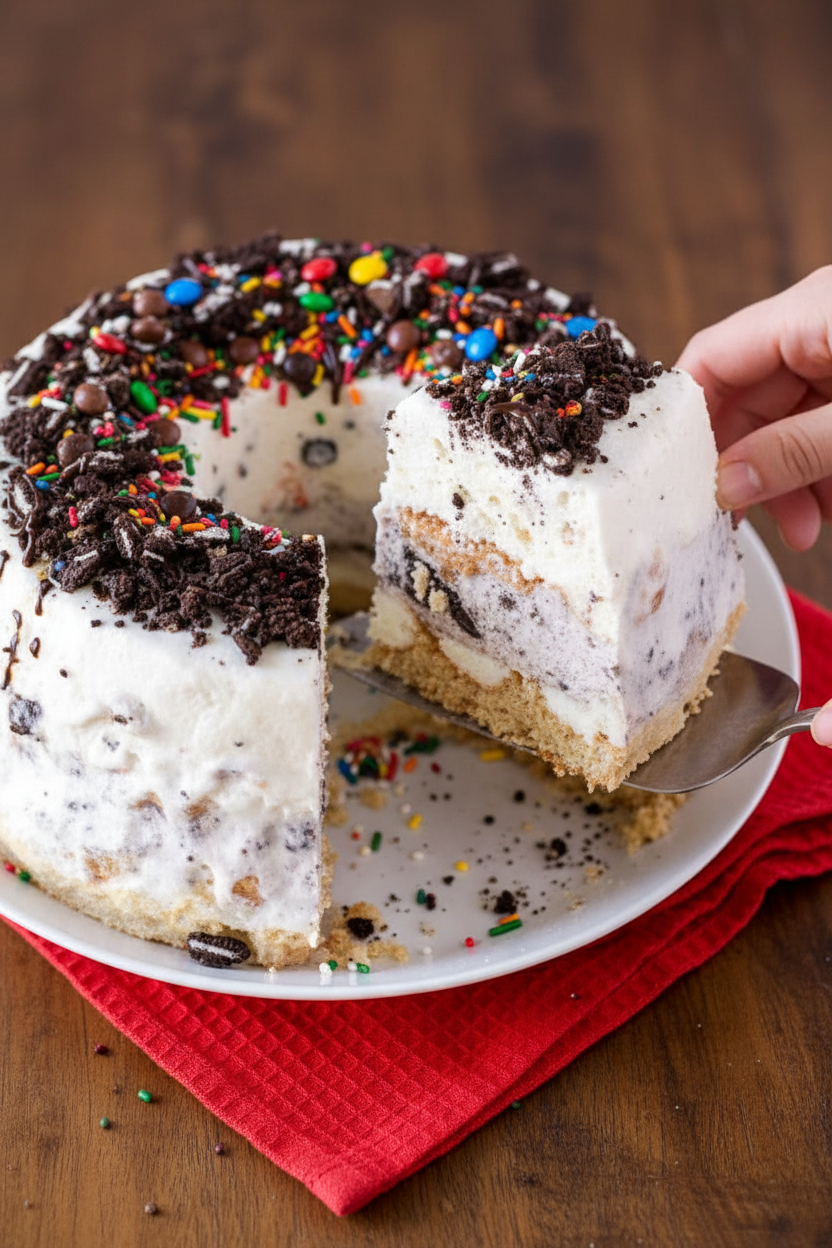
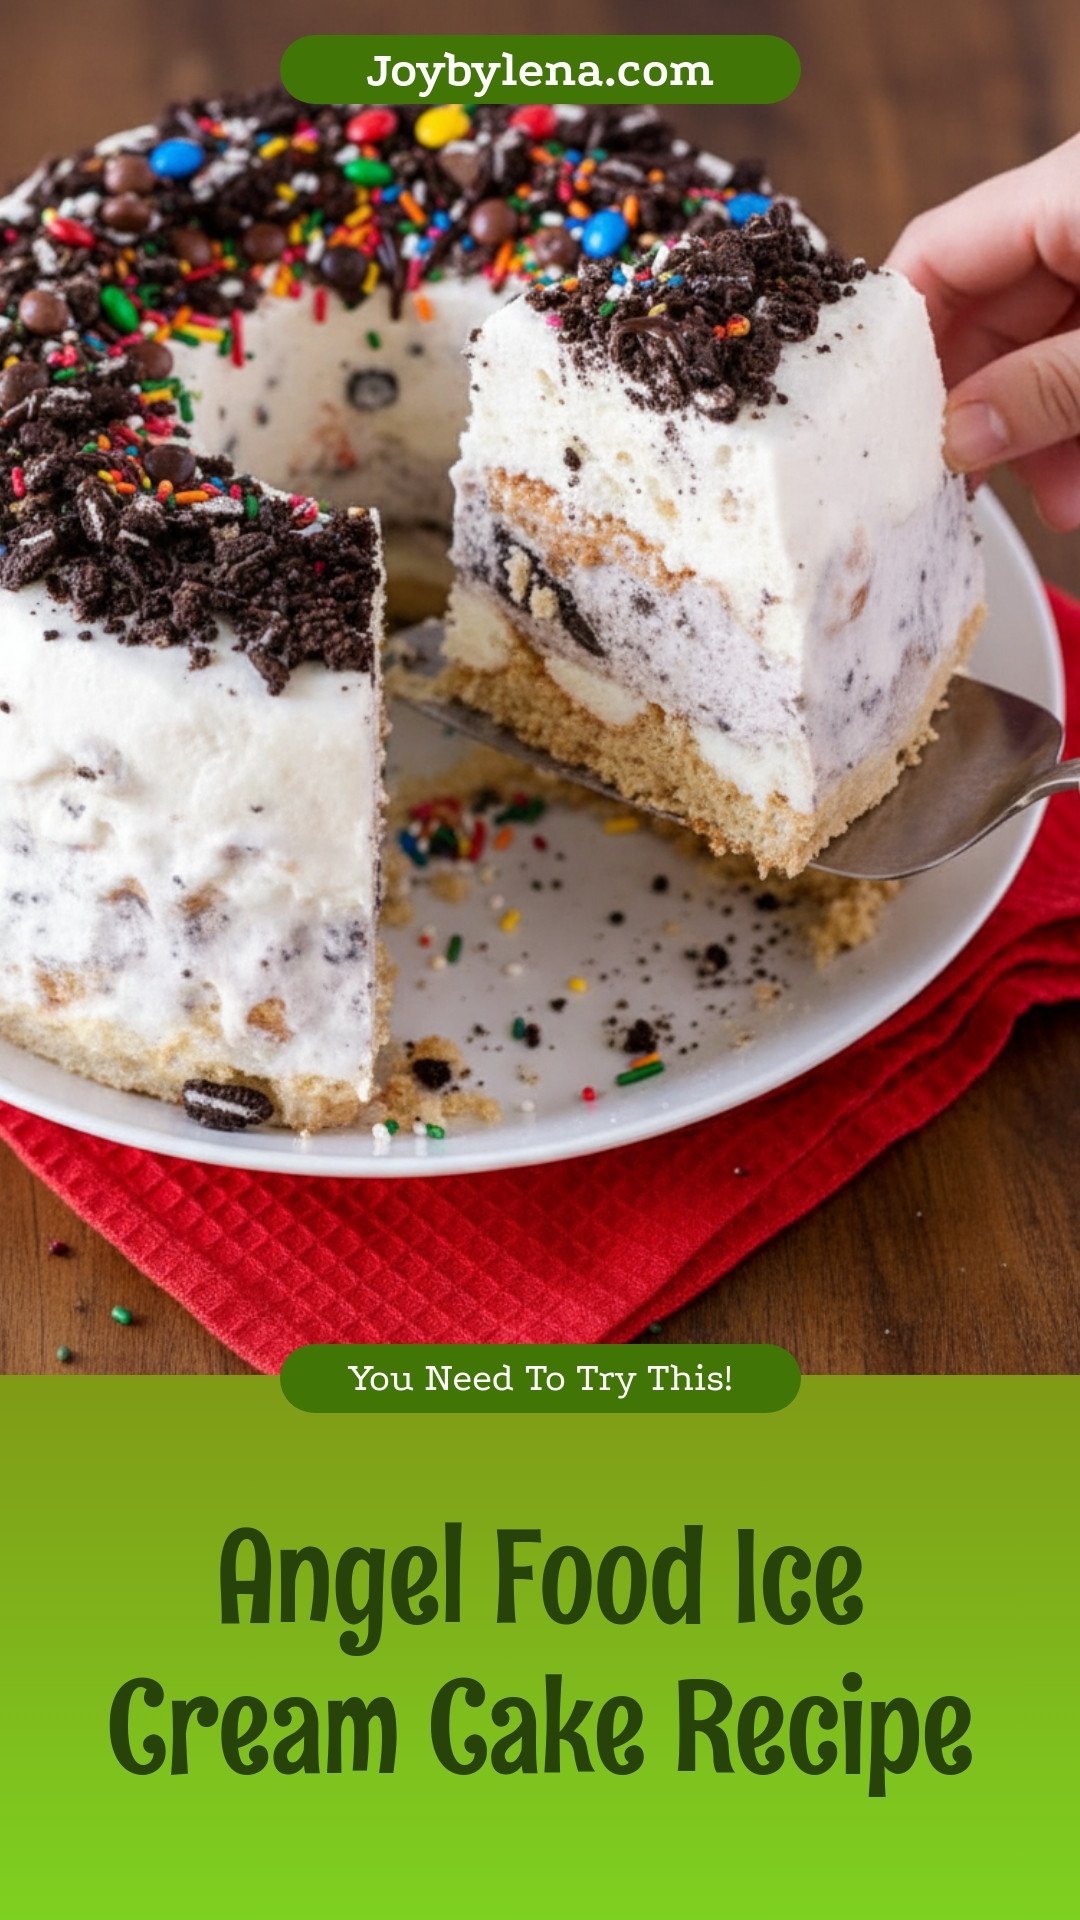
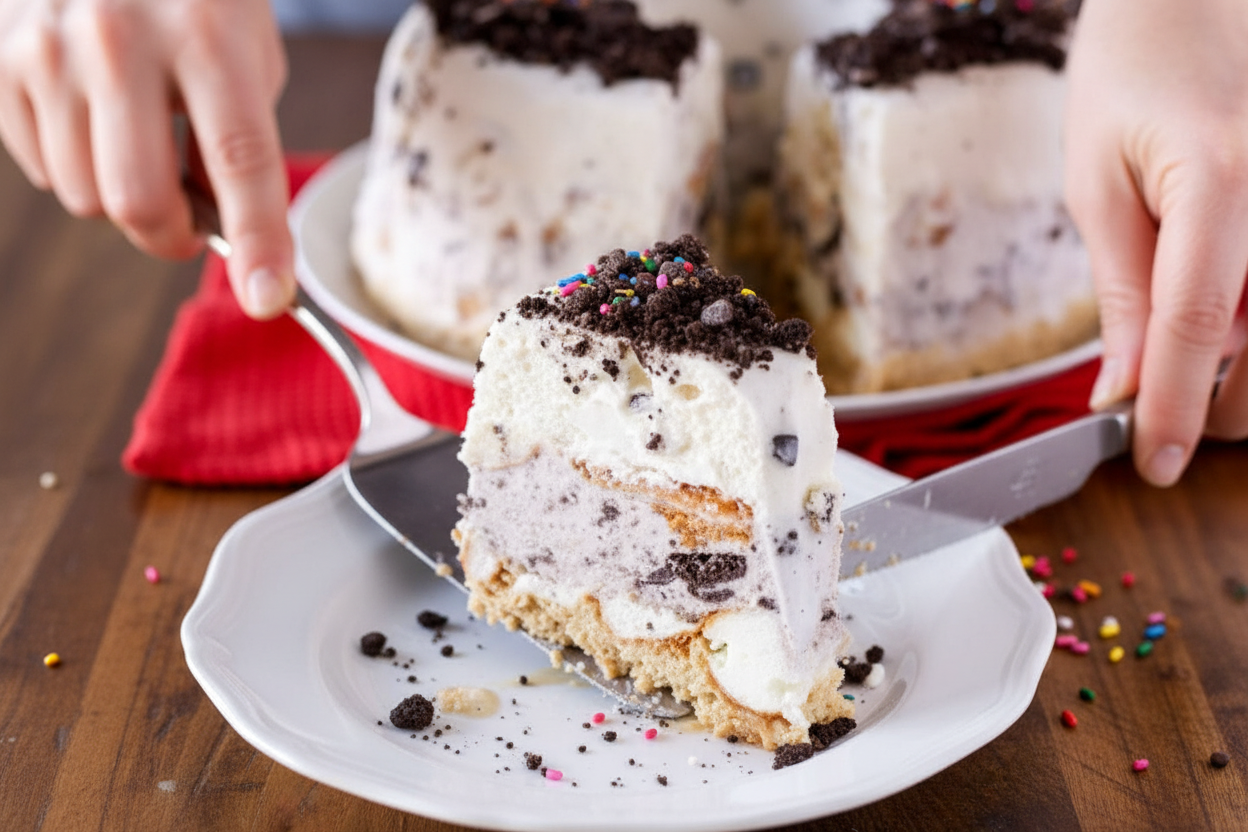
After it freezes overnight, the magic happens. Dip the pan in hot water for a few seconds. Place a plate on top and flip. Hold your breath. Then, tap the pan. Your beautiful cake will slide out.
The outside will look a little melty. That’s okay. This is your canvas. Add sprinkles. Add crushed cookies. Make it yours. Then freeze it again for a couple hours. Have you ever tried a dessert that looks like a total showstopper? It’s easier than you think, right?
Your Turn to Share
This cake is for birthdays. For hot summer nights. For “just because” days. It always brings people together. Everyone gathers around, waiting for a slice. Doesn’t that smell amazing? The sweet cake, the cold ice cream.
If you make it, tell me what you picked for toppings. Did you go wild with candy? Or keep it simple with fresh fruit? I love hearing your ideas. They inspire me for next time.
Ingredients:
| Ingredient | Amount | Notes |
|---|---|---|
| Angel food cake mix | 1 (16-ounce) box | Plus any ingredients listed on the box |
| Ice cream | 4 quarts | Ideally 2–3 different flavors |
| Sprinkles, candies, crushed cookies or chocolates | As desired | Optional toppings |
My Heavenly Angel Food Ice Cream Cake
Hello, my dear! Come sit. Let’s make a cloud cake. This dessert is pure joy. I remember making it for my grandson’s birthday. His eyes got so wide! It’s easier than it looks. We just layer soft cake and ice cream. Doesn’t that sound wonderful?
You will need a box of angel food cake mix. You’ll also need four quarts of ice cream. Pick your favorite flavors! I love strawberry and vanilla together. The colors look so pretty. Now, let’s begin our little project.
Step 1:
First, bake your angel food cake. Follow the directions on the box. Let it cool completely on the counter. This is very important. A warm cake will melt our ice cream! I still laugh at that. I learned the hard way once.
Step 2:
Now, let the ice cream soften. Take the tubs from the freezer. Leave them out for about 10 minutes. We want them spreadable, not soupy. (My hard-learned tip: set a timer! It softens faster than you think.)
Step 3:
Tear the cooled cake into pieces. Use your clean hands! Make bite-sized chunks. It feels fun and messy. This is how we build our layers. What two ice cream flavors would you pick? Share below!
Step 4:
Time to build our dream cake. Use the same cake pan. Spread one-third of the soft ice cream in the bottom. Press half the cake pieces into it. Repeat the layers. Finish with a last blanket of ice cream on top.
Step 5:
Patience, my friend. Freeze the cake overnight. The next day, fill a bowl with hot water. Dip the pan bottom in it for a few seconds. Flip it onto a plate. The cake slides out like magic! Add sprinkles now. Freeze it again for two hours. Then, slice and enjoy the smiles.
Cook Time: 4–6 hours (freezing)
Total Time: 4 hours 30 minutes
Yield: 12 servings
Category: Dessert, Cake
Three Fun Twists to Try
This cake is like a blank canvas. You can paint it with so many flavors! Here are my favorite ideas. They always make the party special.
Cookies & Cream Dream:
Use chocolate ice cream. Mix crushed chocolate sandwich cookies right into the cake pieces. Doesn’t that sound amazing?
Berry Summer Cloud:
Use vanilla ice cream. Swirl in fresh raspberry jam between the layers. Top with real berries. It tastes like sunshine.
Peanut Butter Cup:
Use chocolate and peanut butter ice cream. Add mini peanut butter cups with the cake chunks. It’s my grandson’s absolute favorite.
Which one would you try first? Comment below!
Serving It Up With Style
This cake is a celebration all by itself. But a few little extras make it perfect. I like to add a dollop of whipped cream on each slice. A fresh mint leaf looks pretty, too. You could serve it with a small bowl of extra sprinkles. Let everyone add their own!
For drinks, I have two perfect matches. For the grown-ups, a little glass of sweet dessert wine is lovely. For everyone, a cold glass of fizzy lemonade is just right. It cuts through the sweet creaminess so nicely. Which would you choose tonight?
Keeping Your Angel Food Ice Cream Cake Happy
This cake lives in the freezer. Wrap it tightly in plastic wrap. This keeps ice crystals away. You can store it for up to two weeks.
No reheating needed. Just slice it frozen. Let each piece sit for five minutes before eating. This softens it perfectly.
I once made two cakes for a big family party. It saved me so much time. Batch cooking like this matters. It turns a busy day into a calm one.
Have you ever tried storing it this way? Share below!
Simple Fixes for Common Cake Troubles
Is your ice cream too hard to spread? Let it sit on the counter. Ten minutes is usually enough. I remember when mine melted into soup. A little soft is perfect.
Is the cake sticking to the pan? The hot water trick is key. Dip the pan for just a few seconds. This matters for a beautiful cake. A clean release makes you feel like a pro.
Are the layers messy? Use a spoon to press them gently. It does not need to be perfect. Why does this matter? Every bite will still taste wonderful. Cooking confidence grows with simple fixes.
Which of these problems have you run into before?
Your Quick Questions, Answered
Q: Can I make this gluten-free? A: Yes. Use a gluten-free angel food cake mix. Check your ice cream labels too.
Q: How far ahead can I make it? A: You can assemble it two weeks ahead. The freezer is your friend.
Q: What are good ice cream swaps? A: Try strawberry with vanilla. Or cookies and cream with chocolate. Fun fact: using three flavors makes pretty layers.
Q: Can I make a smaller cake? A: Sure. Just use half the cake mix. Layer it in a loaf pan.
Q: Are toppings necessary? A: No, but they are fun. Crushed cookies add a nice crunch.
Which tip will you try first?
From My Kitchen to Yours
I hope you love making this cake. It is a joyful, messy adventure. I would love to see your creation.
Share a photo of your masterpiece. Let me see your colorful layers and topping choices.
Have you tried this recipe? Tag us on Pinterest! My handle is @LenasCozyKitchen. I cannot wait to see.
Happy cooking! —Lena Morales.
Angel Food Ice Cream Cake
Description
A delightful, no-bake frozen dessert made with light angel food cake and layers of your favorite ice cream flavors.
Ingredients
sprinkles, candies, crushed cookies or chocolates (optional)
Instructions
- Make angel food cake as directed on the box and let cool completely.
- While cake is cooling, remove ice cream tubs from the freezer to soften just enough to be able to spread.
- Remove cake from the pan and tear it into small pieces.
- To layer the cake: Spread about one-third of the softened ice cream in the bottom of an angel food cake pan, then add half the cake pieces. Repeat layering, adding another layer of ice cream followed by the remaining half of the cake, and then finish with a final layer of ice cream. Freeze overnight.
- To remove the cake from the pan, fill a large bowl with hot water and dip the bottom of the pan into the hot water for a few seconds. Place a plate on the top of the pan, then flip it over. The cake should slide right out onto the plate. The outer layer of the cake will be a little melted.
- Add any desired toppings at this point, then place cake back into the freezer to firm it up. Freeze for at least 2 hours before cutting and serving.
Notes
- Nutrition per 1 slice: Calories: 490kcal | Carbohydrates: 56g | Protein: 8g | Fat: 26g | Saturated Fat: 16g | Polyunsaturated Fat: 1g | Monounsaturated Fat: 7g | Cholesterol: 104mg | Sodium: 190mg | Potassium: 471mg | Fiber: 2g | Sugar: 50g | Vitamin A: 996IU | Vitamin C: 1mg | Calcium: 303mg | Iron: 0.2mg


Leave a Reply