The Story Behind My Bean Chimichangas
My grandson, Miguel, invented these. He was ten. He wanted a “crispy bean burrito.” So we played in the kitchen. I still laugh at that messy, happy day.
We tried baking. We tried frying. Our final method worked best. It gives you a crunchy outside and a gooey, warm inside. Family recipes often start by accident. That’s why this matters. The best food comes from trying and having fun.
Why We Mix Things Just So
Let’s talk about the egg white. It seems odd, right? It’s our secret glue. It helps the tortilla stay sealed shut. No bean spillage in the oil!
The Velveeta and RO*TEL melt into the beans. It makes a creamy, tangy filling. Doesn’t that smell amazing when it warms up? *Fun fact: The name “chimichanga” might mean “thingamajig” in Spanish. Someone probably made it by accident, just like us!
How to Fold Without the Fuss
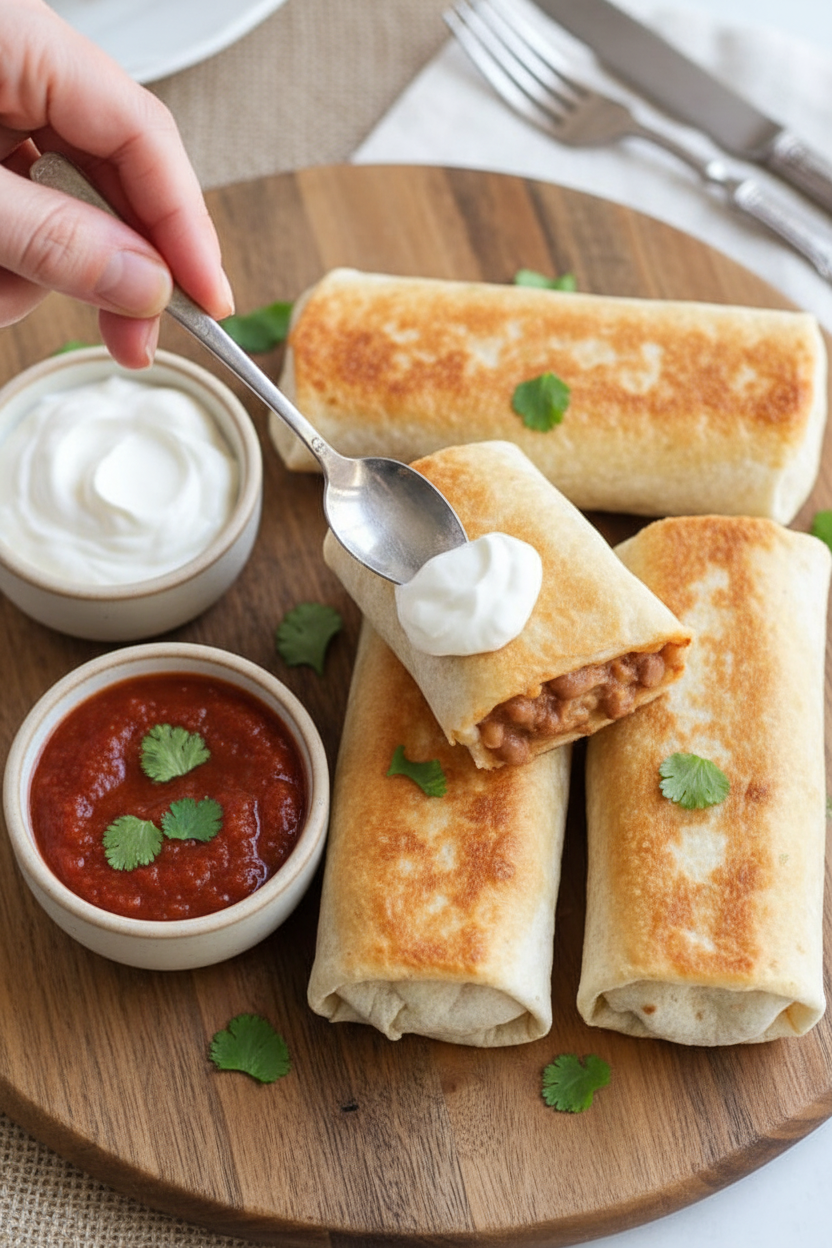
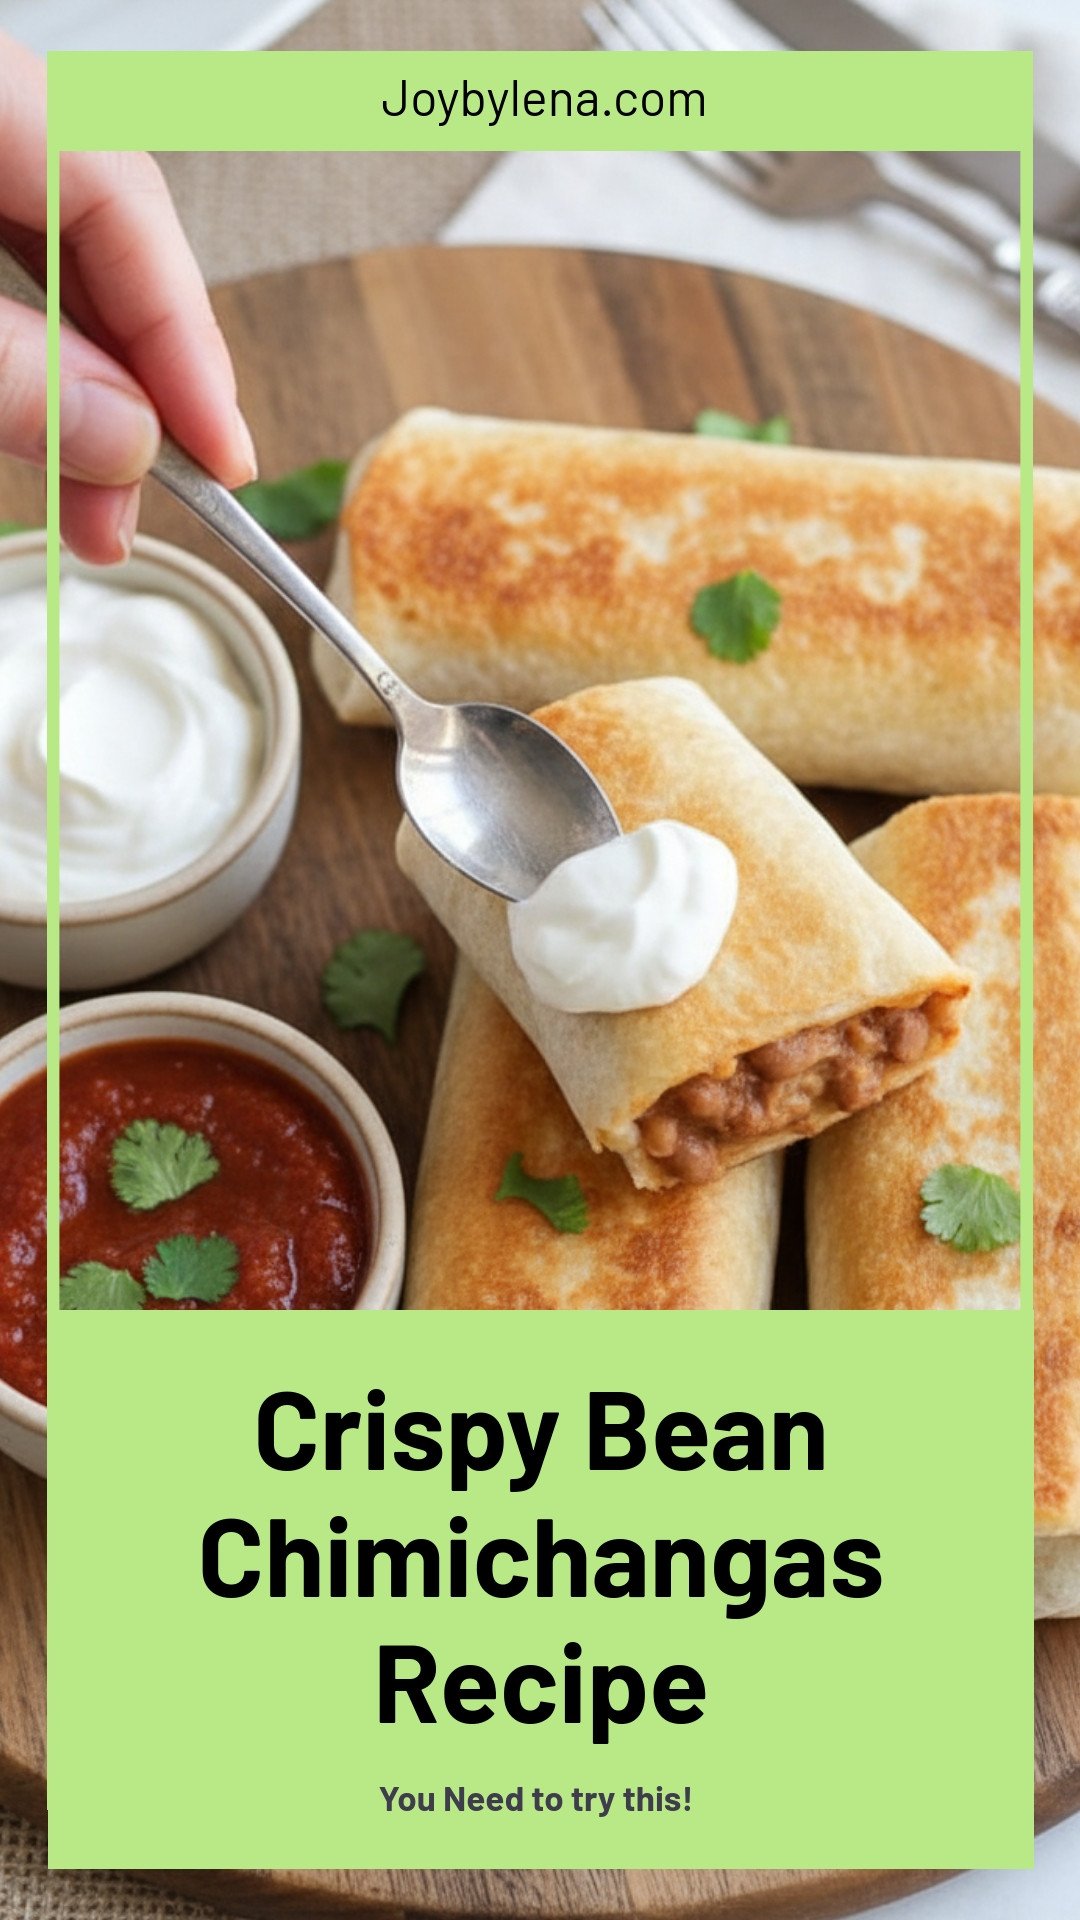
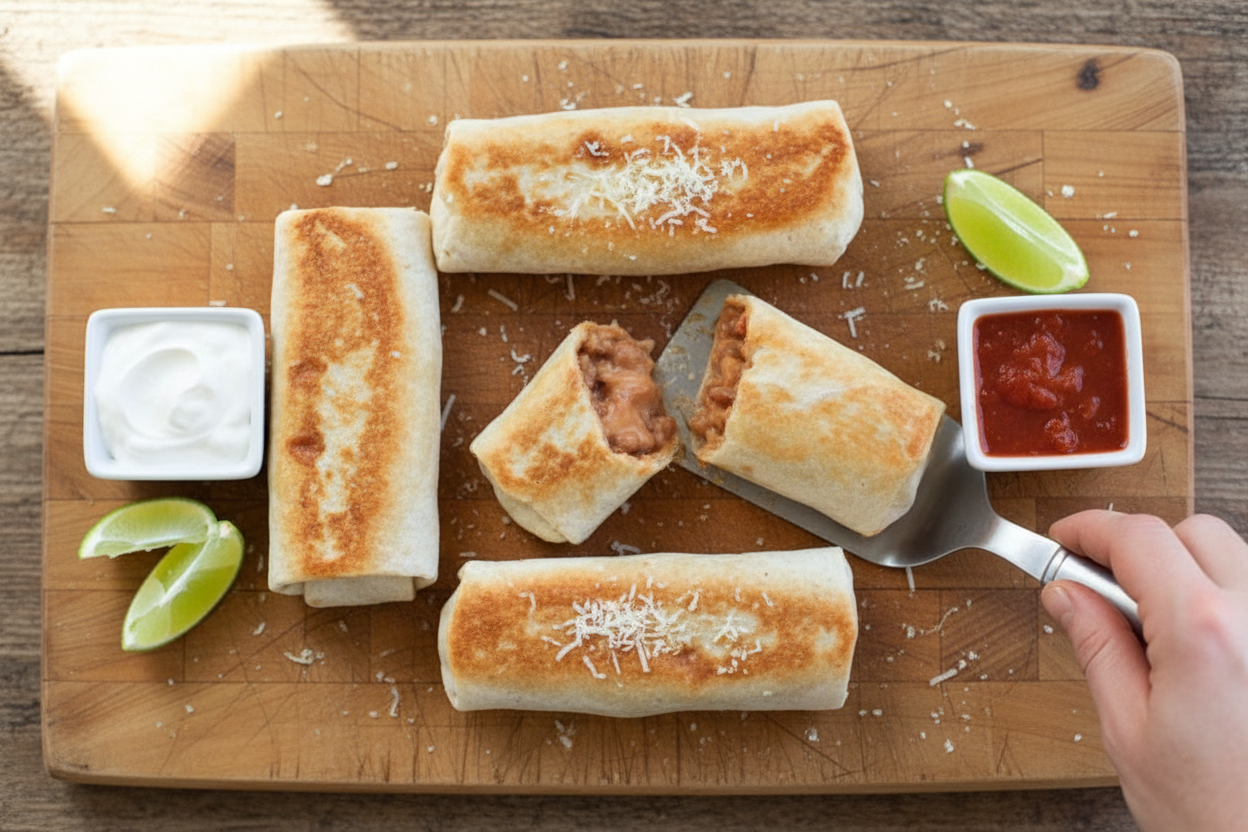
Warm tortillas are flexible. Cold ones crack. Trust me on this. Place a big spoonful of bean mix in the center. Sprinkle on that Monterrey Jack cheese.
Now, paint the edges with your egg white. Fold the bottom up. Then fold in the sides, like an envelope. Use more egg white to seal the top flap. See? It’s like wrapping a tasty present. What’s your biggest challenge when wrapping burritos or rolls?
The Magic of Flash-Frying
We don’t deep fry. We just use a little oil in a pan. This is the “flash fry.” It takes just a minute per side. You want a golden, crisp shell.
This quick fry locks in the shape. It also starts the crunch. Then, the oven finishes the job. It melts everything inside perfectly. This two-step method matters. It gives you texture you can’t get from just baking. Do you prefer super crunchy or soft tacos?
Making It Your Own
These are your chimichangas now. You can add cooked chicken or rice inside. Try different cheeses on top. I love a dollop of cool sour cream after baking.
Food is about sharing. Making a recipe your own is a joy. That’s a life lesson from my kitchen. What would you add to the filling to make it perfect for you? Tell me about your version. I would love to know.
Ingredients:
| Ingredient | Amount | Notes |
|---|---|---|
| Tortillas | 12 | |
| Egg whites | 2 | |
| Refried beans | 1 can | |
| Velveeta | 8 oz | |
| RO*TEL Diced Tomatoes & Chiles | 1/2 can | |
| Vegetable Oil | 2 tbsp | For frying |
| Monterrey Jack Cheese | As needed | For topping/serving |
My Crispy, Cheesy Bean Chimichangas
Hello, my dear! Come sit at the counter. Let’s make my favorite crispy chimichangas. They are like warm, crunchy bean burritos. My grandson Marco calls them “flavor pockets.” I still laugh at that. The secret is in the folding and a quick fry. Doesn’t that smell amazing already? Let’s begin.
Step 1: Grab a medium pot. Plop in the whole can of refried beans. Add the Velveeta and the RO*TEL tomatoes. Turn the heat to medium-low. Stir it slowly until everything is melted and happy together. It will be a gooey, orangey mix. (A hard-learned tip: stir constantly so the cheese doesn’t stick to the bottom!)
Step 2: Warm your tortillas. I just heat them for 20 seconds in the microwave. This makes them soft and stretchy. They won’t crack when you fold them. Now, crack two eggs. We only need the whites. Put the whites in a small bowl. Whisk them with a fork until they are a little bubbly.
Step 3: Lay a warm tortilla flat. Spoon a big line of bean mix down the middle. Sprinkle a little Monterrey Jack cheese on top. Now, use your finger to paint egg white around the edges of the tortilla. This is your “glue.” What do you think the egg white glue does? Share below!
Step 4: Time to fold! Fold the bottom edge up over the filling. Then, fold the left and right sides in. Roll it up tightly, like a little bean blanket. Paint a bit more egg white on the final edge to seal it. Press gently. See? It’s a neat little package.
Step 5: Heat the oil in a big pan. Carefully place a few chimis in, seam-side down. Cook for about a minute per side. You just want them golden and crispy. Then, put them all on a baking sheet, seam-side down again. Bake at 350°F for 12-15 minutes. This makes them extra crunchy all over.
Cook Time: 25 minutes
Total Time: 40 minutes
Yield: 12 chimichangas
Category: Dinner, Snack
Three Fun Twists to Try
You can make these your own, you know. Here are some ideas my family loves. They are all so simple.
The Breakfast Chimi: Add some scrambled eggs right into the bean filling. Perfect for a lazy Saturday.
The Fiesta Chimi: Mix cooked, seasoned ground beef or shredded chicken into the cheesy beans. It makes them extra hearty.
The Garden Chimi: After baking, top them with cool, crunchy lettuce and diced tomato. A fresh little salad on top!
Which one would you try first? Comment below!
Serving Your Masterpiece
These chimis are great all by themselves. But I love to make a little plate. A big dollop of cool sour cream is a must. A side of Spanish rice or a simple green salad is perfect. For drinks, a cold glass of horchata is so nice. For the grown-ups, a light Mexican beer pairs wonderfully. The crispness cuts through the rich cheese. Which would you choose tonight? Just remember to let them cool for a minute. That cheesy center is like a little volcano!
Keeping Your Chimichangas Happy
Let’s talk about keeping these crispy treats. First, let them cool completely. I learned this the hard way. I once put a warm one in a container. The next day, it was soggy and sad.
For the fridge, wrap each one tightly in foil. They will stay good for three days. For the freezer, use a freezer bag. They can live there for two months. This matters because a ready meal is a gift to your future self.
To reheat, use your oven. Bake at 350 degrees until hot. This keeps the outside crispy. The microwave will make them soft. Have you ever tried storing it this way? Share below!
Fixing Little Kitchen Hiccups
Sometimes, tortillas can tear. The fix is simple. Warm them up first. A quick zap in the microwave makes them flexible. I remember when I skipped this step. My filling went everywhere!
If your filling is too runny, just cook it longer. Let some of the liquid steam away. A thicker filling is easier to fold. This matters for a neat, sealed package. Another issue is oil that’s too hot.
Your chimichanga will brown too fast. The inside stays cold. Keep the heat at medium. This gives the heat time to travel inside. Good cooking builds your confidence. Which of these problems have you run into before?
Your Quick Questions, Answered
Q: Can I make these gluten-free?
A: Yes! Use your favorite gluten-free tortillas. They work just fine.
Q: Can I make them ahead?
A: Absolutely. Assemble them and freeze before frying. Fry and bake when ready.
Q: What if I don’t have Velveeta?
A: Shredded cheddar cheese is a great swap. It will melt nicely.
Q: Can I double the recipe?
A: You sure can. It’s perfect for feeding a hungry crowd.
Q: Any optional tips?
A: Serve with cool sour cream. Fun fact: The sour cream cools the spicy chiles! Which tip will you try first?
From My Kitchen to Yours
I hope you love making these. They are full of cozy flavor. Food is best when shared with others. I would love to see your creations.
Take a picture of your golden chimichangas. Share it with all of us. Have you tried this recipe? Tag us on Pinterest at @LenasKitchenTable. Your version might inspire a neighbor.
Happy cooking!
—Lena Morales.
Crispy Bean Chimichangas
Description
A delicious and satisfying recipe for crispy baked chimichangas filled with melted cheese, refried beans, and zesty tomatoes.
Ingredients
Instructions
- Place beans, RO*TEL, and VELVEETA in a pot and heat until cheese is all melted.
- Warm up your tortillas so they are easier to work with.
- Add egg whites to a bowl and mix with a whisk. Add beans to the middle of your tortilla, sprinkle with cheese and then add egg whites all around your beans and fold up. To fold start with one side and fold up an inch and then fold sides and then add more egg white where you make the last fold.
- Flash-fry chimis by placing in a pan of 2 TB Vegetable oil on medium heat. Heat on both sides for a minute or so. Place fried chimis back onto a pan seam-side down.
- After finishing flash-frying your chimis, bake at 350 for 12-15 minutes.
Notes
- Serve with sour cream, guacamole, or salsa for dipping.


Leave a Reply