My First Toffee Fiasco
Let me tell you about my first try. I was so excited. I walked away from the stove for one minute.
I came back to a pan of black, smoky sugar. I was so sad. My kitchen smelled like a campfire for days. I still laugh at that. It taught me a big lesson.
Why this matters: Candy making needs your full attention. It’s a lesson in patience. The reward is so sweet and worth it.
The Simple Magic of Butter and Sugar
Just four things start this magic. Butter, sugar, vanilla, and salt. You stir them in a big pot.
Watch them melt together. They bubble and turn a beautiful gold. Doesn’t that smell amazing? It changes from grainy to glossy. That’s the magic.
*Fun fact: That golden stage has a name. Cooks call it the “hard crack” stage. It means your toffee will be perfectly crisp.
Your Two Best Friends
You need two helpers. First, a candy thermometer. It takes the guesswork out. No more burnt batches.
Second, parchment paper. It lines your pan. It lets you lift the whole toffee slab out later. Trust me on this. It makes life easy.
Do you have a kitchen tool you can’t live without? Is it a special spoon or a favorite pan? I’d love to hear about it.
The Chocolate Blanket
Once the toffee is poured, act fast. Sprinkle those chocolate chips right on top. The heat from the toffee will melt them.
Wait two minutes. Then spread it like a soft, warm blanket. This is my favorite part. It feels so smooth.
Why this matters: The warm toffee melts the chocolate just right. They become one perfect layer. This creates the classic toffee bite.
The Hardest Part
Now you must wait. Let it cool for two whole hours. This is the true test.
Walk away. Do not touch it. Let the toffee get crisp and the chocolate get firm. It will be ready when you can break it with a snap.
What’s your favorite treat to make that requires waiting? Is it cookies, bread, or maybe something else?
Make It Your Own
This recipe is your canvas. Use almonds, or try pecans. Use dark chocolate or milk chocolate. It’s all good.
My grandson loves it with peanuts and a sprinkle of sea salt on top. We make a batch every Christmas. The kitchen is always full of laughter.
What nut or chocolate would you try? Tell me your dream combination. I might just test it myself.
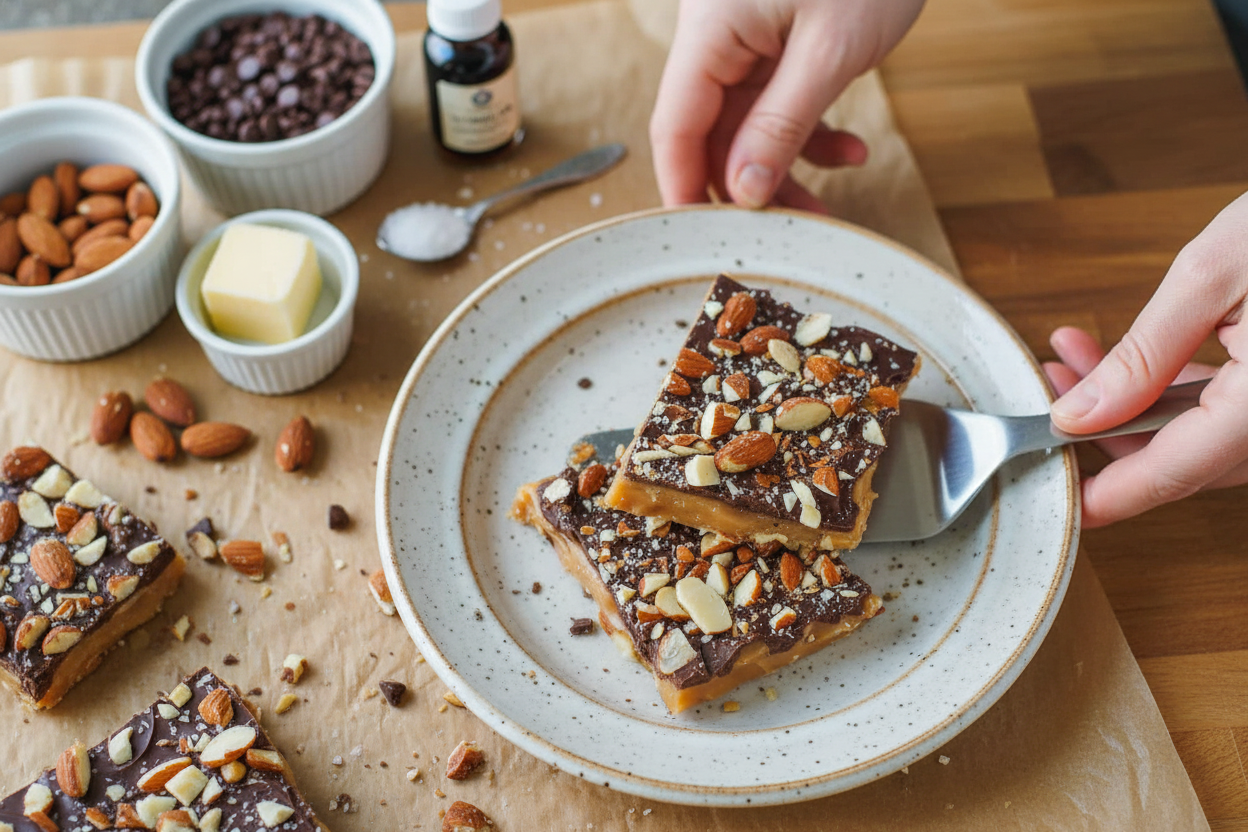
Ingredients:
| Ingredient | Amount | Notes |
|---|---|---|
| Almonds (or your favorite nuts) | 1 cup | toasted and coarsely chopped, divided |
| Granulated sugar | 1 cup | |
| Unsalted butter | 1/2 lb (2 sticks or 1 cup) | |
| Vanilla extract | 1 tsp | |
| Fine sea salt | 1/2 tsp | |
| Semi-sweet chocolate chips | 1 cup | or milk chocolate |
My Easy Homemade Toffee: Sweet, Crunchy, and Full of Love
Hello, my dear! Come sit. Let’s make some toffee. This recipe is my happy place. The smell of butter and sugar is pure comfort. I learned it from my own abuela so long ago.
We’ll make magic with just a few things. Butter, sugar, vanilla, and a little salt. Then we add chocolate and nuts. Doesn’t that sound amazing? It’s simpler than you think. Just stay close and stir. I still laugh at the time I walked away. Let’s just say we had very dark nuts!
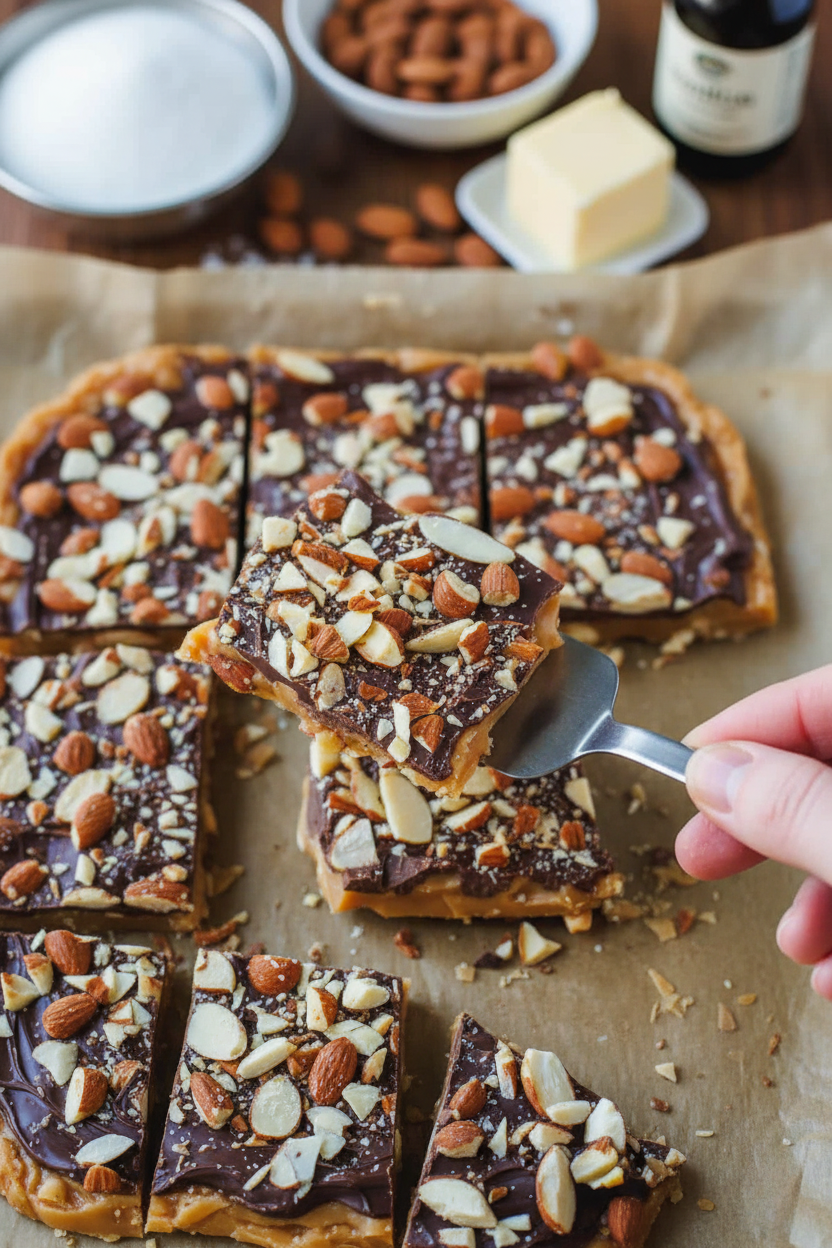
Step 1: First, we prepare our pan. Grease it and line it with parchment paper. Do not grease the top of the paper. Now, toast your nuts in a dry pan. Stir them every 30 seconds. They can burn in a blink! (My hard-learned tip: set a timer. It’s so easy to forget.)
Step 2: Chop half the nuts and spread them in the pan. Save the rest. Now, the fun part! Melt butter, sugar, vanilla, and salt together. Stir it constantly with a wooden spoon. It will bubble and turn a beautiful caramel color.
Step 3: You need a candy thermometer here. Cook until it reaches 300 degrees. This is the “hard crack” stage. The mixture is extremely hot, so no tasting! Why do we cook it to 300°F? Share below! Pour it quickly over the nuts in your pan.
Step 4: Immediately sprinkle chocolate chips on top. Wait two minutes. They will get soft and shiny. Then, spread the chocolate like frosting. Sprinkle the rest of your nuts on top. Gently press them in. Now, the hardest part: waiting for it to cool!
Cook Time: 20 minutes
Total Time: 2 hours 30 minutes (includes cooling)
Yield: About 24 pieces
Category: Dessert, Candy
Three Fun Twists for Your Toffee
Once you master the basic recipe, try playing! Here are my favorite simple twists. Each one makes it feel brand new. Cooking should always be a little fun, don’t you think?
Salty-Sweet Pretzel Crunch: Swap half the nuts for tiny pretzel pieces. The salty crunch is perfect.
Peppermint Holiday Magic: Use dark chocolate. Crush candy canes on top instead of nuts. It sparkles!
Orange Dream: Add a teaspoon of orange zest to the butter and sugar. It smells like sunshine.
Which one would you try first? Comment below!
Serving Your Sweet Creation
Breaking the toffee slab is my favorite sound. It means it’s ready! I serve pieces in a little bowl. They always disappear fast. For a special touch, put some in a pretty jar. It makes a wonderful gift from your kitchen.
This treat is rich. A cold glass of milk is the classic partner. For the grown-ups, a small glass of sherry or port is lovely. The nutty sweetness pairs so well. Which would you choose tonight? I think I’ll have mine with tea and a good story.
Keeping Your Toffee Perfectly Delicious
Let’s talk about keeping your toffee tasty. Store it in an airtight container at room temperature. It stays crunchy for about a week. Do not put it in the fridge. The fridge can make the chocolate sweat and get sticky.
You can freeze toffee for a month. Wrap pieces tightly in parchment paper first. Then place them in a freezer bag. This keeps them from sticking together. Thaw them at room temperature for an hour before eating.
I once stored a batch in a cookie tin. It turned soft by the next day. I learned the hard way that airtight is key. This matters because good storage saves your hard work. You get to enjoy every sweet, crunchy bite.
You can easily double this recipe. Just use a bigger, heavy pot. Pour the toffee into two prepared pans. Have you ever tried storing it this way? Share below!
Simple Fixes for Common Toffee Troubles
Sometimes toffee can be tricky. Here are easy fixes. First, if your toffee is grainy, the sugar did not melt fully. Always stir constantly from the start. Use medium heat, not high.
Second, if it burns, the heat was too high. I remember when I got a phone call and walked away. My toffee burned in one minute. A candy thermometer helps a lot. It tells you the exact temperature.
Third, if the chocolate will not stick, the toffee cooled too much. Sprinkle chips right after pouring. The hot toffee will melt them perfectly. Getting this right builds your cooking confidence. It also makes the flavor and texture just perfect. Which of these problems have you run into before?
Your Toffee Questions, Answered
Q: Is this toffee gluten-free?
A: Yes, these ingredients are naturally gluten-free. Just check your vanilla extract label to be sure.
Q: Can I make it ahead?
A: Absolutely! Make it up to a week before you need it. Store it as I mentioned above.
Q: What nut can I swap for almonds?
A: Use any nut you love. Pecans or walnuts work beautifully. Fun fact: The first toffee I ever made used pecans from my neighbor’s tree!
Q: Can I halve the recipe?
A: You can, but be careful. Use a smaller pot and watch the temperature closely. It will cook faster.
Q: Any optional tips?
A: A tiny sprinkle of sea salt on top of the chocolate is lovely. It makes the sweet flavor pop. Which tip will you try first?
From My Kitchen to Yours
I hope you love making this toffee. It is a wonderful treat to share. Cooking is about creating sweet memories, not just food.
I would love to see your creations. Please share your photos with me. It makes my day to see your kitchen adventures. Have you tried this recipe? Tag us on Pinterest! You can find me at @LenasCozyKitchen.
Happy cooking!
—Lena Morales.
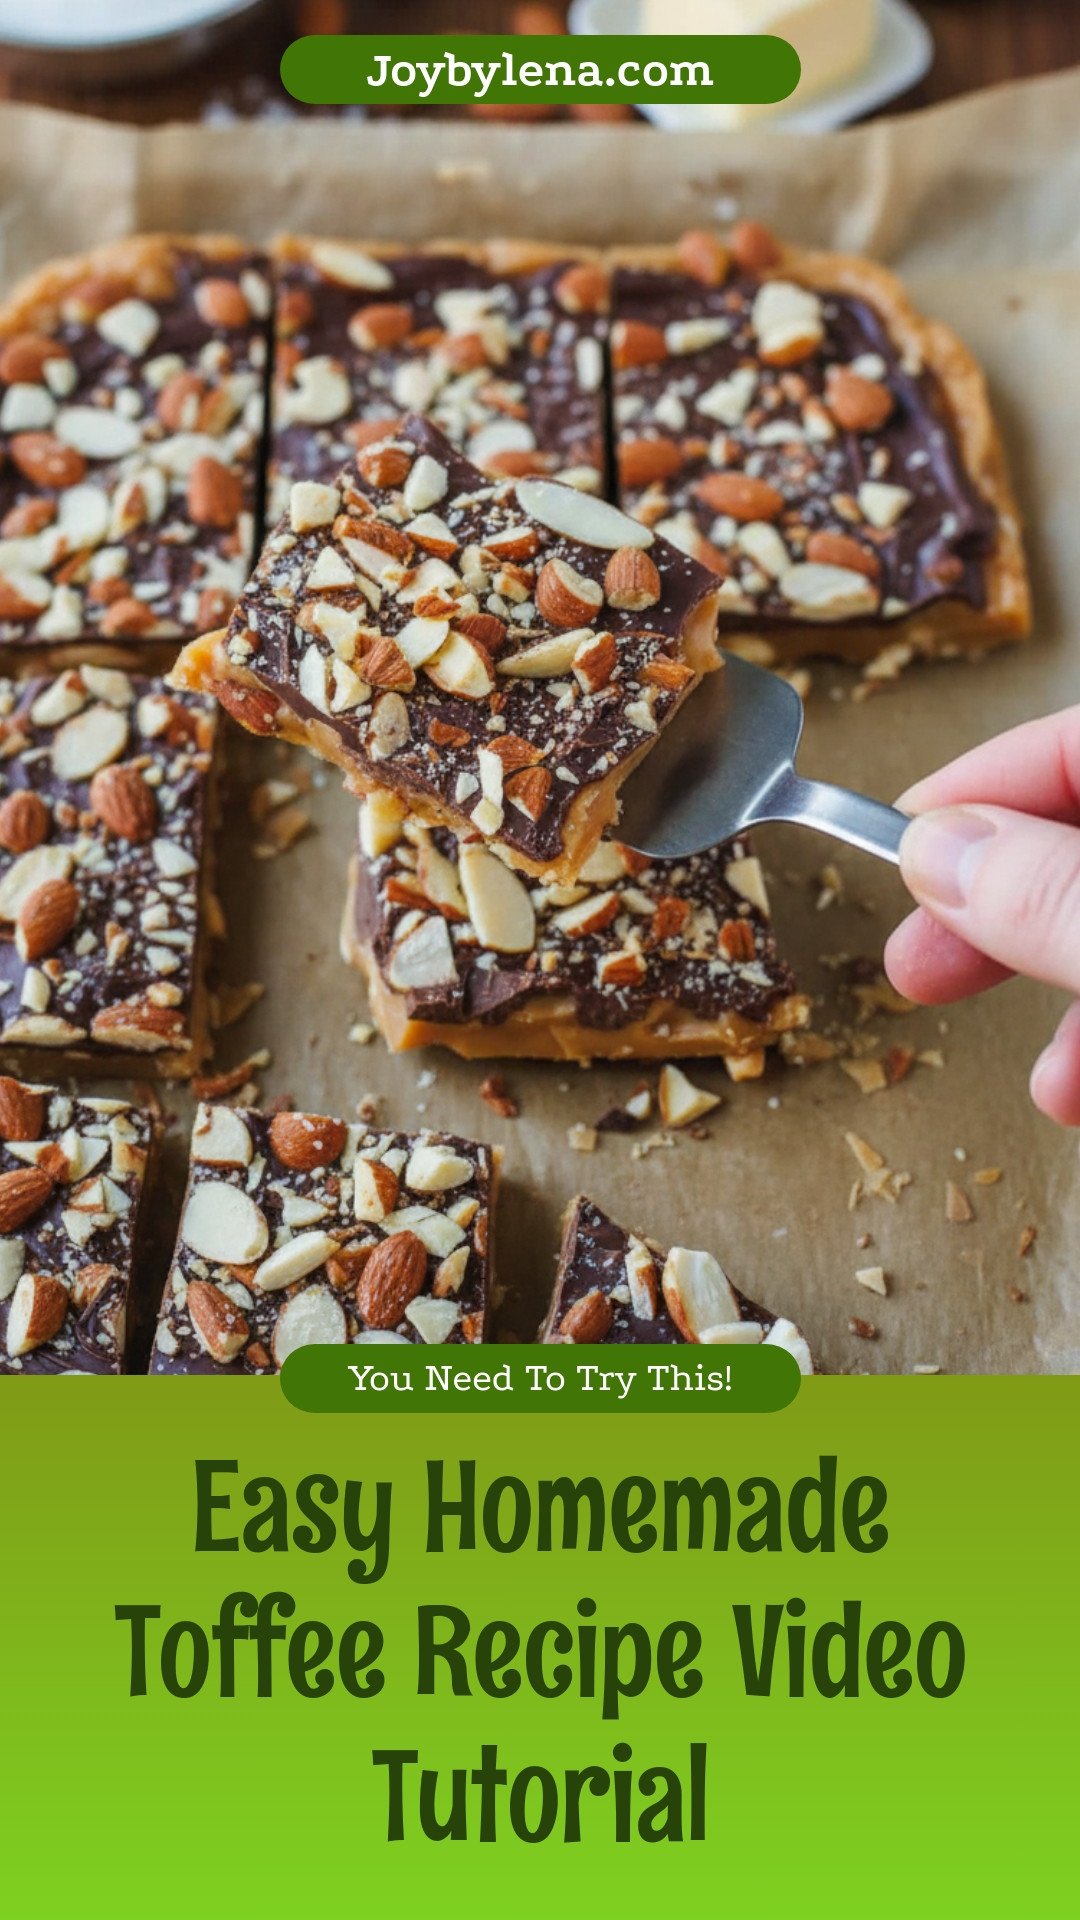
Easy Homemade Toffee Recipe Video Tutorial
Description
This easy homemade toffee recipe features a buttery, crunchy candy layer topped with melted chocolate and toasted nuts. A perfect sweet treat!
Ingredients
Instructions
- Grease a 9×12 or 9×9 metal baking dish, and line it with parchment paper. Do not grease the top of the parchment paper.
- Toast the nuts: Heat whole almonds over medium heat in a skillet for 5-7 minutes. They can burn easily, so stir every 30 seconds and don’t walk away. Or roast the nuts on a baking sheet at 325 degrees for 10-15 minutes. Coarsely chop almonds and spread half of them evenly into your parchment-lined baking pan. Set aside the remaining nuts for topping.
- In a large heavy saucepan (at least 3-4 quarts), combine butter, sugar, vanilla, and salt. Set over medium heat and use a wooden spoon to stir constantly until the butter melts and the mixture comes to a boil. Slowly stir continuously until it turns a caramel color and reaches at least 300 ̊F on a candy thermometer (300-310 is the hard crack stage and takes about 8 to 10 minutes over medium heat). Be careful since the mixture is extremely hot (do not sample!) and will brown quickly toward the end.
- Immediately pour your toffee into your prepared pan. Right away tilt the pan to spread evenly over the nuts. It doesn’t have to reach the edges or look even.
- While hot, sprinkle the top with chocolate chips and rest for 2 minutes (they will glisten once they have softened) then use an offset spatula to spread the chocolate evenly over the surface. Sprinkle on the remaining 1/2 cup of nuts, pressing them gently into the chocolate layer to adhere.
- Let cool for at least 2 hours at room temperature or until the chocolate is fully set then cut or break into pieces to serve. Store in an airtight container at room temperature for up to a week.
Notes
- Nutrition Per Serving: Calories: 178, Total Fat: 14g, Saturated Fat: 7g, Trans Fat: 0.3g, Polyunsaturated Fat: 1g, Monounsaturated Fat: 5g, Cholesterol: 21mg, Sodium: 50mg, Potassium: 89mg, Total Carbohydrates: 14g, Dietary Fiber: 1g, Sugars: 11g, Protein: 2g, Vitamin A: 240IU, Calcium: 23mg, Iron: 1mg


Leave a Reply