My No-Fuss Pumpkin Cheesecake Secret
Hello, my dear. Come sit. Let’s talk about pumpkin cheesecake. Many people find it scary. They worry about cracks and water baths. I did too, long ago.
Then I learned a simple trick. The secret is in the steam, not the bath. You just put a pan of hot water on the rack below. That gentle steam keeps everything happy. No cracks! What dessert has ever made you nervous to bake?
A Crust You Can Trust
Every good story starts with a solid base. For cheesecake, that’s the crust. Graham crackers, a little sugar, cinnamon, and melted butter. That’s it. You press it in with the back of a spoon.
I like to bake it for just 8 minutes first. This matters. It gives the crust a head start. It won’t get soggy later. It becomes a cozy bed for our creamy filling. Fun fact: Graham crackers were invented to stop people from having naughty thoughts! I still laugh at that.
The Heart of the Matter
Now, the filling. Room temperature cream cheese is key. Let it sit out for a few hours. If it’s cold, you’ll get lumps. And we don’t want lumps, do we? Beat it with brown sugar until it’s fluffy.
Then, mix everything else in another bowl. Pumpkin, eggs, a bit of sour cream for tang. My granddaughter once forgot the flour. Her cheesecake puffed up like a balloon! It tasted fine but looked silly. So don’t forget the flour. It helps hold everything together.
The Magic of Slow and Steady
Here is the most important part. Baking slow and cooling slow. We bake it at a lower temperature, 325 degrees. It bakes gently. You know it’s done when the edges are set but the center has a little jiggle.
Then, turn the oven off. Prop the door open with a wooden spoon. Let it sit for 30 minutes. This slow cool-down stops cracks. Why does this matter? Because a smooth top makes you proud. It means you were patient. Do you prefer desserts that are quick, or ones you can take your time with?
Your Turn to Shine
After it cools, you must chill it. Wrap it up and let it sleep in the fridge. Overnight is best. This waiting matters. It lets the flavors become friends. The texture turns perfectly creamy.
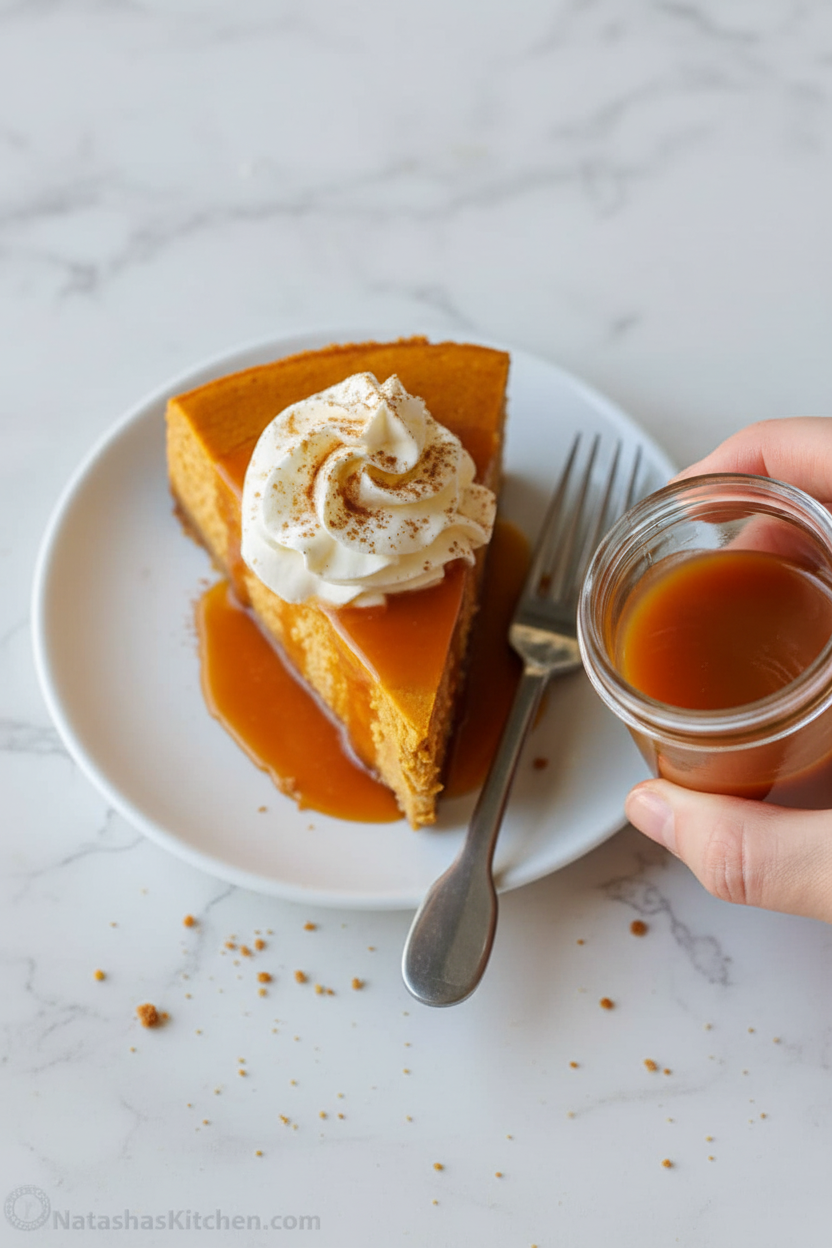
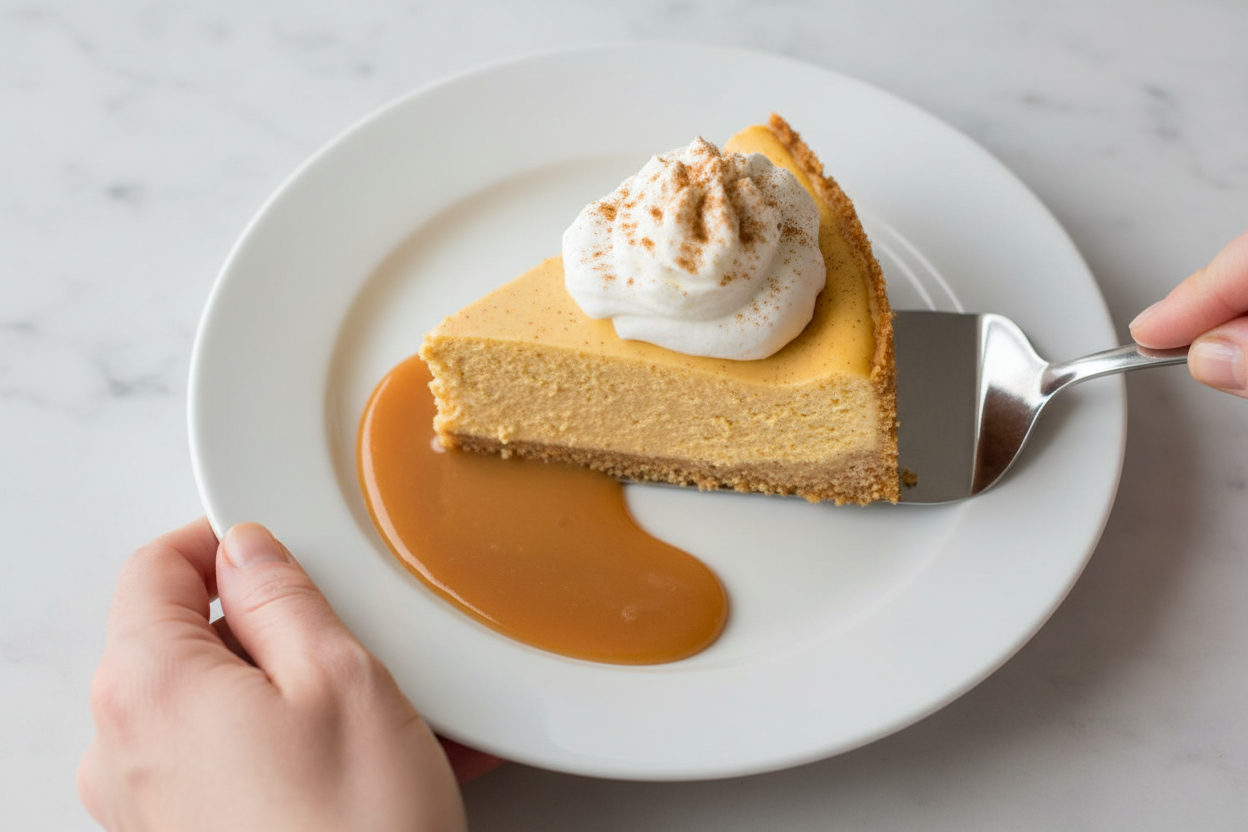
Finally, run a knife around the edge. Release the springform pan. Doesn’t that look beautiful? Top it with whipped cream or caramel. The first slice is always for the cook. What’s your favorite topping for a slice of cheesecake? Tell me yours.
Ingredients:
| Ingredient | Amount | Notes |
|---|---|---|
| Graham cracker crumbs | 1 1/2 cups | from about 13 whole graham crackers |
| Unsalted butter, melted | 6 Tbsp | |
| Granulated sugar | 1 Tbsp | |
| Cinnamon | 1/2 tsp | |
| Cream cheese, room temperature | 24 oz | |
| Light brown sugar, packed | 1 1/2 cups | |
| Pumpkin puree | 15 oz | Libby’s brand, or well-drained homemade puree |
| Large eggs | 4 | |
| Sour cream | 1/4 cup | |
| All-purpose flour | 2 Tbsp | |
| Pumpkin pie spice | 2 1/2 tsp | plus more to dust |
| Salt | 1/4 tsp | |
| Real vanilla extract | 1 Tbsp | |
| Butterscotch Sauce, or Caramel | To taste | Optional Topping |
| Whipped Cream | To taste | Optional Topping |
My No-Fuss Pumpkin Cheesecake Story
Hello, my dear! Come sit. Let’s talk about pumpkin cheesecake. I used to fuss with water baths for hours. My towels would get soggy. What a mess! Then I found this easier way. No big pot of water in the oven. Just a little steam from a pan. It works like a charm every single time. The top stays smooth and perfect. I still laugh at that first perfect one I made. My grandson thought I bought it from a fancy bakery!
Here is how we make it, step by step. Remember, room-temperature ingredients are your best friends here. It makes everything so smooth.
Step 1: The Cozy Crust
First, we make the cozy crust. Crush those graham crackers until they look like sand. Mix them with the melted butter, sugar, and cinnamon. Doesn’t that smell amazing? Press it into your pan. Bake it for just 8 minutes. This gives our cheesecake a strong, tasty foundation. Let it cool completely.
Step 2: The Creamy Filling
Now, the creamy filling. Beat the soft cream cheese and brown sugar together. Do this for a full 5 minutes. It should look fluffy and light. (My hard-learned tip: Scrape the bowl halfway! No one wants hidden lumps of cream cheese.) In another bowl, whisk the pumpkin, eggs, and all those lovely spices.
Step 3: Combine & Pour
Gently mix the pumpkin into the cream cheese. Go slow. Just until it’s one beautiful orange color. Pour it over your cooled crust. Now, tap the pan firmly on the counter. This gets rid of sneaky air bubbles. They can cause cracks later.
Step 4: The Secret Bake
Time to bake! Put a loaf pan with hot water on the oven rack. Place your cheesecake right next to it. The steam is our secret. Bake until the edges are set but the center still jiggles a bit. Then turn the oven off. Prop the door open with a wooden spoon. This slow cool-down is the final key to no cracks!
Step 5: The Patient Chill
The waiting part is tough. Run a knife around the edge to loosen it. Let it cool, then chill it for hours. Overnight is even better. The flavor gets so deep and happy. What’s your favorite part of making a dessert: the mixing, the baking, or the eating? Share below!
| Cook Time | 1 hour (plus cooling & chilling) |
| Total Time | About 8 hours |
| Yield | 12 happy slices |
| Category | Dessert, Holiday |
Three Fun Twists on Our Classic
This recipe is like a favorite sweater. It’s cozy as is, but you can dress it up! Here are three simple ideas to play with. They make it feel new again.
- Gingersnap Crust: Swap the graham crackers for crushed gingersnap cookies. It adds a lovely spicy snap.
- Chocolate Swirl: Melt some chocolate chips. Drop spoonfuls on the filling before baking. Swirl with a knife for a marbled look.
- Maple Pecan: Use maple syrup in the filling instead of some sugar. Top with toasted pecans and a drizzle of caramel.
Which one would you try first? Comment below!
Serving It With Style
A slice of this cheesecake is a celebration all by itself. But a little extra touch makes it special. Try a dollop of fresh whipped cream. A sprinkle of pumpkin pie spice on top is pretty. For a fancy plate, add a few candied pecans on the side.
What to drink with it? A cup of hot spiced apple cider is perfect. The spices dance together. For the grown-ups, a small glass of sweet sherry or a creamy bourbon-laced eggnog pairs beautifully. It feels so festive.
Which would you choose tonight: the warm cider or the cozy eggnog?
Keeping Your Cheesecake Happy
This cheesecake loves a cold nap in the fridge. Cover it well with plastic wrap. It will stay perfect for four days. You can also freeze it for two months. Wrap the whole cake or slices tightly in plastic, then foil.
Thaw it overnight in your refrigerator. Do not reheat it. Serve it cold and creamy. I once froze a whole cheesecake for my grandson’s surprise visit. It tasted just-baked when he arrived!
This matters because good food should be ready for life’s little surprises. You can make this dessert ahead for a busy week. Have you ever tried storing it this way? Share below!
Simple Fixes for Common Troubles
First, a cracked top. This happens if the cake cools too fast. The slow cool-down in the oven stops cracks. It lets the cake settle gently. I remember when my first cheesecake cracked like a canyon!
Second, a soggy crust. Always bake your crust first. Let it cool completely before adding filling. This creates a strong, crispy base. Third, a dense or lumpy filling. Your cream cheese must be very soft. Beat it until it is completely smooth.
Getting this right builds your kitchen confidence. A smooth texture also makes every bite heavenly. Which of these problems have you run into before?
Your Cheesecake Questions, Answered
Q: Can I make this gluten-free? A: Yes! Use gluten-free graham crackers for the crust. The filling is already gluten-free.
Q: How far ahead can I make it? A: Make it 1-2 days before serving. It gets even better in the fridge.
Q: What if I don’t have sour cream? A: Plain Greek yogurt works great too. It adds the same creamy tang.
Q: Can I make a smaller cake? A: You can halve the recipe. Use a 7-inch springform pan. Bake time will be less.
Q: Is the water pan necessary? A: The steam helps prevent cracks. But your oven’s slow cool-down is the real hero. Which tip will you try first?
From My Kitchen to Yours
I hope this recipe becomes a favorite in your home. Baking is about sharing joy and sweet moments. Fun fact: Pumpkin puree is full of Vitamin A, which is great for your eyes!
I would love to see your beautiful creations. Sharing food stories connects us all. Have you tried this recipe? Tag us on Pinterest! I can’t wait to see your photos.
Happy cooking!
—Lena Morales.
Perfect No-Crack Pumpkin Cheesecake Without a Water Bath
Description
A smooth, creamy, and perfectly spiced pumpkin cheesecake with a spiced graham cracker crust. This no-water-bath method ensures a flawless, crack-free top every time.
Ingredients
For the Crust:
For the Pumpkin Cheesecake:
Optional Toppings:
Instructions
- Make the Crust: Prep – Preheat Oven to 350˚F. Pulse graham crackers in a food processor until fine crumbs form. Bake – In a medium bowl, stir together the crust ingredients – graham cracker crumbs, sugar, cinnamon, and melted butter. Transfer into a 9-inch springform pan with 3″ tall walls and use a large spoon to press crumbs into the bottom of your springform pan, going about 1/2″ up the sides of the pan. Place on a foil-lined sheet pan to catch any drippings and bake at 350˚F for 8 minutes. Remove from oven and cool to room temperature.
- Make the Pumpkin Cheesecake: Beat the cream cheese– Preheat to 325°F. In the bowl of your mixer with the paddle attachment, beat softened cream cheese and brown sugar on med speed until light and fluffy and without lumps (5 min), scraping down the bowl once to make sure you don’t have chunks of cream cheese.
- Mix the pumpkin – In a separate bowl, using a whisk, stir together pumpkin puree, eggs, sour cream, flour, pumpkin pie spice, salt, and vanilla extract. Mix until well combined. Add this mixture to the cream cheese filling and continue mixing on low speed just until well combined, scraping down the bowl as needed.
- Bake – Transfer the filling into the pre-baked and cooled crust, and then tap the pan on the counter 15 times to release air bubbles. Place a loaf pan half filled with hot water (steam helps prevent cracks), and your cheesecake on the center rack and bake at 325˚F for 50-60 minutes* or until the edges are set and there is a slight wobble in the center 3″ of the cheesecake when you jolt the pan. Turn the oven off and prop the door open with a wooden spoon for 30 minutes to cool slowly. Note: If you have a gas oven, turn the oven off and leave the door closed since gas ovens cool much faster.
- Chill and Serve – Once the cheesecake is out of the oven, run a knife around the edges of the pan (helps release tension), then cool on a rack until room temperature; about 2 hours. Wrap in plastic wrap and refrigerate for at least 4 hours or overnight. To serve, carefully remove chilled cheesecake from the springform pan, cut into slices, and add your desired toppings.
Notes
- Nutrition Per Serving (1 slice, recipe serves 12): Calories: 450, Total Fat: 28g, Saturated Fat: 16g, Trans Fat: 0.2g, Polyunsaturated Fat: 1g, Monounsaturated Fat: 8g, Cholesterol: 129mg, Sodium: 331mg, Potassium: 241mg, Total Carbohydrates: 44g, Dietary Fiber: 2g, Sugars: 34g, Protein: 7g, Vitamin A: 6548IU, Vitamin C: 2mg, Calcium: 116mg, Iron: 2mg


Leave a Reply