My Kitchen Table Memory
My grandson Leo loves banana pudding. He asked for a birthday cake version. I thought, why not mix it with cheesecake? This recipe was born. I still laugh at that messy first try. The kitchen was a happy disaster.
It matters because food is about love and trying new things. It’s okay if it’s not perfect. The fun is in the making. Do you have a favorite dessert you’d like to mix with another? I’d love to hear your ideas!
Let’s Talk About the Crust
First, we make the crust. Crush those graham crackers. You can use a bag and a rolling pin. It’s a great way to get out any grumpy feelings! Mix the crumbs with sugar and melted butter.
Press it into your pie plate. Get it up the sides. Bake it until it smells toasty. That smell means it’s ready. Let it cool completely. A cool crust keeps everything nice and firm later.
The Heart of the Pudding
Now, the creamy filling. You make a simple pudding on the stove. Whisk the milk with sugar and flour. You must stir, stir, stir. It gets thick and bubbly. Doesn’t that smell amazing?
Here’s the important part. You mix a little hot pudding with the egg yolks first. This warms them up slowly. Then you mix it all back in. This keeps the eggs from scrambling. *Fun fact: This step is called “tempering.” It’s a fancy word for being gentle with eggs.
Putting It All Together
Beat the cream cheese until it’s smooth. Then mix in your cooled pudding. This is the magic. You get the tangy cheesecake and the sweet pudding in one bowl. It’s so good.
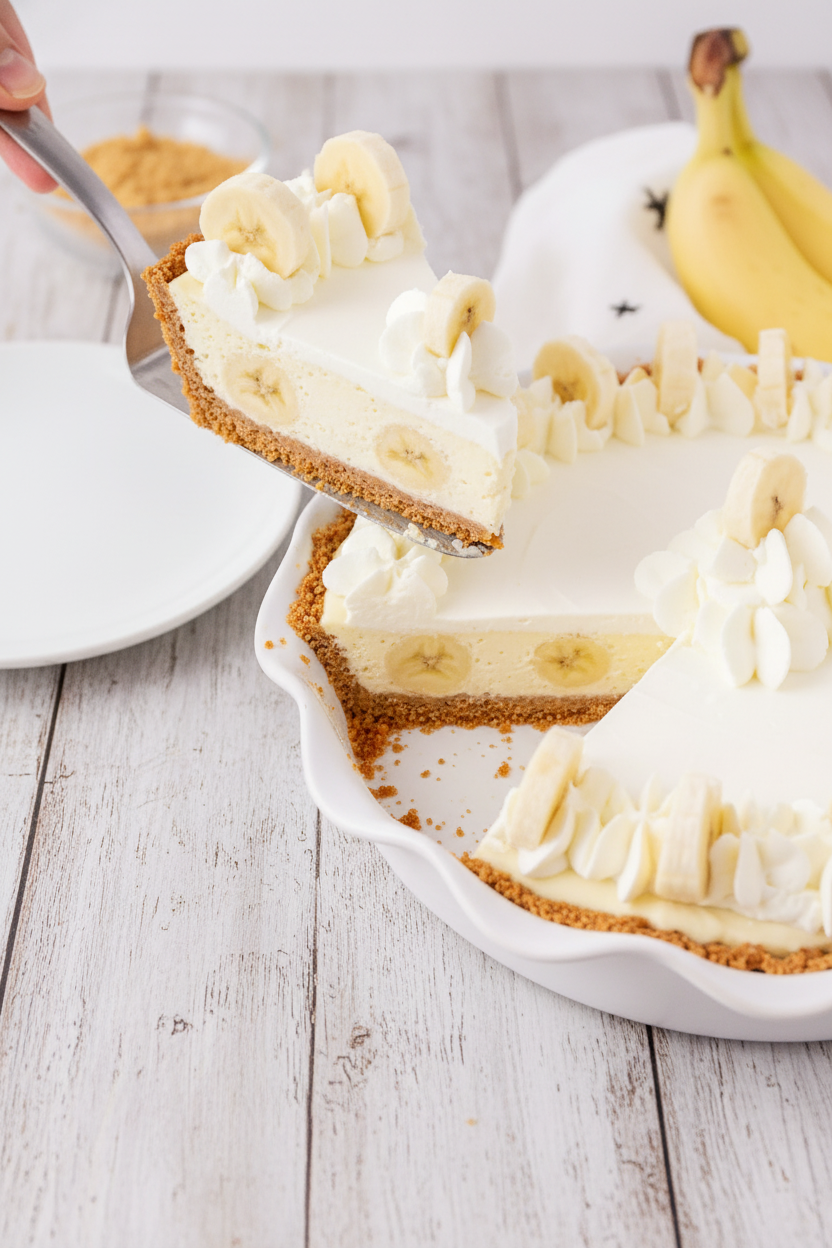
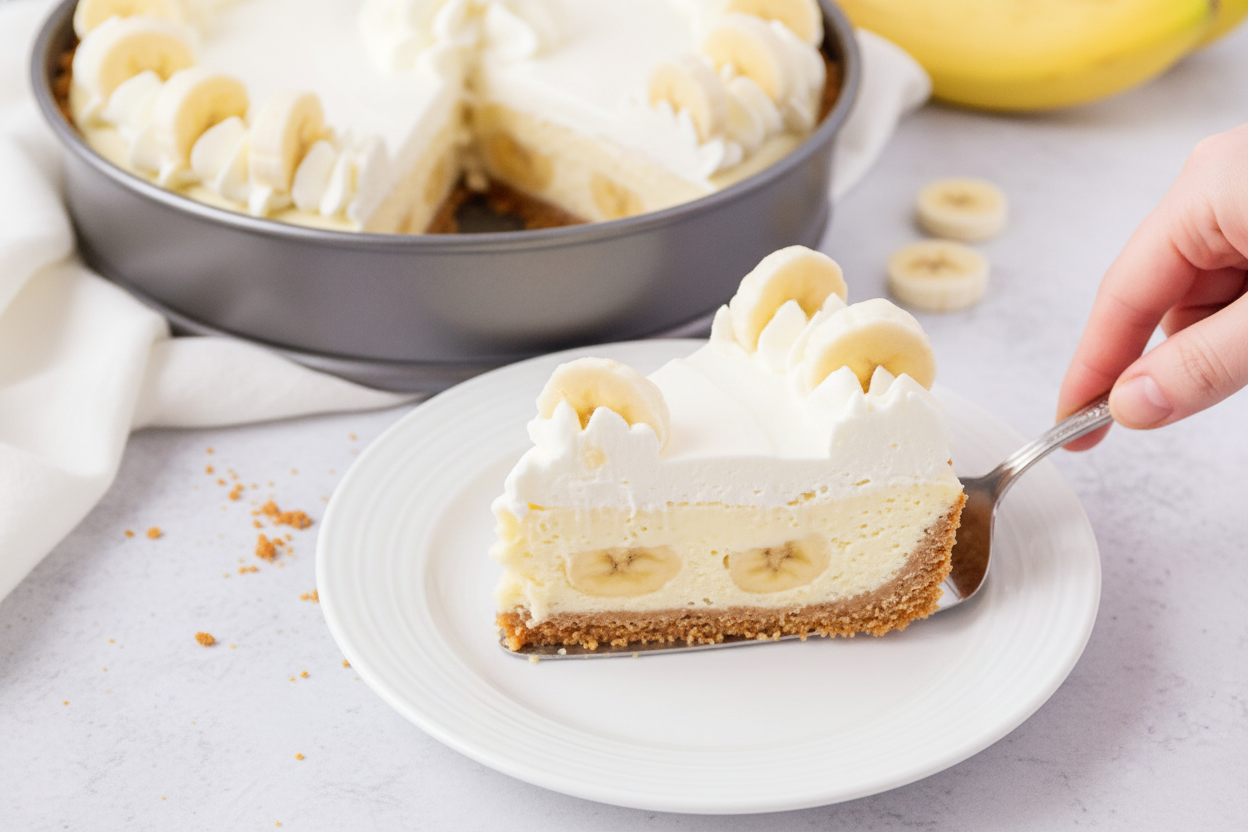
Layer it in the cool crust. Pudding, then bananas, then more pudding. The bananas in the middle stay nice. They won’t turn brown as fast. Chill it for a few hours. Patience is the hardest ingredient!
Why This Cake Matters
This cake is special. It mixes two classic treats. It shows you can be creative in the kitchen. It matters because sharing food makes memories. Leo’s smile was worth every dirty dish.
What’s your favorite memory tied to a special dessert? Was it a birthday, a holiday, or just a Tuesday? Tell me about it. And a little poll: do you like your bananas firm or very soft in desserts?
Serving Your Masterpiece
Right before serving, add the whipped cream. Use a big spoon to make pretty swirls. Top it with fresh banana slices. This makes it look so fancy. But it’s really just fun.
Slice it with a clean, wet knife. This gives you neat pieces. The layers will show. Pudding, bananas, creamy filling, and that crunchy crust. Every bite has a little bit of everything. That’s what makes it perfect.
Ingredients:
| Ingredient | Amount | Notes |
|---|---|---|
| Graham crackers, crushed | 12 whole (≈1 2/3 cups) | For the crust |
| Sugar | 1/4 cup | For the crust |
| Butter, melted | 1/2 cup | For the crust |
| Sugar | 2/3 cup | For the filling |
| All-purpose flour | 1/4 cup | For the filling |
| Salt | 1/4 teaspoon | For the filling |
| 2% milk | 2 cups | For the filling |
| Egg yolks | 3 whole | For the filling |
| Vanilla extract | 1 1/2 teaspoons | For the filling |
| Cream cheese, softened | 16 ounces | For the filling |
| Bananas, sliced | 4 | For the filling |
| Whipped cream | 1-2 cups | For serving |
| Banana, sliced | 1 | For serving |
My Banana Pudding Cheesecake, A Family Hug in a Pie Plate
Hello, sweetie! Come sit. Let me tell you about this dessert. It’s like my grandma’s banana pudding met a cheesecake for a party. The result is pure magic. I make it for birthdays and just-because days. The kitchen smells like warm sugar and memories. Doesn’t that smell amazing?
It looks fancy, but it’s really simple. You just need a pie plate and a good mixing bowl. I still use my yellow bowl from the 1970s. It has a tiny chip, but it’s perfect. Ready to make some magic together? Let’s begin.
Step 1: The Crust
First, get your crust ready. Crush those graham crackers until they look like sand. I use a bag and a rolling pin. It’s a great way to get out any grumpy feelings! Mix crumbs with sugar and melted butter. Press it firmly into your pie plate. Bake it for just 7-8 minutes until golden. Let it cool completely. (A hard-learned tip: Let the crust cool! A warm crust makes the filling runny.)
Step 2: The Creamy Pudding
Now, the creamy pudding. Whisk sugar, flour, and salt in a saucepan. Add the milk and stir. Cook on medium until it bubbles and thickens. This part needs your attention. Stir, stir, stir! It’s like giving the pudding a little hug.
Step 3: Tempering the Egg Yolks
Time for the egg yolks. Scoop a little hot milk into them and mix fast. This warms them up slowly. Pour it all back into the pot. Keep stirring! It will get thick and lovely. Remove from heat and add vanilla. Let it cool for a bit. Why do we warm the yolks first? Share below!
Step 4: The Fluffy Clouds
Beat the softened cream cheese until smooth. My grandson calls this “fluffy clouds.” Add your slightly warm pudding to the cheese. Mix it all together. See how silky it becomes? I still laugh at how easy this is.
Step 5: Assembly & Patience
The fun assembly! Pour one-third of the filling into the cool crust. Add a layer of sliced bananas. Then, cover them with the rest of the filling. Be gentle. Now, patience. It must chill for at least two hours. This is the hardest part, waiting!
Step 6: The Pretty Part
Finally, the pretty part. Right before serving, add fluffy whipped cream on top. Garnish with fresh banana slices. Each slice is a creamy, dreamy bite of happiness. Your family will ask for this again and again.
| Cook Time: | 20 minutes |
| Total Time: | 2 hours 30 minutes (plus chilling) |
| Yield: | 12 servings |
| Category: | Dessert, Pie |
Three Fun Twists to Make It Your Own
This recipe is like a favorite story. You can tell it a little differently each time. Here are some of my favorite twists. They are all so delicious.
- Cookie Swap: Use vanilla wafers instead of graham crackers for the crust. It tastes just like classic banana pudding!
- Caramel Drizzle: Add a layer of salted caramel sauce over the banana layer. The sweet and salty mix is wonderful.
- Chocolate Chip Joy: Fold mini chocolate chips into the filling. They add little bursts of happiness in every bite.
Which one would you try first? Comment below!
Serving It Up With Style
This dessert is a star all by itself. But you can make it extra special. For a pretty plate, add a few extra vanilla wafers on the side. A tiny sprinkle of cinnamon on the whipped cream looks lovely. It tastes good, too.
What to drink with it? For the grown-ups, a small glass of sweet dessert wine is nice. It sips like honey. For everyone, a cold glass of milk is the classic choice. Or try a frothy iced coffee. It cuts through the sweetness perfectly.
Which would you choose tonight?
Keeping Your Cheesecake Happy
This dessert is best kept in the fridge. Cover it tightly with plastic wrap. It will stay delicious for about three days. You can freeze it for one month, too.
Wrap the whole pie plate in foil first. Thaw it overnight in your refrigerator. I don’t recommend reheating this one. It is meant to be served cold and creamy.
You can make the crust and pudding a day ahead. Store them separately in the fridge. Assemble everything the next day. This saves so much time for a party.
I once tried to freeze a slice on a plate. It got a funny freezer taste. Now I always wrap it well. Storing food right keeps flavors fresh and saves money. Have you ever tried storing it this way? Share below!
Simple Fixes for Common Troubles
Is your pudding too lumpy? Whisk the flour and sugar very well first. Add the milk slowly while stirring. This prevents those little flour balls from forming.
Did your crust crumble when you cut it? Let it cool completely first. A warm crust is too soft. A cool crust holds its shape beautifully.
Are the bananas turning brown? Toss them in a little lemon juice. This slows the browning. I remember my first pie had brown bananas. It still tasted great, but looked messy.
Getting the texture right builds your kitchen confidence. Preventing brown fruit makes your creation look as good as it tastes. Which of these problems have you run into before?
Your Quick Questions, Answered
Q: Can I make this gluten-free? A: Yes! Use gluten-free graham crackers for the crust. Use cornstarch instead of flour in the pudding.
Q: How far ahead can I make it? A: You can assemble the whole dessert one day ahead. Just add the final whipped cream and banana slices right before serving.
Q: What if I don’t have fresh bananas? A: You can use a cup of mashed ripe banana in the filling. *Fun fact: The riper the banana, the sweeter the flavor!*
Q: Can I make a smaller version? A: Absolutely. Just cut all the ingredients in half. Use a smaller pie plate or dish.
Q: Any optional add-ins? A: A handful of vanilla wafer cookies layered with the bananas is lovely. Which tip will you try first?
From My Kitchen to Yours
I hope you love making this banana pudding cheesecake. It is a hug in dessert form. Share it with people who make you smile.
I would love to see your beautiful creations. Your version might give me a new idea! Have you tried this recipe? Tag us on Pinterest! You can find me at @LenasCozyKitchen.
Happy cooking!
—Lena Morales.

Banana Pudding Cheesecake: Banana Pudding Cheesecake Recipe
Description
A creamy, no-bake cheesecake filling meets classic banana pudding and a graham cracker crust in this decadent dessert.
Ingredients
For the crust:
For the filling:
For serving:
Instructions
- Preheat the oven to 375° F.
- In a medium bowl, mix together the graham crackers, sugar, and butter. Press the mixture into a 9-inch pie plate in an even layer, pressing the crumbs up the sides of the pie plate. Bake for 7-8 minutes, until golden brown, then let cool completely.
- While the crust is cooling, whisk together the sugar, flour, and salt in a medium saucepan. Add the milk and mix until well combined. Turn the heat to medium and cook until slightly thickened and bubbling.
- Pour about 1/2 cup of the milk mixture into the egg yolks, and mix quickly to combine. Pour the egg yolks back into the saucepan and mix, stirring constantly, until the pudding is thickened. Remove from heat and stir in the vanilla. Let the pudding cool for 10-15 minutes, until just slightly warm.
- Add the cream cheese to a medium bowl and beat until smooth. Add the pudding to the cream cheese and mix until well combined.
- Pour 1/3 of the pudding mixture into the pie crust, spreading evenly. Top with the sliced bananas, then pour the remaining pudding mixture over the top. Chill in the refrigerator for at least 2 hours, until thoroughly chilled.
- To serve, top with whipped cream or cool whip, and garnish with sliced bananas.
Notes
- For best results, ensure the pudding is only slightly warm when mixing with the cream cheese to avoid melting it. Chill thoroughly before serving for clean slices.


Leave a Reply