My First Spooky Treat
I first made these for my grandson, Leo. He was scared of ghosts in his closet. I told him we should make some friendly ones. He loved it. Now he is not scared anymore.
We made a big mess in my kitchen. There was white chocolate everywhere. I still laugh at that. The best part was seeing his happy face. It was worth the cleanup.
Why We Make Food Together
This is more than a recipe. It is a way to make memories. Cooking with someone you love is a special thing. You talk and laugh. That matters more than a perfect cookie.
It also teaches little ones to be brave. Trying new things can be fun. Even if it is a spooky ghost! What is a food that makes you feel brave?
Let’s Make Our Ghosts
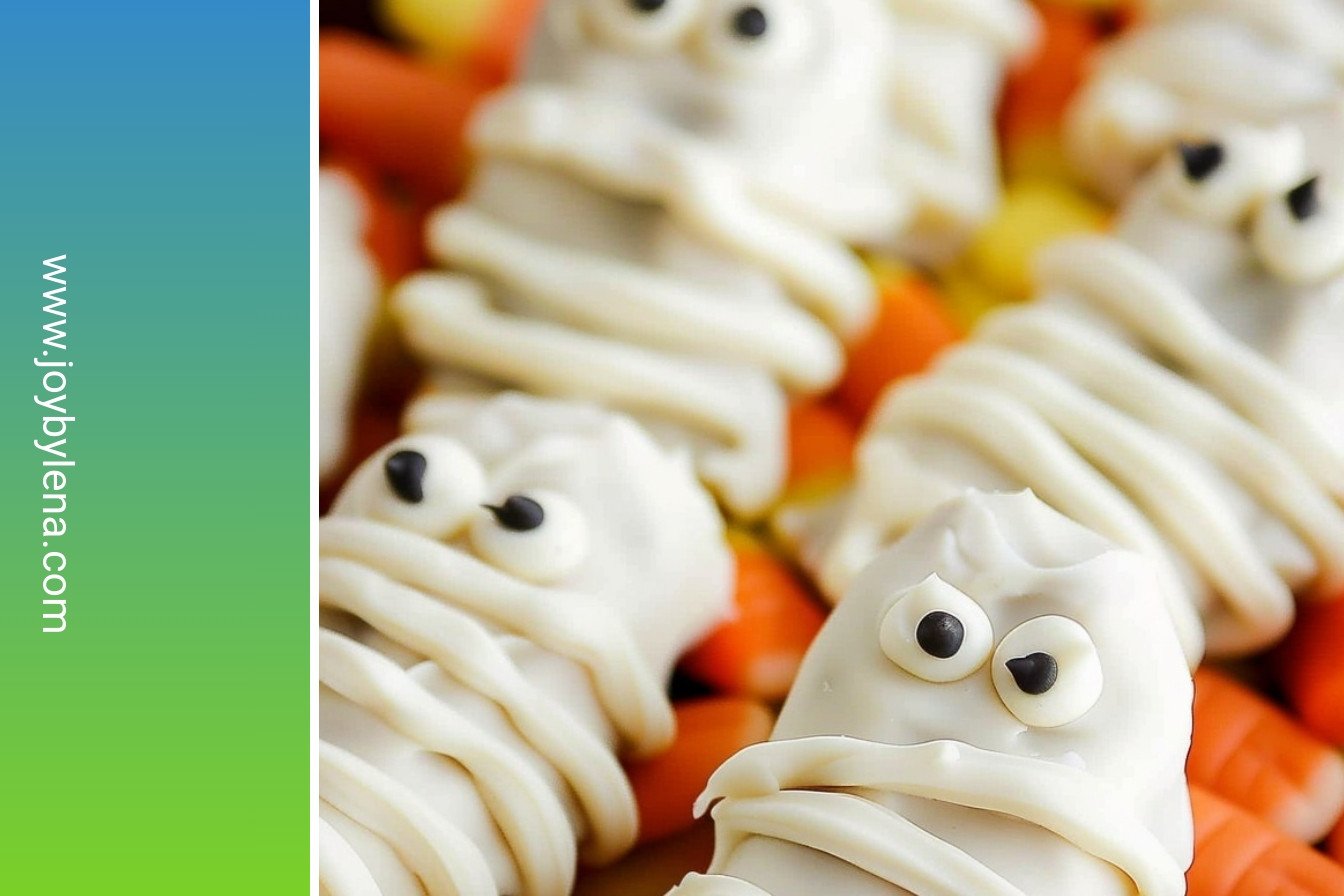
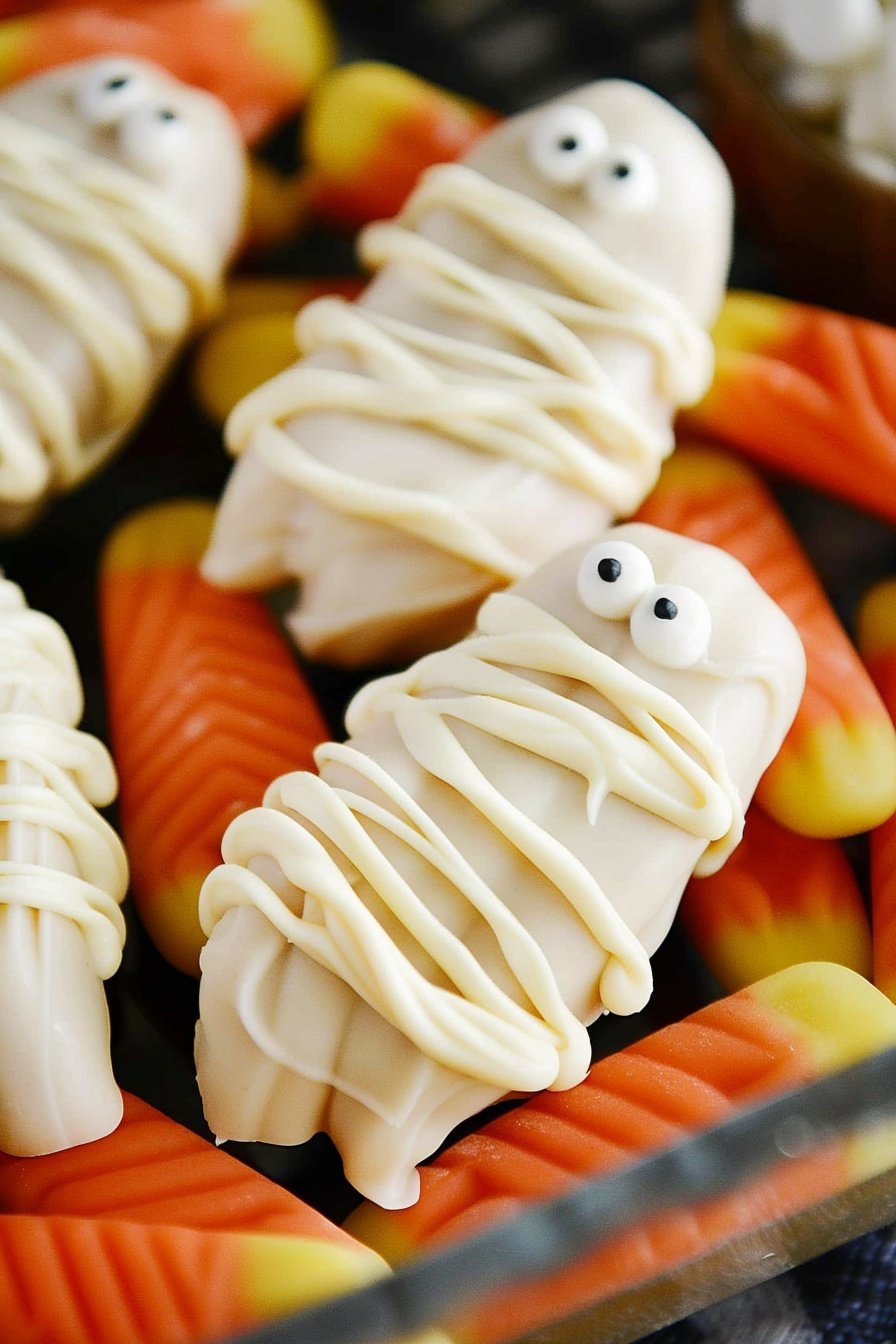
First, melt most of the white chocolate. Be careful, the bowl gets hot. Dip each Nutter Butter cookie in. Shake off the extra. Place them on wax paper.
Now for the fun part. Stick on the candy eyes right away. The chocolate is still soft. Doesn’t that smell amazing? They are already starting to look like little ghosts.
The Magic Wrapping
Melt the rest of the chocolate. Put it in a little bag. Snip a tiny piece off the corner. Now you can drizzle lines on your ghosts. This is their mummy wrapping.
Let them sit until they are hard. This is the hardest part, waiting! *Fun fact:* The first candy eyeballs were made for cake decorating in the 1960s. Did you know that?
Your Turn to Share
I love seeing what everyone creates. Did your ghosts turn out funny or spooky? What other spooky treats do you like to make? Tell me all about it.
Making food with your hands is a joy. It connects us to family and friends. That is why this matters. It is a simple way to show you care. Will you make these with someone special this week?
Ingredients:
| Ingredient | Amount | Notes |
|---|---|---|
| Nutter Butter Cookies | 1 (16-ounce) package | |
| White chocolate almond bark candy coating | 1 (24-ounce) package | |
| Candy eyeballs (or mini chocolate chips) | 1 package | For decoration |
My Spooky Peanut Butter Ghosts
Hello, my dear! Come sit with me. I want to show you a fun kitchen project. We are making Peanut Butter Ghosts today. They are sweet, a little spooky, and totally delicious. My grandkids go crazy for them every Halloween. I still laugh at how easy they are to make.
All you need are some Nutter Butter cookies and white chocolate. The little candy eyes make them come alive. Doesn’t that sound like a fun time? We can chat and create a whole ghostly family together. Let me walk you through it. It’s one of my favorite traditions.
What You’ll Need
- Nutter Butter cookies
- White chocolate
- Candy eyes or mini chocolate chips
- Wax paper
- Microwave-safe bowl
- Plastic bag
Let’s Make Them!
Step 1: First, we melt most of the white chocolate. Do it in a microwave-safe bowl. Follow the directions on the package. Be careful, the bowl gets hot. Stir it until it is completely smooth and shiny.
Step 2: Now, take a Nutter Butter cookie. Dip it into the melted chocolate. Cover it completely like a little ghost sheet. Gently shake off the extra chocolate. (A hard-learned tip: too much coating makes a puddle at their feet!). Place your ghost on wax paper.
Step 3: This is the best part. Give your ghost a face! Press on two candy eyes while the chocolate is wet. If you don’t have eyes, mini chocolate chips work great. I like giving some ghosts a surprised look. It makes me smile.
Step 4: Melt the rest of the white chocolate. Put it in a plastic bag and snip a tiny corner off. Now you can drizzle lines over your ghosts. This looks like spooky wrappings. Let them sit until the chocolate gets hard. Do you prefer candy eyes or chocolate chip eyes? Share below!
| Prep Time | 30 minutes |
| Total Time | 30 minutes |
| Yield | 32 ghosts |
| Category | Dessert, Snack |
Spooky & Sweet Twists
Once you know the basics, you can get creative. I love trying new versions of my recipes. It keeps things exciting in the kitchen. Here are a few fun ideas for our little ghosts.
- Chocolate Phantom: Use milk chocolate coating instead of white. They become dark, shadowy phantoms.
- Spooky Sprinkles: Add orange and black sprinkles right after dipping. So colorful and fun for a party.
- Peanut Butter Blob: Use a spoon to drop the coating onto paper. Then add eyes. They become cute, blobby ghosts.
Which one would you try first? Comment below!
Serving Your Ghostly Treats
These treats are perfect for a Halloween party. Pile them high on a dark plate. It looks like a ghostly gathering. You could also put one on top of a cup of hot chocolate. What a fun surprise for a friend.
For a drink, a cold glass of milk is always the best match. The peanut butter loves milk. For the grown-ups, a creamy pumpkin ale is a nice fall pairing. It tastes like the season in a glass. Which would you choose tonight?

Keeping Your Ghosts from Disappearing
These little ghosts are best enjoyed the day you make them. But you can store them for a few days. Just put them in a single layer in an airtight container. Keep them in a cool, dry place.
I once left mine on the counter uncovered. They got soft and lost their spooky charm. You do not want that to happen. Batch cooking is a great idea for a party. Making a lot at once saves you time later.
This matters because good food should be shared with friends. Storing it right means no treats go to waste. Have you ever tried storing it this way? Share below!
Spooky Troubles and Simple Fixes
Is your chocolate coating too thick? It can make your ghosts look lumpy. Just add a tiny bit of coconut oil to thin it. This helps the coating flow smoothly over the cookie.
Are the candy eyeballs not sticking? I remember when my first ghost lost its eyes. You must press them on while the chocolate is still wet. This ensures they stay put for good.
Is your drizzled chocolate breaking the bag? The bag might be too hot from your hands. Let the melted chocolate cool for a minute first. Fixing small problems builds your confidence in the kitchen. It also makes your treats look and taste better. Which of these problems have you run into before?
Your Ghostly Questions, Answered
Q: Can I make these gluten-free? A: Yes! Just use your favorite gluten-free peanut butter sandwich cookies.
Q: Can I make them ahead of time? A: You can make them a day before your party. Store them as I mentioned earlier.
Q: What if I do not have almond bark? A: White chocolate chips will work too. *Fun fact: Almond bark is not made from almonds!*
Q: Can I make a smaller batch? A: Of course. Just use half the package of cookies and chocolate.
Q: Any other spooky decorations? A: You can use a dot of black icing for a mouth. Which tip will you try first?
Share Your Spooky Creations
I hope you have so much fun making these peanut butter ghosts. Cooking is about creating happy memories in your kitchen. I love seeing all your wonderful kitchen creations.
Please share your photos with me and everyone. It makes me so happy to see your families enjoying them. Have you tried this recipe? Tag us on Pinterest!
Happy cooking!
—Lena Morales.
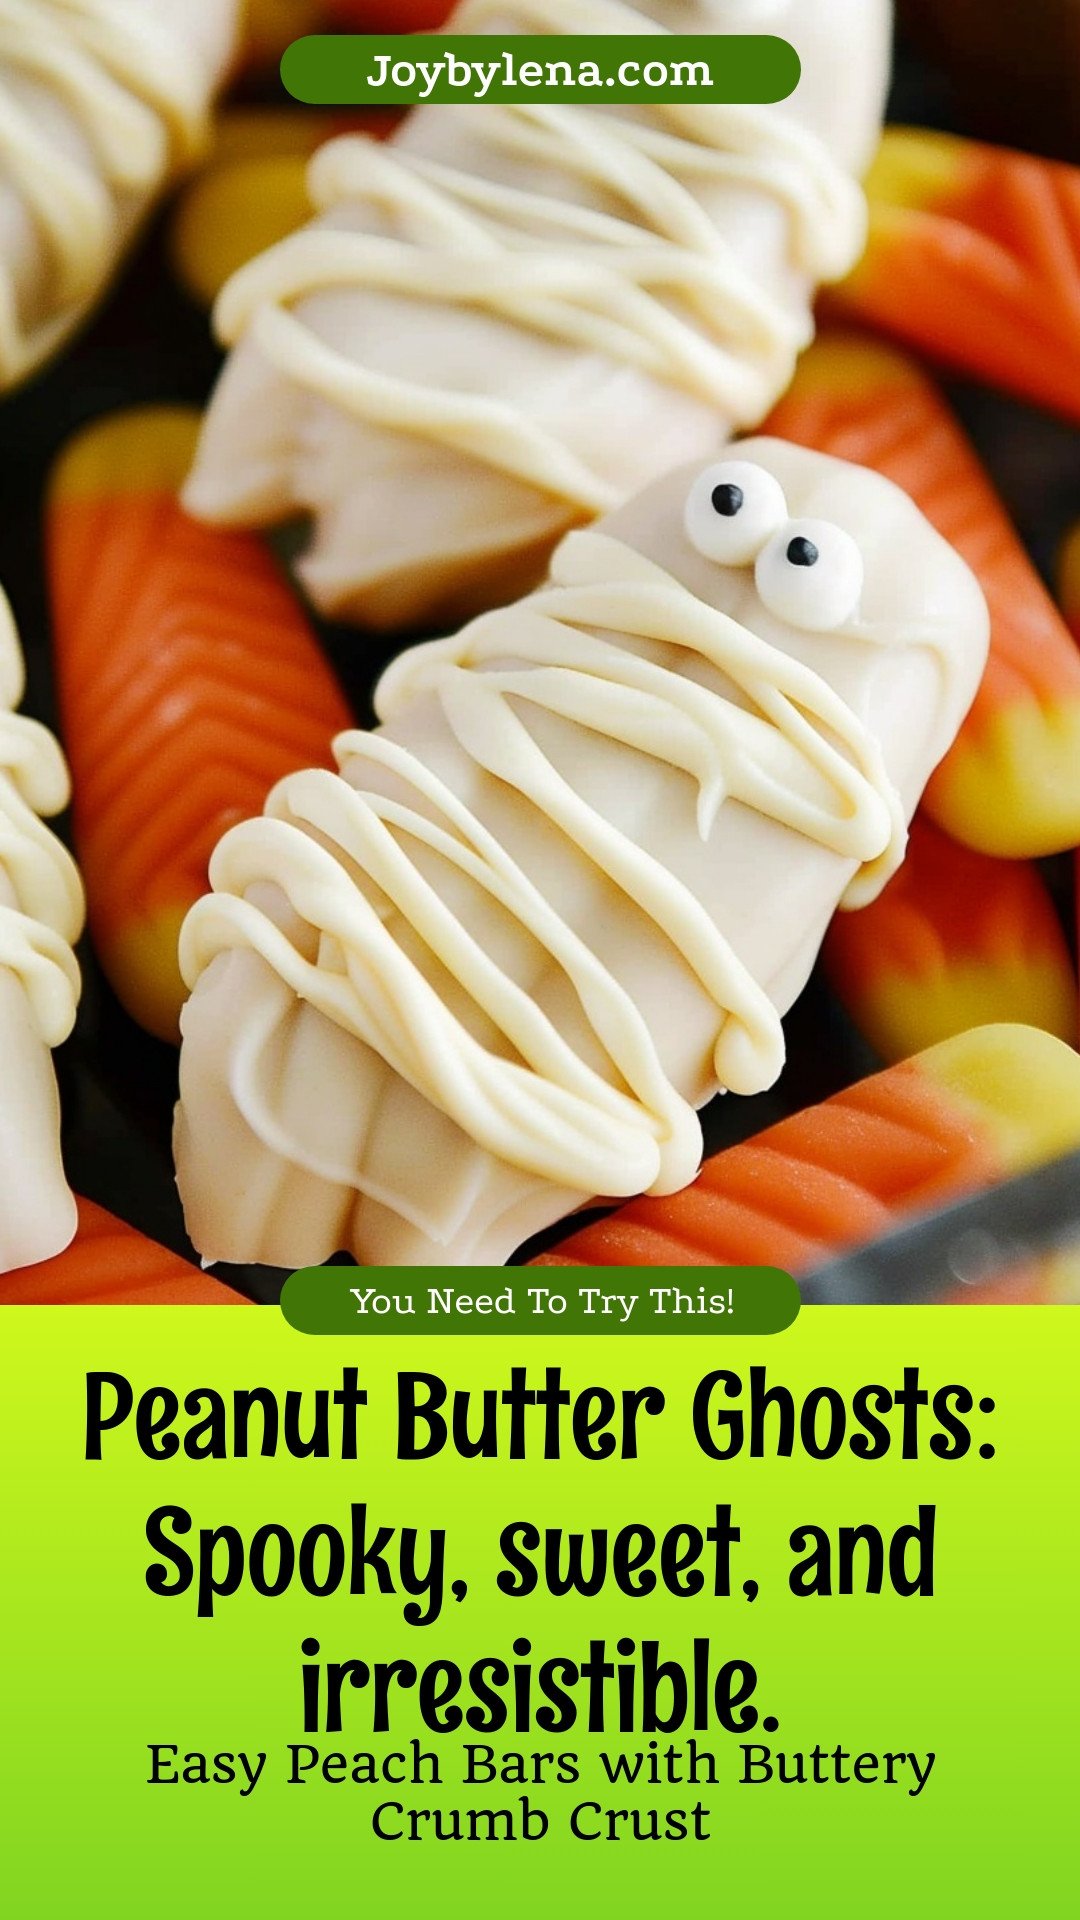
Peanut Butter Ghosts: Spooky, sweet, and irresistible.:
Description
Spooky, sweet & irresistible peanut butter ghosts! The perfect easy Halloween treat for kids & parties. Get the simple recipe for these adorable no-bake bites.
Ingredients
Instructions
- In a small bowl, melt 3/4 of the almond bark in the microwave according to the package instructions.
- Dip each Nutter Butter in the bark to coat it and then shake off any excess. Place the coated cookies on wax paper or parchment paper. Repeat until all the cookies are coated.
- Add the eyes (or chocolate chips) to each mummy while the almond bark is still soft.
- Add the remaining bark to a clean bowl and melt it according to the package instructions. Transfer the melted bark to a disposable piping bag or zip-top bag. Snip the very tip or corner off of the bag and drizzle the melted bark over the cookies to look like the mummy’s wrapping. Allow the bark to harden completely before removing the cookies from the wax paper and removing the excess bark from the sides.


Leave a Reply