Why I Love This Pot Pie
This chicken pot pie is like a warm hug on a cold day. I first made it for my grandson who needs to eat gluten-free. He looked so sad at family dinners, missing out on all the cozy food. I told him, “We will fix that.” And we did. The smell of thyme and butter filled my kitchen. Doesn’t that smell amazing? It felt good to give him something he could enjoy with everyone else.
Here is the thing: you do not need fancy ingredients. You just need a good gluten-free flour that bakes like the real stuff. I like Pillsbury or Better Batter. They never let me down. Have you tried a gluten-free pie crust before? Tell me about your first try—was it a win or a funny mess?
The Secret Is in the Crust
The crust is the part people worry about most. I get it. Gluten-free dough can be a little crumbly. But here is a little trick: chill it well before you roll it out. Cold dough is happy dough. *Fun fact: chilling gluten-free dough helps the flour absorb moisture, so the crust holds together better.* That tip came from a long night of trial and error. I still laugh at how that first crust cracked into a dozen pieces. My grandson called it a “pot pie puzzle.”
Why does this matter? Because a good crust makes everyone feel included at the table. When you make this for a friend who cannot eat gluten, you are saying, “You belong here.” That is a powerful thing.
Making the Filling Rich and Easy
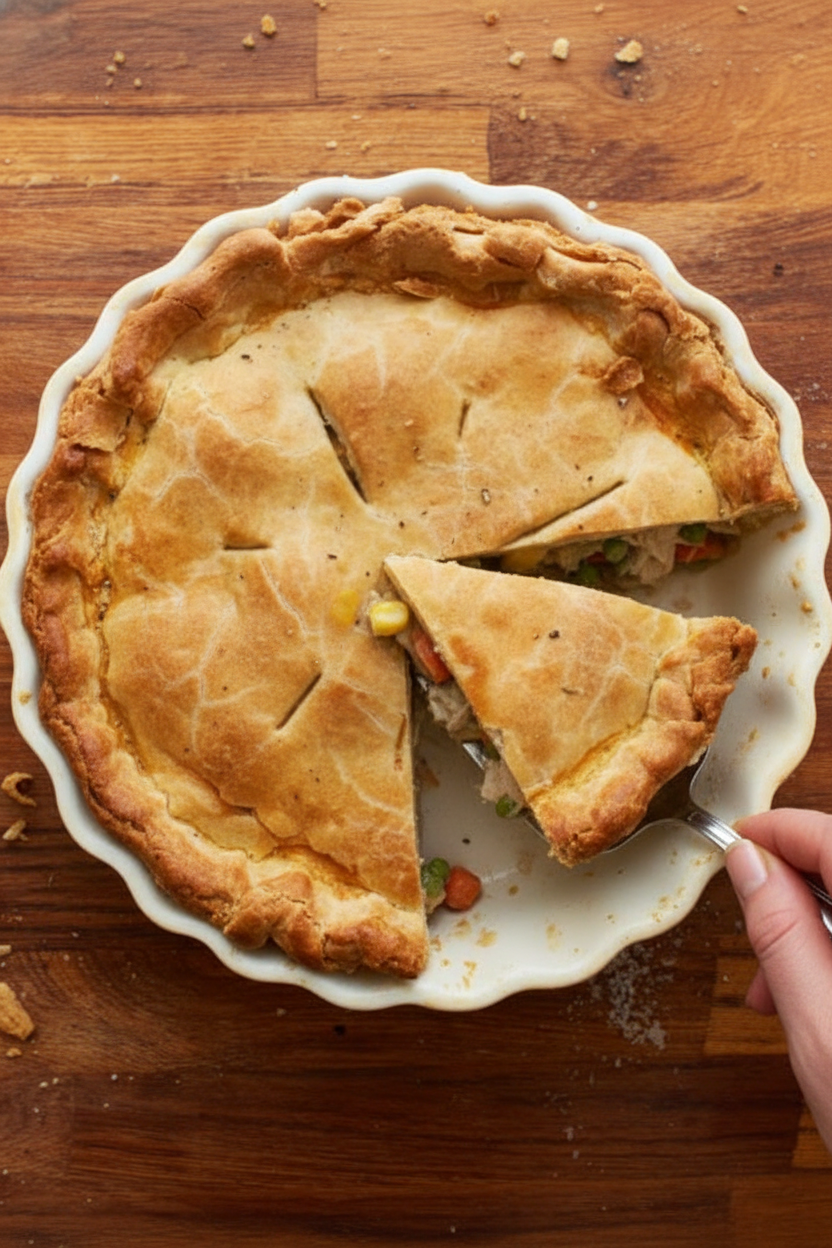
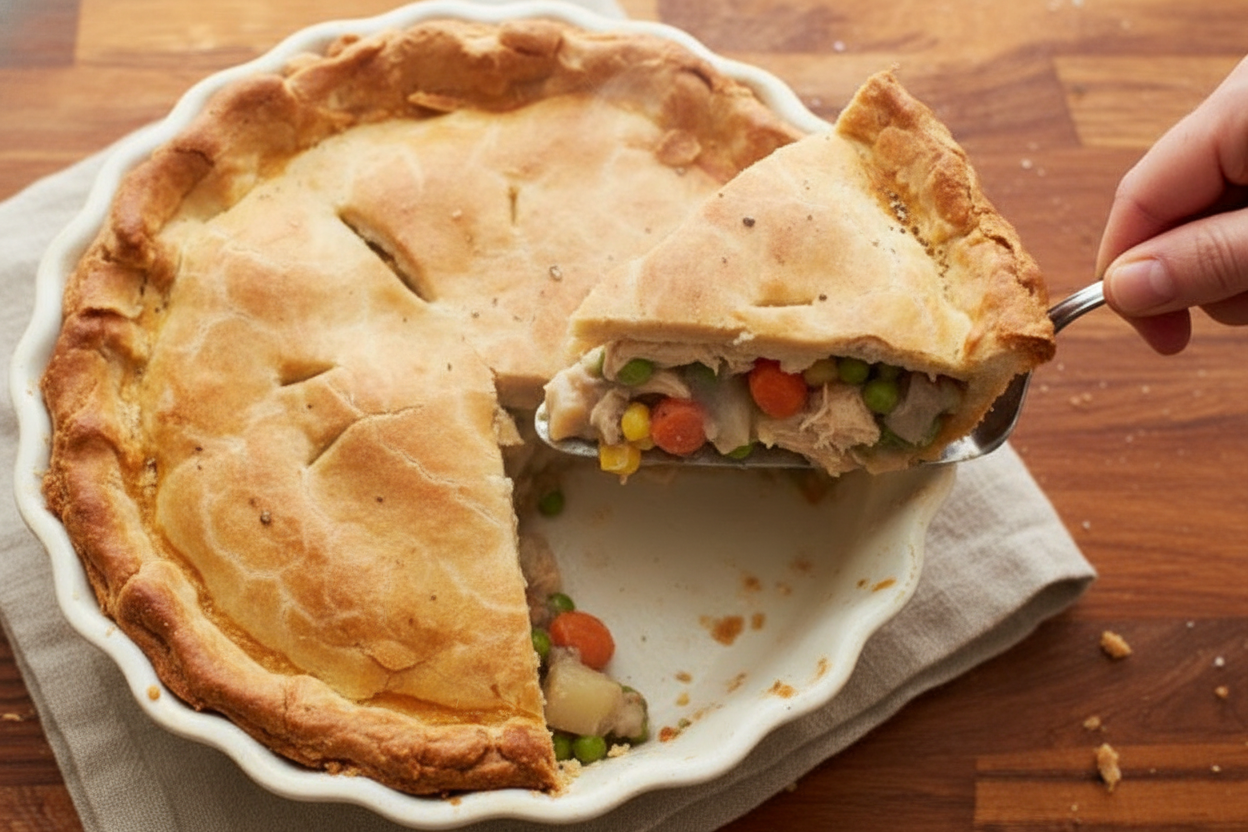
The filling is where the comfort lives. You start by boiling potatoes and frozen veggies until they are soft. That is simple. Then you make a creamy sauce with butter, milk, and gluten-free flour. Whisk it smooth, and watch it get thick and golden. I always add extra thyme because it smells like my grandmother’s kitchen. Stir in the chicken and pour it all in the crust. Easy, right?
I want to ask you something. What is your favorite vegetable to sneak into a pot pie? Mine is corn. It adds a little sweetness. And remember, you can use leftover chicken from a roast or even a rotisserie bird. That saves time. Why does this matter? Because a home-cooked meal should not take all day. You deserve a good dinner without stress.
A Little Story About Leftovers
Last winter, I made two pot pies at once. One for dinner, one for the freezer. My neighbor came over to borrow some sugar and saw the second pie cooling on the counter. She said, “That looks like the one my grandma used to make.” I wrapped it up and handed it to her. She almost cried. That is the magic of a pot pie. It brings back memories and makes new ones.
Have you ever shared a meal that meant more than just food? I bet you have. That is why we cook. Not just to eat, but to show love.
Baking and Serving Tips
Brush the top crust with egg wash for that golden shine. Do not skip this step. It makes the pie look like a bakery treat. Bake it on a lower rack with a baking sheet underneath to catch any drips. That way, your oven stays clean. Let the pie rest for ten minutes after baking. This helps the filling set so it does not turn into soup on your plate.
Here is a quick poll for you: do you like your pot pie with a side salad, or do you just eat it all by itself? I am a “just eat it” kind of person. But a little green salad never hurts. Why does this matter? Because resting the pie is not just a fancy rule. It helps the flavors settle together. Patience pays off.
Making It Dairy-Free, Too
Some folks cannot have dairy either. I made this for my niece who is dairy-free. I swapped the butter for Smart Balance and used unsweetened almond milk. It worked beautifully. The sauce was still creamy and rich. The crust has a dairy-free option in my recipe, too. So this pot pie can fit almost everyone at your table. That makes me happy.
Have you ever had to change a recipe for someone you love? Tell me what you swapped. I love hearing how people make food their own. Remember, cooking is not about being perfect. It is about making people feel cared for.
Ingredients:
| Ingredient | Amount | Notes |
|---|---|---|
| Gluten-free pie crusts | 2 | Use my easy gluten-free pie crust recipe; also has dairy-free option. I use Pillsbury gluten-free or Better Batter flour. |
| Cooked chopped gluten-free chicken | 2 cups | |
| Potato, peeled and diced | 1 large | |
| Frozen mixed vegetables (peas, carrots, corn, green beans) | 2 cups | |
| Water | 1 cup | |
| Butter | 3 teaspoons | Dairy-free use Smart Balance. |
| Gluten-free all-purpose flour | 1/3 cup | I like Pillsbury gluten-free flour or Better Batter flour. |
| Salt | 1 teaspoon | |
| Ground black pepper | 1/4 teaspoon | |
| Dried thyme | 1 teaspoon | |
| Onion powder | 2 teaspoons | |
| Gluten-free chicken broth | 1 1/2 cups | |
| Milk | 2/3 cup | Dairy-free use unsweetened almond or coconut milk. |
| Large egg | 1 | For egg wash |
| Water | 1 tablespoon | For egg wash |
There’s Nothing Like a Warm Pot Pie on a Cold Night
I still remember the first time I made a pot pie for my family. It was raining outside and the house smelled like butter and thyme. Doesn’t that smell amazing? This gluten-free version came later, after my neighbor Sarah found out she couldn’t eat wheat. She said it tasted just like the one her grandma used to make. That made me so happy. Now I want to share it with you.
You don’t need any fancy skills for this recipe. Just a little patience and a big love for good food. I use Pillsbury gluten-free flour because it never lets me down. The crust gets golden and flaky, just like a hug on a plate. And the filling is creamy, cozy, and full of tender chicken and soft veggies. It’s the kind of meal that makes everyone at the table smile.
Your Step-by-Step Guide to Pot Pie Perfection
Step 1: Start by getting your pie crusts ready. I like to chill my gluten-free pie dough for at least an hour. This keeps it from getting too sticky. While it chills, grease a 9-inch pie dish with cooking spray. Put a baking sheet on the lower rack of your oven and preheat to 425°F. Trust me, the baking sheet catches any drips and keeps the bottom crust crispy.
Step 2: Roll out one pie crust and press it gently into the greased dish. Make sure it’s smooth all over. Now, in a big pot, toss in one diced potato and two cups of frozen mixed vegetables. Add one cup of water and cook on medium heat for 10–15 minutes. (Hard-learned tip: Don’t skip draining the veggies well, or your filling will be soupy!)
Step 3: Drain the veggies and set them aside in a bowl. Melt three teaspoons of butter in the same pot over medium heat. In a small bowl, whisk together 2/3 cup milk and 1/3 cup gluten-free flour. This trick stops lumps from forming. Pour the flour mixture into the pot and stir in one teaspoon salt, a pinch of pepper, one teaspoon dried thyme, and two teaspoons onion powder.
Step 4: Keep whisking as you add 1 1/2 cups gluten-free chicken broth. Stir until it gets thick and bubbly, like a good gravy. Take the pot off the heat. Stir in your cooked chicken and the drained vegetables. Pour everything into the pie crust. It should smell so savory and warm. What’s your favorite comfort food smell? Share below!
Step 5: Place the second pie crust on top of the filling. Pinch the edges shut all around. Cut a few small slits in the top so steam can escape. In a tiny bowl, whisk one egg with one tablespoon of water. Brush this egg wash all over the top crust. This is what makes it turn that beautiful golden brown.
Step 6: Pop the pie dish onto that preheated baking sheet in the oven. Bake for 30–35 minutes, until the top is golden and the filling is bubbling. The inside should reach 165°F. Let the pot pie rest for 10 minutes before cutting. I know it’s hard to wait, but it sets the filling perfectly. Serve it up and watch everyone dig in!
Cook Time: 35 minutes
Total Time: 1 hour 10 minutes
Yield: 6 servings
Category: Dinner, Comfort Food
Three Fun Ways to Mix It Up
Sometimes you want to change things up a little. These twists are easy and so tasty. Try one next time you make this pot pie. Which one would you try first? Comment below!
Go Vegetarian: Skip the chicken and use two cans of drained chickpeas instead. Use veggie broth in place of chicken broth. It’s still creamy and filling.
Spicy Southwestern: Add one can of drained black beans and half a cup of frozen corn. Stir in a teaspoon of chili powder and a dash of cumin. Serve with a dollop of dairy-free sour cream.
Spring Garden: Swap the frozen mixed veggies for fresh asparagus pieces, peas, and baby spinach. Add the spinach at the very end so it just wilts. It tastes like sunshine.
How to Serve Your Pot Pie Like a Pro
A good pot pie deserves some fun sides. I love serving mine with a simple green salad dressed with lemon juice and olive oil. The bright crunch balances the creamy pie. You could also roast some broccoli with a pinch of salt and garlic powder. It’s quick and cozy.
For drinks, pour a tall glass of cold apple cider for the kids. Grown-ups might enjoy a light, crisp white wine like a Sauvignon Blanc. The wine’s freshness cuts through the rich filling so nicely. Which would you choose tonight? I always go for the cider, honestly. It reminds me of autumn afternoons on the porch.
Storing and Reheating Your Pot Pie
This pot pie stores like a dream. Let it cool completely before covering with foil. Pop it in the fridge for up to three days. I once left a whole pie out by accident. My grandma would have tsked at me. So set a timer if you are busy.
For the freezer, bake the pie first. Wrap it tight in foil and then a freezer bag. It keeps for about a month. Thaw it in the fridge overnight before reheating. Cover with foil and warm at 350°F for 20 minutes. Why does this matter? Batch cooking saves you on busy weeknights. You will have a cozy dinner ready without the mess.
To reheat a single slice, use the microwave for 60 seconds. The crust gets a little soft, but the filling stays warm. I remember my first time reheating leftovers. I burnt my tongue because I was too hungry. Learn from me: let it cool a minute. Have you ever tried storing it this way? Share below!
Common Pot Pie Problems (And Easy Fixes)
Three things can go wrong with this pot pie. First, a soggy bottom crust. This happens when the filling is too wet. My fix? Cook the vegetables until the water is mostly gone. Drain them well, like I taught you. Why this matters: a crunchy crust makes each bite better. You will feel proud pulling out a perfect pie.
Second, the sauce can turn out lumpy. I remember when I whisked too fast and splashed flour everywhere. The secret is mixing the milk and flour in a separate bowl first. Stir that smooth paste into the pot slowly. Third, the top crust might crack. Pinch the edges firmly and cut slits for steam to escape. Which of these problems have you run into before?
Why fixing these matters? It builds your cooking confidence. You will learn to trust your hands. The flavor also gets better when you take these small steps. No one wants a watery pie. You deserve a golden, flaky one.
Your Pot Pie Questions Answered
Q: Can I use store-bought gluten-free crust?
A: Yes, but roll it a little thinner so it bakes through.
Q: Can I make this ahead?
A: Assemble the pie raw and refrigerate for up to 24 hours. Bake right before serving.
Q: Can I swap the potato for something else?
A: Try diced sweet potato or cauliflower. Both work great.
Q: How do I scale the recipe for two pies?
A: Double everything. Use two pie dishes and bake them together.
Q: Can I skip the egg wash?
A: Yes, but the crust won’t be shiny. Brush with a little milk instead.
Which tip will you try first?
A Warm Goodbye From My Kitchen
Thank you for spending time with me today. I hope this pot pie brings you warmth and full bellies. It reminds me of Sunday dinners at my abuela’s table. The whole house smelled like thyme and butter. I would love to see your creation. Have you tried this recipe? Tag us on Pinterest!
Here is a fun fact: My first pot pie was so salty, I had to serve it with extra peas. We all learn by messing up. Keep cooking, keep sharing, and keep asking questions. Happy cooking!
—Lena Morales.
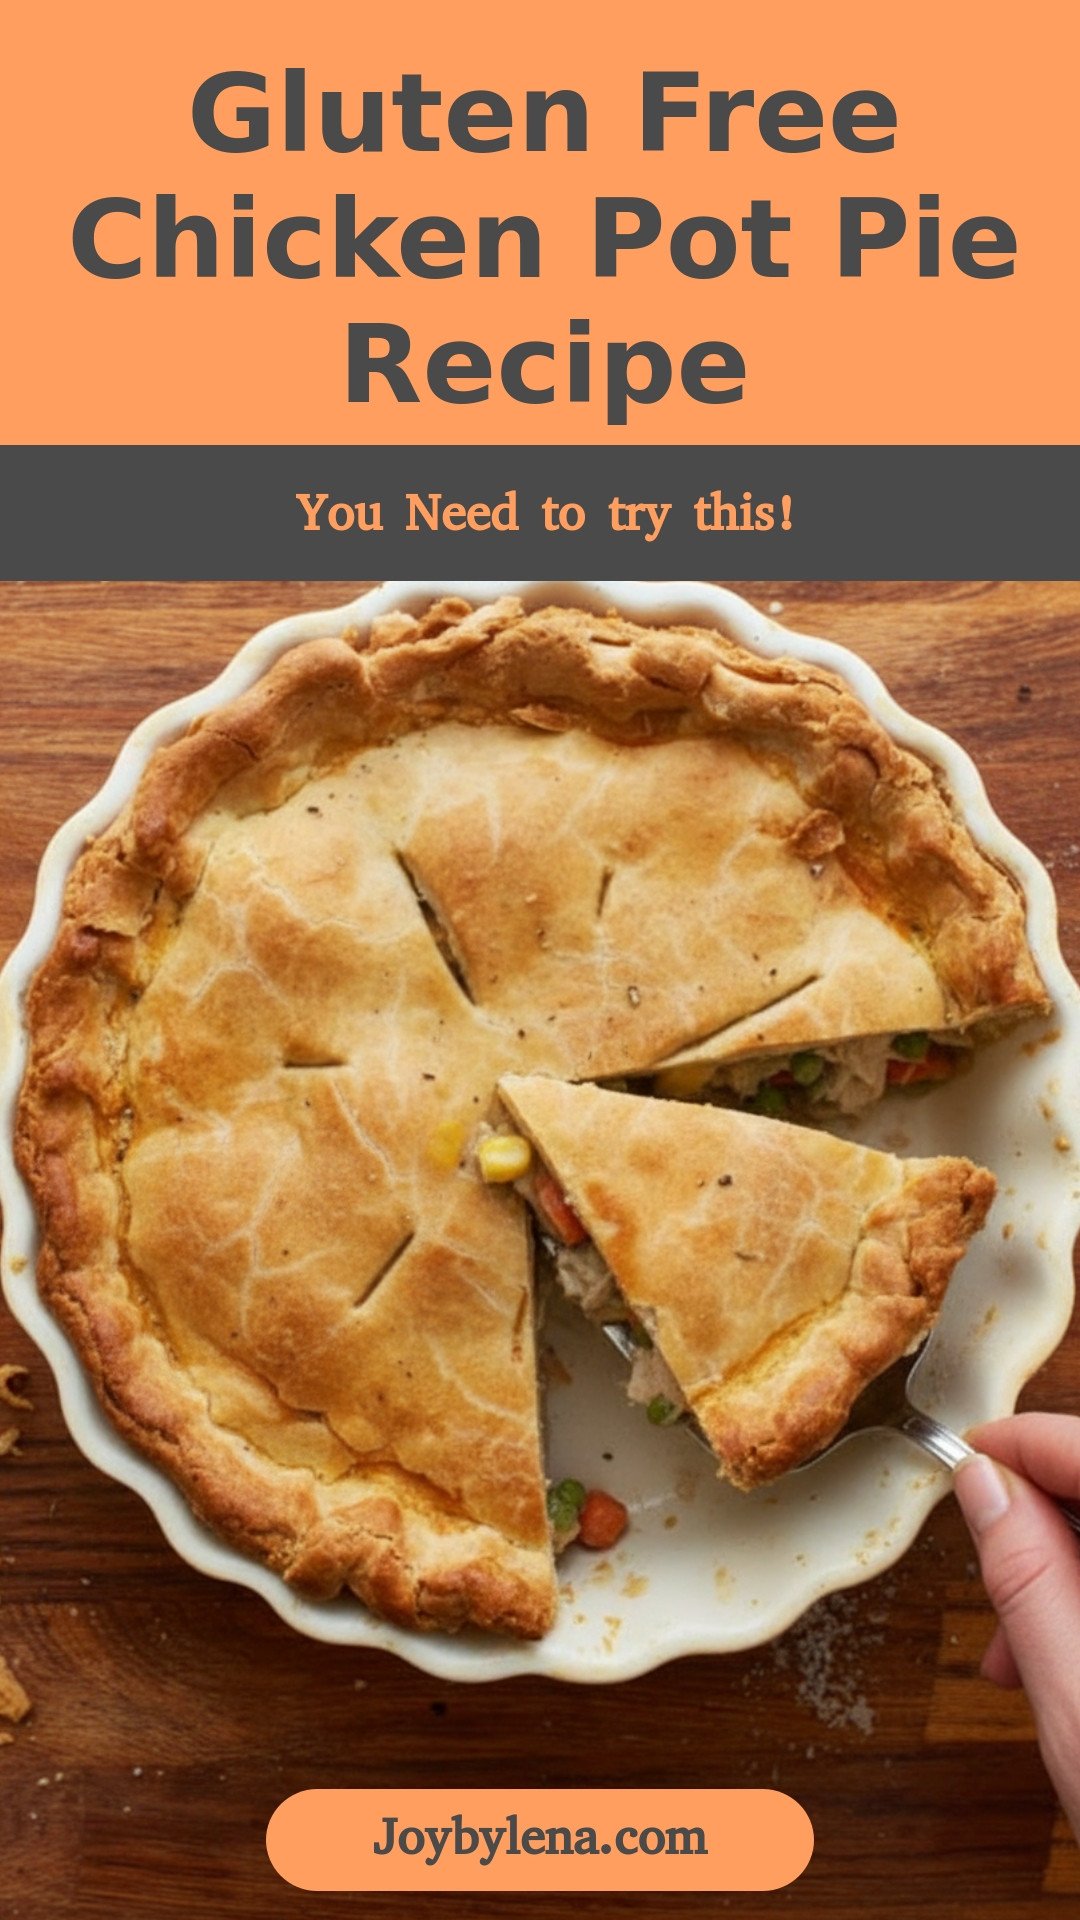
Gluten Free Chicken Pot Pie Recipe
Description
Enjoy a comforting gluten-free chicken pot pie with a flaky crust and creamy filling.
Ingredients
Gluten-Free Crust
Filling
Egg Wash
Instructions
- Prepare 2 pie crusts by doubling my gluten-free pie crust recipe, including chilling.
- Place a baking sheet on the lower rack of the oven. Preheat the oven to 425°F and grease a 9-inch pie dish with gluten-free cooking oil cooking spray.
- Place one of the gluten-free pie doughs into the bottom of the greased pie dish. Make sure it is smooth.
- Place the diced potatoes and frozen vegetables in a large pot. Cover the vegetables with the 1 cup water to cover and cook over medium heat for 10-15 minutes, until potatoes are soft. Drain the vegetables and place in a bowl.
- Add the butter to the pot and melt over medium heat. In a small bowl whisk together the milk and gluten-free flour. Stir in gluten-free flour and seasonings, whisking continuously until smooth.
- Add the gluten-free chicken broth, stirring frequently until thick. Remove the pot from heat.
- Stir in the chopped chicken and vegetables. Pour the filling into the pie crust.
- Place the remaining pie crust over the top of the filling and pinch the edges shut. Cut slits in the top of the pot pie.
- Whisk together the egg and the water in a small bowl and brush it all over the top crust.
- Bake for 30-35 minutes, or until golden brown and internal temperature reaches 165°F.
- Allow the pot pie to cool for 10 minutes and serve!
Notes
- For a dairy-free version, use Smart Balance butter and unsweetened almond or coconut milk.


Leave a Reply