Why I Love These Little Treats
I still laugh at the first time I tried making chocolate-covered raspberries. I was in a big hurry, and the berries were still a little wet. The chocolate turned into a lumpy, gray mess. It looked like a science experiment gone wrong. Doesn’t that just make you groan? This recipe fixes all those mistakes.
The secret is patience. You need to let the berries dry completely. I mean, really dry. A damp berry will ruin the chocolate’s shine. That is the first “why this matters” insight: dry berries make smooth, beautiful chocolate shells. Have you ever ruined a dessert by rushing?
The Double-Dip Trick
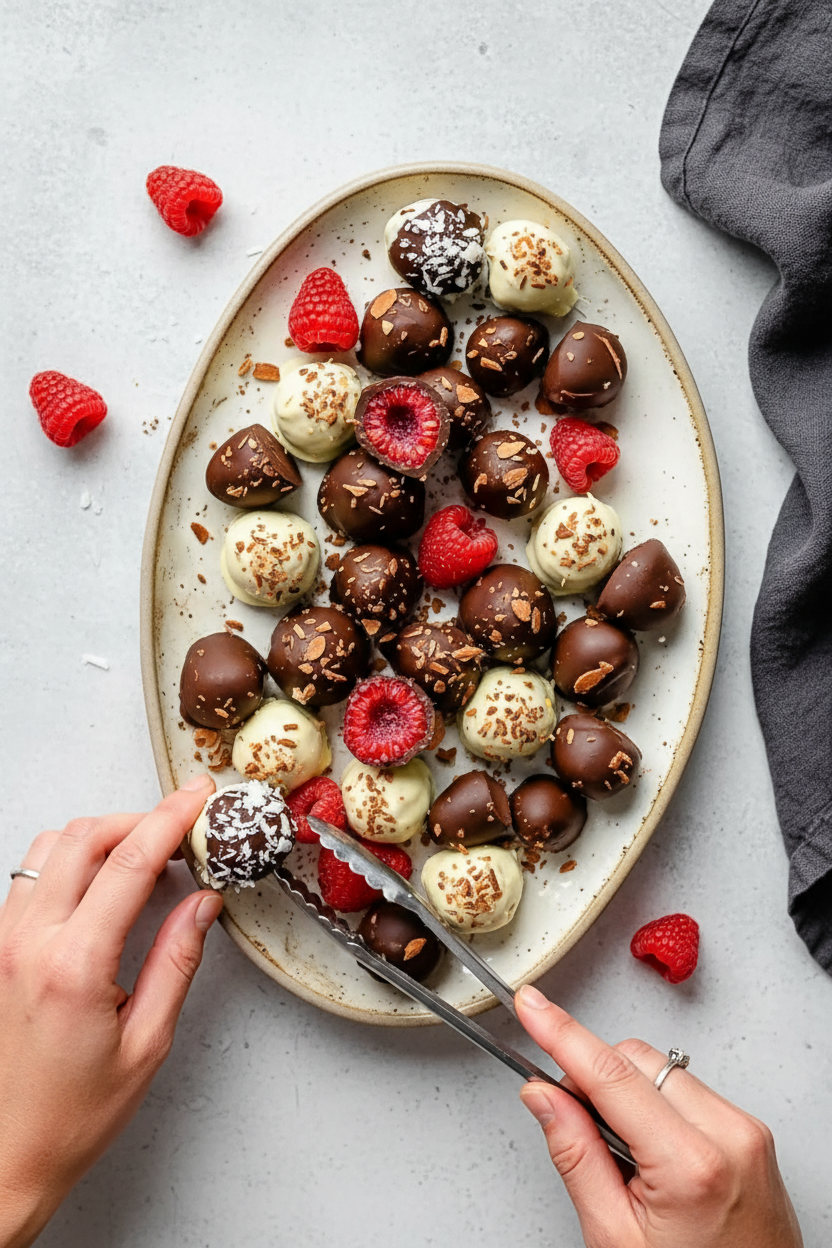
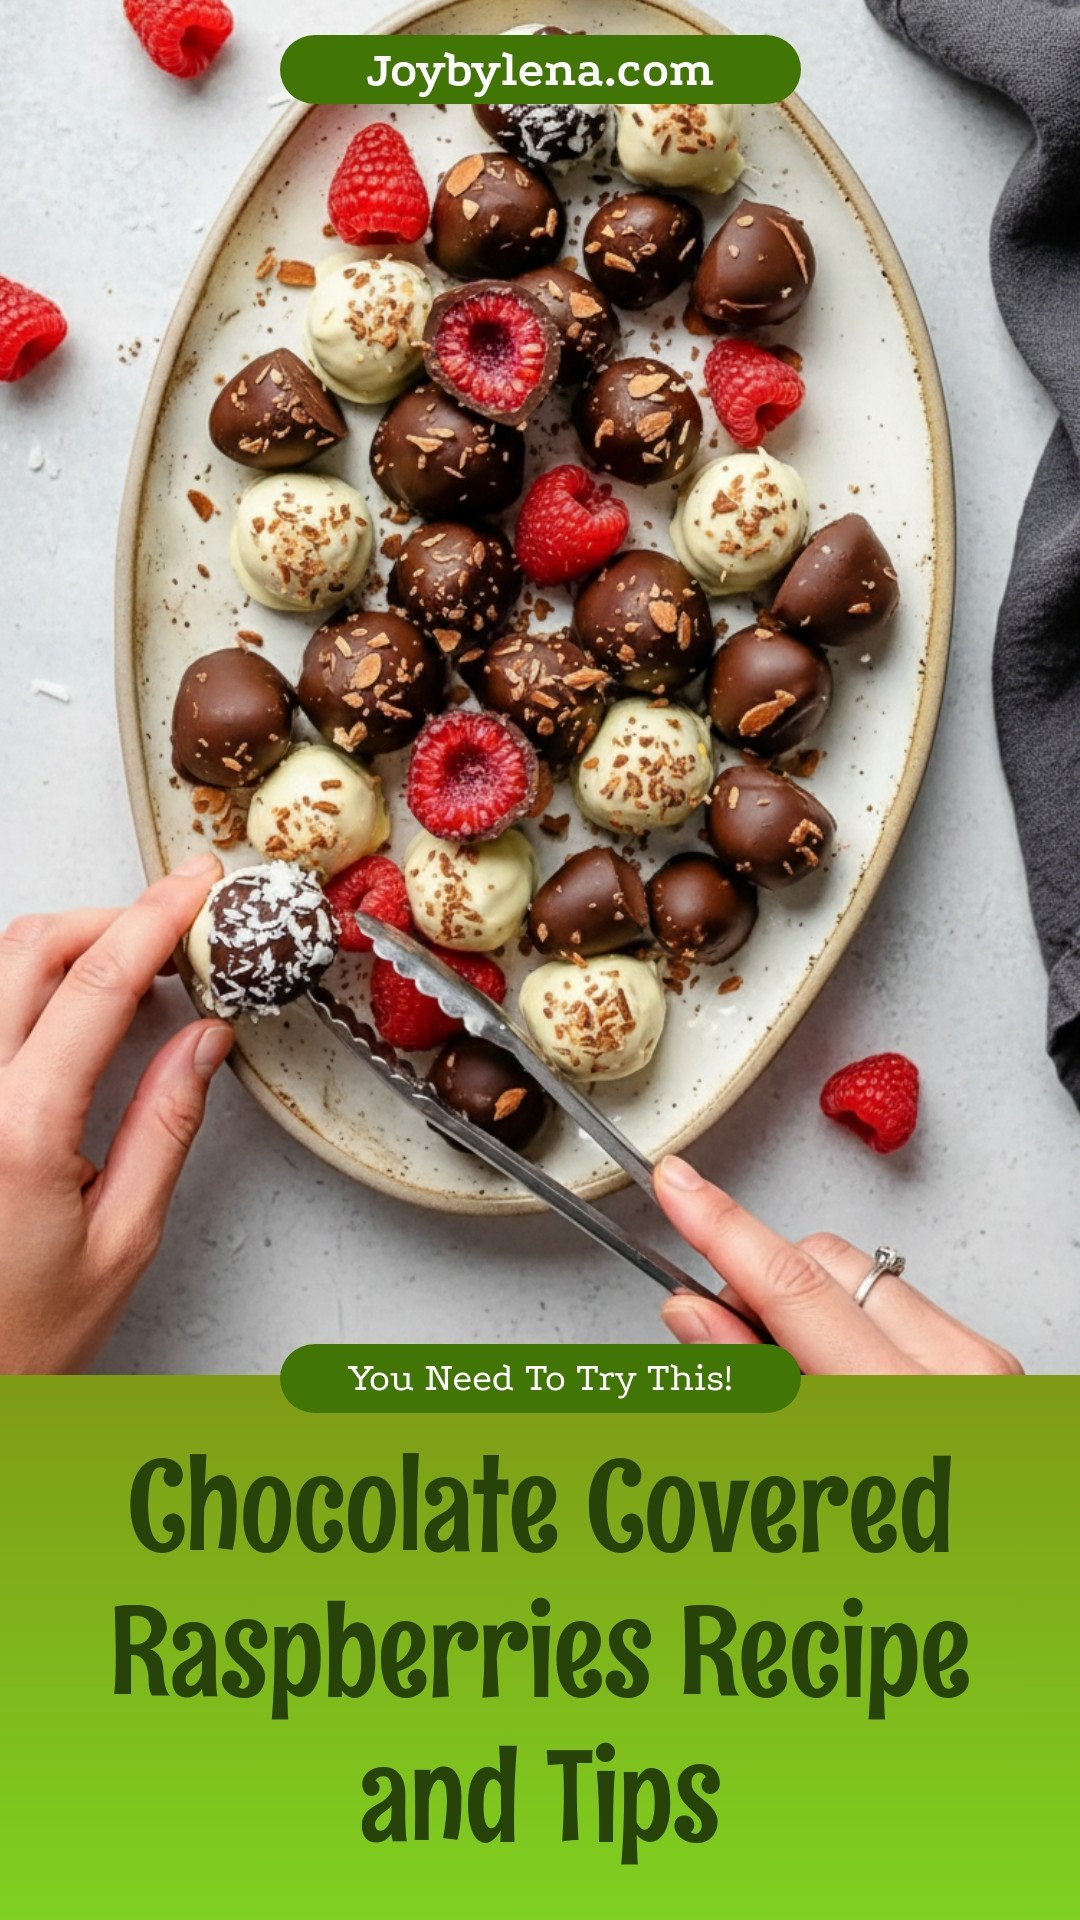
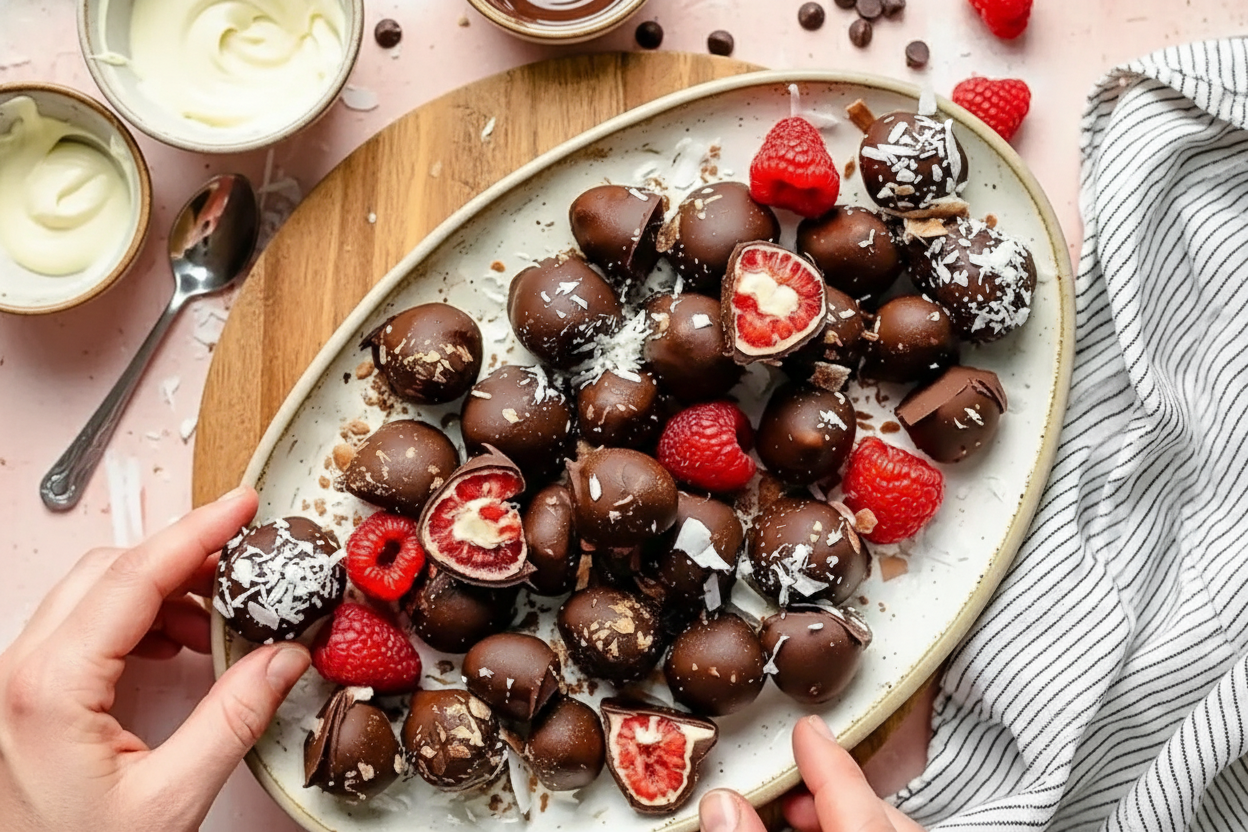
Most people just dip a raspberry in dark chocolate and call it a day. Not us. We are making something special. First, you cover each berry in white chocolate. It is like giving them a cozy, sweet hug. Then you freeze them until they are hard.
Next comes the dark chocolate dip. That frozen white center keeps the dark chocolate from soaking in. The two layers stay separate. When you bite into one, you get a loud *snap* of dark chocolate, then the creamy white, then the tart berry. *Fun fact:* This trick is called “shell molding” by candy makers. It gives you that perfect crunchy coat.
My Little Kitchen Anecdote
My granddaughter, Sofia, loves helping with these. She is nine years old. Last summer, she decided to dip the berries with her fingers instead of a toothpick. Her fingers were covered in melted white chocolate. She looked like a ghost with sticky hands. We both laughed so hard I nearly knocked over the bowl.
That is the best part of cooking. You make a memory along with the food. Those sticky fingers made the treats taste even sweeter. What is a funny kitchen memory you have? I bet you have a good one.
The Right Chocolate Matters
I always use good chocolate bars, not chips. Chips have a waxy coating that helps them hold their shape. That waxy stuff does not melt as smooth. Bars melt into a silky river of chocolate. It is worth the extra dollar or two.
This is another “why this matters” insight: good chocolate tastes better and melts better. You want that 60-70% cocoa dark chocolate. It is strong enough to stand up to the sweet white layer. Do you have a favorite kind of chocolate for baking?
Keeping Them Perfect
These little gems must live in the freezer. If you leave them out, the raspberry gets soft and leaks juice. That juice makes the chocolate sweaty and sticky. A frozen raspberry is a happy raspberry.
You can keep them in an airtight container for up to two weeks. That is if you can resist eating them all in one day. I usually cannot. They are perfect for a hot afternoon snack. Take one out and let it sit for just one minute before you bite. It thaws just enough to be soft inside.
A Little Poll For You
I like to know what my readers think. So here is a tiny question for you: Which do you like better, white chocolate or dark chocolate? Or are you a milk chocolate fan like my husband? He says dark chocolate is too bitter. I tell him he is missing out.
You could also try this recipe with strawberries or blueberries. The method is the same. Just make sure the fruit is dry. I would love to hear what fruit you pick. You can tell me in your head, or you can write it down and share with a friend.
Ingredients:
| Ingredient | Amount | Notes |
|---|---|---|
| Fresh raspberries | 2 cartons (6 ounces each) | Room temperature, completely dry |
| White chocolate bars or chips | 8 ounces | Use bars for best melting |
| Dark chocolate bars or chips | 8 ounces | 60-70% cocoa recommended |
My First Try With Chocolate Raspberries
I still remember the first time I made these for a little party. My fingers were sticky, and I dropped three raspberries on the floor. My grandma just laughed and handed me more. Doesn’t that smell amazing when the chocolate melts? It’s like a warm hug in a bowl.
The trick is to be patient with the berries. If they are wet at all, the chocolate will get grainy and lumpy. I learned that the hard way one rainy afternoon. So give them time to air-dry while you set up your baking sheet.
You only need two kinds of chocolate and fresh fruit. White chocolate gives a sweet surprise inside. Dark chocolate makes a rich, crunchy shell. It’s like a little treasure chest in your mouth.
Now let me walk you through the steps. I’ll share a few secrets my mom taught me along the way.
How to Make Perfect Chocolate Covered Raspberries
Step 1: Cover your baking sheet with parchment paper or a Silpat mat. Place it near your freezer so you can move fast later. Rinse two cartons of fresh raspberries gently under cool water. Pat each berry completely dry with paper towels. Let them air-dry for 10–15 minutes on a clean towel. (Hard-learned tip: Even one drop of water will ruin your chocolate. Be extra careful here.)
Step 2: Melt 8 ounces of white chocolate in a microwave-safe bowl. Use 30-second intervals and stir well in between. Stop when the chocolate is warm and smooth, not hot. I once burned a whole batch because I got distracted by a phone call. Stir gently and slowly for the best texture. What is your favorite kind of chocolate to cook with? Share below!
Step 3: Coat each dry raspberry with white chocolate using a toothpick. Let the extra chocolate drip back into the bowl before moving on. Place each coated berry onto your prepared baking sheet. Don’t crowd them together or they will stick. My grandson always tries to eat one before it freezes.
Step 4: Put the baking sheet in the freezer for 15–20 minutes. You want the white chocolate to become firm to the touch. While you wait, melt 8 ounces of dark chocolate (60–70% cocoa) the same way. Use 30-second intervals and stir until smooth and shiny.
Step 5: Take the frozen white chocolate berries out of the freezer. Dip each one into the melted dark chocolate using a clean toothpick. Let the extra dark chocolate drip off, then place it back on the sheet. Freeze again for another 15–20 minutes until the dark chocolate is hard. Store them in an airtight container in the freezer for up to two weeks.
Cook Time: 40 minutes (active)
Total Time: 1 hour 15 minutes (with freezing)
Yield: About 40–50 raspberries
Category: Dessert, Snack
Three Fun Twists to Try
Salty Crunch: Sprinkle a tiny pinch of flaky sea salt on the dark chocolate before it sets. It sounds funny, but the salt makes the sweet chocolate taste even better. My neighbor calls it “beach candy.”
Spicy Kick: Add a small dash of cinnamon or cayenne pepper to the melted dark chocolate. Stir it in well before dipping. It gives a warm little surprise at the end, like a cozy fire on a cold night.
White Cocoa Dust: After the final freeze, dust the berries lightly with unsweetened cocoa powder or powdered sugar. It makes them look fancy for a party. Which one would you try first? Comment below!
How to Serve and What to Drink
Serve these little gems on a pretty plate with a few fresh mint leaves. They look beautiful next to a bowl of vanilla ice cream. For a simple dessert, just pile them in a small glass cup and watch everyone grab them.
For a grown-up drink, try a small glass of port wine or a sweet red wine. The dark chocolate and berry flavors match perfectly. For kids or a cozy night in, pour a tall glass of cold milk or warm hot cocoa. Which would you choose tonight?
Storing Your Chocolate Covered Raspberries
These little treats need to stay cold. Always keep them in the freezer, not the fridge. The fridge can make them sweat and get soggy.
Place them in a single layer in an airtight container. Put wax paper between layers if you stack them. They will keep for up to two months this way.
I remember my first batch. I left them on the counter for just an hour. What a mess! The raspberries leaked juice and the chocolate turned white and streaky.
To serve, take them out five minutes before eating. Do not let them sit out longer. They taste best straight from the freezer.
Batch cooking these is a lifesaver for parties. Make two trays at once and store one for later. It saves time and stress.
This matters because proper storage keeps the crunch and flavor perfect. No one wants a mushy berry. Have you ever tried storing it this way? Share below!
Three Common Problems and Easy Fixes
Problem one: wet raspberries. If your berries have any water on them, the chocolate will slide right off. Always pat them bone-dry with a paper towel.
I once rushed this step and ended up with a puddle of chocolate on my tray. The coating looked blotchy and sad. Now I let them air-dry for a full fifteen minutes.
Problem two: lumpy melted chocolate. If you overheat it in the microwave, it turns into a thick paste. Heat it in short bursts and stir each time.
Problem three: messy dipping. Use a toothpick to hold each berry. Dip and let the extra drip off before placing it on the tray.
This matters because fixing these small mistakes makes you feel like a pro. You will gain confidence and the berries will look beautiful.
Getting the chocolate smooth is also about flavor. A smooth coating tastes better on your tongue. Which of these problems have you run into before?
Your Questions, Answered
Q: Are these gluten-free?
A: Yes, as long as your chocolate is gluten-free. Check the label on your chips.
Q: Can I make them a day ahead?
A: Absolutely. Make them one or two days before your party. Keep them in the freezer.
Q: Can I swap the dark chocolate for milk chocolate?
A: Yes, you can use any chocolate you like. Milk chocolate will be sweeter.
Q: How do I double the recipe?
A: Just double all ingredients. You might need two baking sheets for room.
Q: Any tip to make them look fancy?
A: Drizzle extra white chocolate over the top. Use a fork to make thin lines. Which tip will you try first?
*Fun fact: Raspberries are not actually berries. They are a cluster of tiny fruits called drupelets.*
From My Kitchen to Yours
I hope you make these for someone you love. They are simple but feel so special. My grandkids ask for them every birthday.
Share a photo of your batch. I would love to see your colorful creations. Have you tried this recipe? Tag us on Pinterest!
Remember, cooking is just making memories with your hands. You have all the skills you need right now.
Happy cooking!
—Lena Morales.
Chocolate Covered Raspberries Recipe and Tips
Ingredients
Instructions
- Cover your baking sheet with parchment paper or a Silpat mat. Set up near your freezer for easy access.
- Rinse raspberries gently under cool water. Pat completely dry with paper towels and let air-dry for 10-15 minutes.
- Melt white chocolate in a microwave-safe bowl in 30-second intervals, stirring in between, until warm and smooth.
- Coat each raspberry with white chocolate using a toothpick, letting excess drip back into the bowl. Transfer to prepared baking sheet.
- Freeze the white chocolate-coated raspberries for 15-20 minutes until set.
- Melt dark chocolate in the same manner as the white chocolate.
- Dip frozen white chocolate raspberries into dark chocolate using a toothpick. Transfer back to the baking sheet.
- Freeze double-coated raspberries for 15-20 minutes until dark chocolate hardens. Store in an airtight container in the freezer.
Notes
- Use bars for best melting. 60-70% cocoa recommended for dark chocolate. Ensure raspberries are at room temperature and completely dry before coating.


Leave a Reply